
生成器#
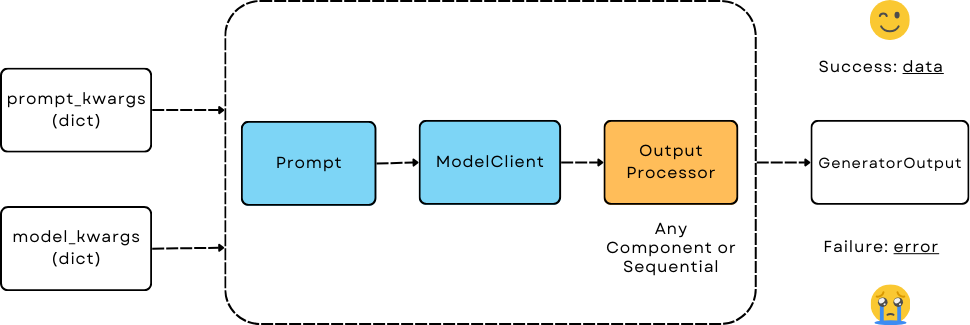
Generator 是一个面向用户的编排组件,具有简单且统一的接口,用于LLM预测。 它是一个由三个子组件组成的管道。通过切换提示模板、模型客户端和输出解析器,用户可以完全控制和灵活调整。
设计#
生成器 - 大型语言模型预测的协调者#
Generator 旨在实现以下目标:
模型无关性:生成器应该能够使用相同的提示调用任何LLM模型。
统一接口:它管理从提示(输入)-> 模型调用 -> 输出解析的管道,同时仍然让用户完全控制每个部分。
统一输出:这将使得记录和保存所有LLM预测的结果变得容易。
与优化器一起工作:它应该能够与优化器一起工作以优化提示。
前三个目标同样适用于其他协调器组件,如Retriever、Embedder和Agent(大部分情况下)。
一个协调器#
它协调三个组件:
提示: 通过接收
template(字符串) 和prompt_kwargs(字典) 在初始化时格式化提示。 当未提供template时,默认使用DEFAULT_ADALFLOW_SYSTEM_PROMPT。ModelClient: 通过接收一个已经实例化的
model_client和model_kwargs来调用模型。 切换模型客户端允许你使用相同的提示和输出解析来调用任何LLM模型。output_processors: 一个单独的组件或通过
Sequential链接的组件,用于将原始响应处理为所需的格式。 如果没有提供输出处理器,则由模型客户端决定,通常返回原始字符串响应(来自第一个响应消息)。
调用和参数
Generator 支持 call (__call__) 和 acall 方法。
它们接受两个可选参数:
prompt_kwargs(字典): 这与初始Prompt组件中的prompt_kwargs结合使用,用于格式化提示。model_kwargs(dict): 这与初始模型客户端中的model_kwargs结合,并与ModelType.LLM一起传递给ModelClient。 ModelClient 会将所有输入解释为特定于每个模型 API 提供者的api_kwargs。
注意
这也意味着任何希望与Generator兼容的ModelClient都应该接受model_kwargs和model_type作为参数。
生成器输出#
与其他组件不同,我们不能总是强制LLM遵循输出格式。ModelClient和output_processors可能会失败。
注意
每当发生错误时,我们不会引发错误并强制程序停止。 相反,Generator 将始终返回一个输出记录。 我们做出这个设计选择是因为它对于记录训练/评估集中的各种失败案例非常有帮助,以便进一步调查和改进。
特别是,我们创建了GeneratorOutput来捕获重要信息。
data (object) : 存储管道中所有三个组件处理后的最终响应,表示success。
error (str): 如果管道中的三个组件中的任何一个失败,则包含错误消息。当此值不为None时,表示failure。
raw_response (str): 用于参考任何LLM预测的原始字符串响应。目前,它是来自第一个响应消息的字符串。[这可能会在未来发生变化并有所不同]
metadata (dict): 存储任何额外的信息
usage: 保留用于跟踪LLM预测的使用情况。
是否在发生错误时进行进一步处理或终止管道,从现在起由用户决定。
生成器实战#
我们将创建一个简单的单轮聊天机器人来演示如何使用生成器。
最小示例#
在代码中启动生成器的最小设置:
from adalflow.core import Generator
from adalflow.components.model_client import GroqAPIClient

generator = Generator(
    model_client=GroqAPIClient(),
    model_kwargs={"model": "llama3-8b-8192"},
)
print(generator)
生成器的结构使用print:
    Generator(
    model_kwargs={'model': 'llama3-8b-8192'},
    (prompt): Prompt(
        template:
        {# task desc #}
        {% if task_desc_str %}
        {{task_desc_str}}
        {% else %}
        You are a helpful assistant.
        {% endif %}
        {# output format #}
        {% if output_format_str %}

        {{output_format_str}}

        {% endif %}
        {# tools #}
        {% if tools_str %}

        {{tools_str}}

        {% endif %}
        {# example #}
        {% if examples_str %}

        {{examples_str}}

        {% endif %}
        {# chat history #}
        {% if chat_history_str %}

        {{chat_history_str}}

        {% endif %}
        {#contex#}
        {% if context_str %}

        {{context_str}}

        {% endif %}
        {# steps #}
        {% if steps_str %}

        {{steps_str}}

        {% endif %}

        {% if input_str %}

        {{input_str}}

        {% endif %}
        You:
        , prompt_variables: ['input_str', 'tools_str', 'context_str', 'steps_str', 'task_desc_str', 'chat_history_str', 'output_format_str', 'examples_str']
    )
    (model_client): GroqAPIClient()
    )
显示最终提示
Generator 的 print_prompt 方法将简单地中继来自 Prompt 组件的方法:
prompt_kwargs = {"input_str": "What is LLM? Explain in one sentence."}
generator.print_prompt(**prompt_kwargs)
输出将是格式化的提示:
<User>
What is LLM? Explain in one sentence.
</User>
You:
调用生成器
output = generator(
    prompt_kwargs=prompt_kwargs,
)
print(output)
输出将是GeneratorOutput对象:
GeneratorOutput(data='LLM stands for Large Language Model, a type of artificial intelligence that is trained on vast amounts of text data to generate human-like language outputs, such as conversations, text, or summaries.', error=None, usage=None, raw_response='LLM stands for Large Language Model, a type of artificial intelligence that is trained on vast amounts of text data to generate human-like language outputs, such as conversations, text, or summaries.', metadata=None)
使用模板#
在这个例子中,我们将使用一个自定义模板来格式化提示。 我们用一个变量task_desc_str初始化了提示,该变量在提示中进一步与input_str结合。
template = r"""<SYS>{{task_desc_str}}</SYS>
User: {{input_str}}
You:"""
generator = Generator(
    model_client=GroqAPIClient(),
    model_kwargs={"model": "llama3-8b-8192"},
    template=template,
    prompt_kwargs={"task_desc_str": "You are a helpful assistant"},
)

prompt_kwargs = {"input_str": "What is LLM?"}

generator.print_prompt(
    **prompt_kwargs,
)
output = generator(
    prompt_kwargs=prompt_kwargs,
)
最终的提示是:
<SYS>You are a helpful assistant</SYS>
User: What is LLM?
You:
注意
使用任何提示都非常简单。
他们只需要遵循jinja2语法。
使用输出处理器#
在这个例子中,我们将指示LLM输出一个JSON对象作为响应。 我们将使用JsonParser将输出解析回dict对象。
from adalflow.core import Generator
from adalflow.core.types import GeneratorOutput
from adalflow.components.model_client import OpenAIClient
from adalflow.core.string_parser import JsonParser

output_format_str = r"""Your output should be formatted as a standard JSON object with two keys:
{
    "explanation": "A brief explanation of the concept in one sentence.",
    "example": "An example of the concept in a sentence."
}
"""

generator = Generator(
    model_client=OpenAIClient(),
    model_kwargs={"model": "gpt-3.5-turbo"},
    prompt_kwargs={"output_format_str": output_format_str},
    output_processors=JsonParser(),
)

prompt_kwargs = {"input_str": "What is LLM?"}
generator.print_prompt(**prompt_kwargs)

output: GeneratorOutput = generator(prompt_kwargs=prompt_kwargs)
print(type(output.data))
print(output.data)
最终的提示是:
<SYS>
<OUTPUT_FORMAT>
Your output should be formatted as a standard JSON object with two keys:
    {
        "explanation": "A brief explanation of the concept in one sentence.",
        "example": "An example of the concept in a sentence."
    }

</OUTPUT_FORMAT>
</SYS>
<User>
What is LLM?
</User>
You:
上述打印输出是:
<class 'dict'>
{'explanation': 'LLM stands for Large Language Model, which are deep learning models trained on enormous amounts of text data.', 'example': 'An example of a LLM is GPT-3, which can generate human-like text based on the input provided.'}
请参考Parser以获取关于Parser组件的更全面指南。
切换模型客户端#
另外,你是否注意到在上面的例子中我们已经切换到使用OpenAI的模型?
这展示了在生成器中切换model_client是多么容易,使其成为一个真正与模型无关的组件。
我们甚至可以使用ModelClientType来切换模型客户端,而无需处理多个导入。
from adalflow.core.types import ModelClientType

generator = Generator(
    model_client=ModelClientType.OPENAI(),  # or ModelClientType.GROQ()
    model_kwargs={"model": "gpt-3.5-turbo"},
)
获取GeneratorOutput中的错误#
我们将使用一个错误的API密钥故意创建一个错误。
我们仍然会得到一个响应,但它只会包含空的data和一个错误信息。
以下是OpenAI的API密钥错误示例:
GeneratorOutput(data=None, error="Error code: 401 - {'error': {'message': 'Incorrect API key provided: ab. You can find your API key at https://platform.openai.com/account/api-keys.', 'type': 'invalid_request_error', 'param': None, 'code': 'invalid_api_key'}}", usage=None, raw_response=None, metadata=None)
从配置创建#
与所有组件一样,我们可以纯粹从配置中创建生成器。
知道它是一个生成器
在这种情况下,我们知道我们正在创建一个生成器,我们将使用from_config方法,该方法来自Generator类。
from adalflow.core import Generator

config = {
    "model_client": {
        "component_name": "GroqAPIClient",
        "component_config": {},
    },
    "model_kwargs": {
        "model": "llama3-8b-8192",
    },
}

generator: Generator = Generator.from_config(config)
print(generator)

prompt_kwargs = {"input_str": "What is LLM? Explain in one sentence."}
generator.print_prompt(**prompt_kwargs)
output = generator(
    prompt_kwargs=prompt_kwargs,
)
print(output)
仅从配置中
这更加通用。
此方法可用于从配置创建任何组件。
我们只需要遵循配置结构:component_name 和 component_config 对于所有参数。
from adalflow.utils.config import new_component
from adalflow.core import Generator

config = {
    "generator": {
        "component_name": "Generator",
        "component_config": {
            "model_client": {
                "component_name": "GroqAPIClient",
                "component_config": {},
            },
            "model_kwargs": {
                "model": "llama3-8b-8192",
            },
        },
    }
}

generator: Generator = new_component(config["generator"])
print(generator)

prompt_kwargs = {"input_str": "What is LLM? Explain in one sentence."}
generator.print_prompt(**prompt_kwargs)
output = generator(
    prompt_kwargs=prompt_kwargs,
)
print(output)
它的工作方式与前一个示例完全相同。
在这种情况下,我们导入了Generator,只是为了显示类型提示。
注意
请参考配置以获取有关如何从配置创建组件的更多详细信息。
库中的示例#
除了这些例子,LLM就像水一样,即使在我们的库中,我们也有组件将Generator适应于各种其他功能。
LLMRetriever是一个使用生成器调用LLM来检索最相关文档的检索器。DefaultLLMJudge是一个使用 Generator 调用 LLM 来评估响应质量的评判者。TGDOptimizer是一个使用生成器调用LLM来优化提示的优化器。ReAct Agent Planner是一个使用生成器来规划和调用 ReAct Agent 中函数的 LLM 规划器。
追踪#
特别是,我们提供了两种跟踪方法来帮助您开发和改进Generator:
在开发过程中跟踪提示的历史变化(状态)。
追踪所有失败的LLM预测以进一步改进。
由于本说明已经相当长。请参考tracing了解这两种追踪方法。
训练#
生成器默认支持训练模式。
它需要用户定义Parameter并将其传递给prompt_kwargs。
API 参考