用例 - QML中的定位器和布局
如何在QML应用程序中为视觉组件创建布局的示例
在QML中有几种定位项目的方法。
以下是一个简要概述。更多详细信息,请参阅Qt Quick中的重要概念 - 定位。
手动定位
可以通过设置它们的x、y属性,将项目放置在屏幕上的特定x、y坐标处。这将根据视觉坐标系规则,设置它们相对于父元素左上角的位置。
结合使用绑定而不是这些属性的常量值,通过将x和y坐标设置为适当的绑定,相对定位也很容易实现。
import QtQuick
Item {
    width: 100; height: 100

    Rectangle {
        // Manually positioned at 20,20
        x: 20
        y: 20
        width: 80
        height: 80
        color: "red"
    }
}
锚点
Item 类型提供了锚定到其他 Item 类型的能力。每个项目有七条锚定线:左、右、垂直中心、顶部、底部、基线 和 水平中心。三条垂直锚定线可以锚定到另一个项目的任意三条垂直锚定线,四条水平锚定线可以锚定到另一个项目的水平锚定线。
有关完整详情,请参阅使用锚点定位和锚点属性的文档。
import QtQuick
Item {
    width: 200; height: 200

    Rectangle {
        // Anchored to 20px off the top right corner of the parent
        anchors.right: parent.right
        anchors.top: parent.top
        anchors.margins: 20 // Sets all margins at once

        width: 80
        height: 80
        color: "orange"
    }

    Rectangle {
        // Anchored to 20px off the top center corner of the parent.
        // Notice the different group property syntax for 'anchors' compared to
        // the previous Rectangle. Both are valid.
        anchors { horizontalCenter: parent.horizontalCenter; top: parent.top; topMargin: 20 }

        width: 80
        height: 80
        color: "green"
    }
}
定位器
对于希望将一组类型以规则模式定位的常见情况,Qt Quick 提供了一些定位器类型。放置在定位器中的项目会自动以某种方式定位;例如,Row 将项目水平相邻定位(形成一行)。
有关完整详情,请参阅项目定位器。
import QtQuick
Item {
    width: 300; height: 100

    Row { // The "Row" type lays out its child items in a horizontal line
        spacing: 20 // Places 20px of space between items

        Rectangle { width: 80; height: 80; color: "red" }
        Rectangle { width: 80; height: 80; color: "green" }
        Rectangle { width: 80; height: 80; color: "blue" }
    }
}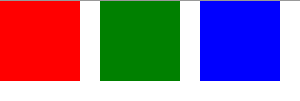
布局类型
布局类型 的功能与定位器类似,但允许对布局进行进一步的细化或限制。具体来说,布局类型允许您:
设置文本和其他项目的对齐方式
自动调整大小并填充分配的应用区域
设置大小约束,例如最小或最大尺寸
设置布局内项目之间的间距
上面的代码片段来自基本布局示例。该代码片段展示了在布局中添加各种字段和项目的简单性。GridLayout可以调整大小,并且其格式可以通过各种属性进行自定义。
有关布局类型的更多信息,请访问:
Qt Quick 布局概述
基本布局示例
注意
Qt Quick Layouts 是在 Qt 5.1 中引入的,并且需要 Qt Quick 2.1。