Qt Quick 布局概述
一组用于在用户界面中排列QML项目的API。
使用Qt Quick布局来排列用户界面中的项目。Qt Quick布局会调整其项目的大小,这使得它们非常适合可调整大小的用户界面。
主要特点
Qt Quick 布局的一些关键特性包括:
使用Layout.alignment属性对齐Align项目。
使用 Layout.minimumWidth、Layout.preferredWidth 和 Layout.maximumWidth 属性设置 大小约束 – “Width” 可以替换为 “Height” 以指定类似的高度约束。
您可以使用 spacing、rowSpacing 或 columnSpacing 来指定间距。
使用拉伸因子在水平和垂直方向上拉伸项目。
此外,GridLayout 添加了以下功能:
Automatic grid coordinates 与 flow、rows 和 columns 属性一起使用。
Spans 跨行或跨列,您可以使用 Layout.rowSpan 和 Layout.columnSpan 属性来指定。
入门指南
要开始使用Qt Quick布局,请在你的.qml文件中使用以下导入语句将QML类型导入到你的应用程序中:
下一步是创建一个简单布局。你也可以学习Qt Quick Layouts - 基本示例。
一个简单的布局
使用布局的目的是在布局大小发生变化时重新排列其子元素。这意味着应用程序必须确保布局被调整大小。在以下代码片段中,RowLayout通过指定anchors.fill: parent来确保这一点。然而,你也可以通过其他方式实现这一点,例如指定width和height属性。在同一代码片段中,橙色矩形的固定大小为100乘以150像素,而紫色矩形将扩展以占据所有分配的空间。
Window {
    RowLayout {
        anchors.fill: parent
        spacing: 6
        Rectangle {
            color: 'azure'
            Layout.preferredWidth: 100
            Layout.preferredHeight: 150
        }
        Rectangle {
            color: "plum"
            Layout.fillWidth: true
            Layout.fillHeight: true
        }
    }
}
布局负责其子元素的几何属性。这包括诸如width、height、x、y、anchors等属性。
重要提示: 不要在您的应用程序中指定影响子项几何形状的属性。在子项上设置这些属性会导致利益冲突,结果是未定义的。这也适用于当子项是布局时。因此,只有没有父布局的布局才能有 anchors.fill: parent。
间距
如前面的代码片段所示,RowLayout的间距设置为6。这确保了布局中的所有项目之间有6像素的间距:
spacing: 6
如果您省略指定间距值,布局将使用默认的5像素。间距以及任何子项的implicitWidth都会影响布局的implicitWidth。如果您依赖默认行为,这一点很重要,因为它可能会影响您的布局设计。例如,以下代码片段中的两个ColumnLayout都设置了Layout.fillWidth: true。很自然地认为它们会获得相同的宽度。然而,由于内部RowLayout中项目之间的默认5像素间距,第一个ColumnLayout的implicitWidth变得更大,为第二个ColumnLayout留下了更少的空间。例如:
ApplicationWindow {
    id: root
    width: 300
    height: 300
    visible: true

    RowLayout {
        anchors.fill: parent
        ColumnLayout {
            Rectangle {
                color: "tomato";
                Layout.fillWidth: true
                Layout.fillHeight: true
            }
            RowLayout {
                Rectangle {
                    color: "navajowhite"
                    Layout.fillWidth: true
                    Layout.fillHeight: true
                }
                Rectangle {
                    color: "darkseagreen"
                    Layout.fillWidth: true
                    Layout.fillHeight: true
                }
            }
        }
        ColumnLayout {
            Rectangle {
                color: "lightpink"
                Layout.fillWidth: true
                Layout.fillHeight: true
            }
            Rectangle {
                color: "slategray"
                Layout.fillWidth: true
                Layout.fillHeight: true
            }
            Rectangle {
                color: "lightskyblue"
                Layout.fillWidth: true
                Layout.fillHeight: true
            }
        }
    }
}
这段代码将生成如下布局:
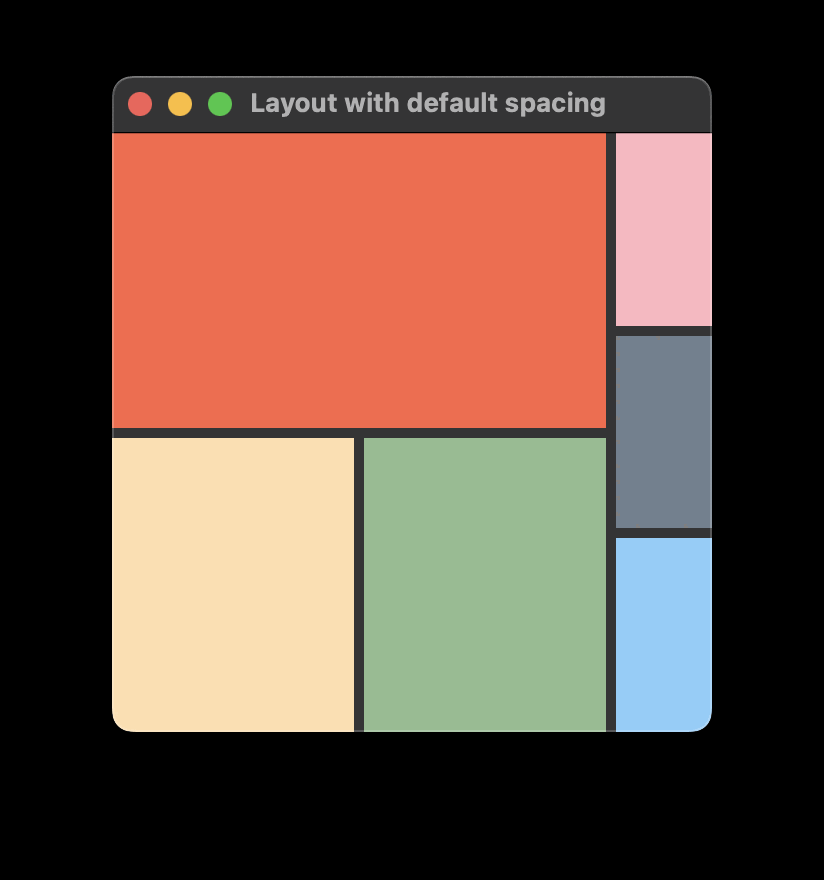
为了确保这两列的大小相等,你可以
将RowLayout的间距设置为
0,或者将 preferredWidth 设置为两个 ** ColumnLayout ** 上的相同值。
指定首选大小
对于每个项目,有效的首选尺寸可能来自几个候选属性之一。为了确定有效的首选尺寸,项目会按照以下顺序查询这些候选属性,并将使用第一个具有有效宽度或高度的候选属性。
候选属性
描述
如果默认的隐式大小不能提供最佳排列,应用程序应修改这些属性。
这些属性应由每个项目提供,以给出一个有意义的理想大小。例如,显示Text类型的所有内容所需的大小。
0的隐式宽度或高度被视为无效。
一个项目可以指定Layout.preferredWidth而不必指定Layout.preferredHeight。在这种情况下,有效的首选高度由implicitHeight决定。
大小限制
由于项目可以通过其布局调整大小,布局需要知道所有设置了Layout.fillWidth或Layout.fillHeight为true的项目的最小、首选和最大大小。
如果布局本身没有绑定到特定大小,则preferred宽度和高度是项目的实际宽度和高度。如果布局设置为特定大小,则根据其项目的首选大小的比例分配额外空间,同时考虑最小和最大大小。当所有项目设置fillWidth和fillHeight时,首选和隐式大小充当比例和权重。
例如,以下代码生成一个布局,其中包含两个水平拉伸的并排矩形。橙色矩形可以从50x150调整到300x150,而紫色矩形可以从100x100调整到∞x100。只要每个项目的最小和最大宽度不超过,紫色矩形的宽度将是橙色矩形的两倍。
RowLayout {
    id: layout
    anchors.fill: parent
    spacing: 6
    Rectangle {
        color: 'orange'
        Layout.fillWidth: true
        Layout.minimumWidth: 50
        Layout.preferredWidth: 100
        Layout.maximumWidth: 300
        Layout.minimumHeight: 150
        Text {
            anchors.centerIn: parent
            text: parent.width + 'x' + parent.height
        }
    }
    Rectangle {
        color: 'plum'
        Layout.fillWidth: true
        Layout.minimumWidth: 100
        Layout.preferredWidth: 200
        Layout.preferredHeight: 100
        Text {
            anchors.centerIn: parent
            text: parent.width + 'x' + parent.height
        }
    }
}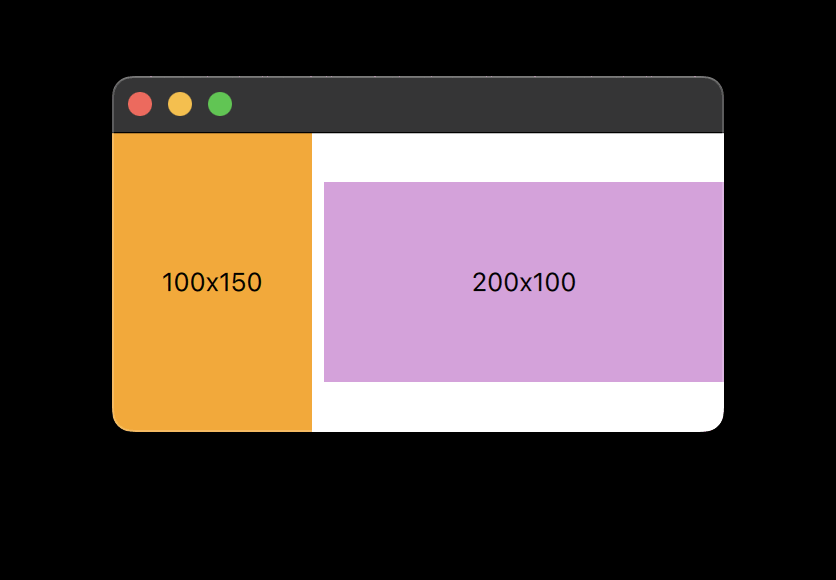
结合每个项目的约束条件,为布局元素提供这些隐式约束:
最小值
首选值
最大值
隐式约束(宽度)
156
306
∞ (
Number.POSITIVE_INFINITY)隐式约束(高度)
150
150
150
因此,布局的宽度不能小于156,高度也不能高于或低于150,否则会破坏其子项的任何约束。
连接窗口和布局
您可以使用常规的锚定概念来确保您的布局跟随窗口大小的调整。
RowLayout {
    id: layout
    anchors.fill: parent
您可以依赖布局的大小约束来确保窗口不能调整大小超出布局约束。您可以从布局中获取大小约束,并将这些约束设置在Window元素的minimumWidth、minimumHeight、maximumWidth和maximumHeight上。以下代码确保窗口不能调整大小超出布局的约束:
minimumWidth: layout.Layout.minimumWidth
minimumHeight: layout.Layout.minimumHeight
maximumWidth: 1000
maximumHeight: layout.Layout.maximumHeight
注意
因为在这种情况下layout.Layout.maximumWidth是无限的,我们不能将其绑定到Window的maximumWidth属性,因为那是一个整数。因此,最大宽度被设置为一个固定值1000。
最后,将窗口的初始大小设置为布局的隐式大小:
width: layout.implicitWidth
height: layout.implicitHeight
跨越和拉伸项目
在GridLayout中使用spans使子项占据多个单元格。例如,您可能有一个GridLayout,它有两行六列。顶行包含Items item1、item2和item3。底行包含Item item4,它指定了columnSpan: 3和alignment: Qt.AlignHCenter。这将item4放置在构成底行的三个单元格的中间。以下代码片段作为示例:
ApplicationWindow {
    id: root
    width: 300
    height: 300
    visible: true

    GridLayout {
       rows: 2
       columns: 3
       Rectangle {
           color: 'cyan'
           implicitWidth: 50
           implicitHeight: 50
       }
       Rectangle {
           color: 'magenta'
           implicitWidth: 50
           implicitHeight: 50
       }
       Rectangle {
           color: 'yellow'
           implicitWidth: 50
           implicitHeight: 50
       }
       Rectangle {
           color: 'black'
           implicitWidth: 50
           implicitHeight: 50
           Layout.columnSpan: 3
           Layout.alignment: Qt.AlignHCenter
       }
    }
}
行和列的大小由其内容隐式给出。例如,一个按钮可能会影响其所在列的宽度或所在行的高度。这意味着GridLayout没有均匀分布。因此,您不能使用跨度来拉伸布局。要操作项目或布局的拉伸,请使用stretchFactor和/或大小提示。
注意
在设置隐式或首选大小时,不要将相应的属性绑定到布局本身或其依赖的大小计算项的宽度或高度上,因为这可能会导致难以追踪的循环依赖。