Python-QML 集成
本教程提供了一个快速入门,介绍了一个加载并与QML文件交互的Python应用程序。QML是一种声明性语言,它让你比传统语言(如C++)更快地设计用户界面。QtQml和QtQuick模块为基于QML的用户界面提供了必要的基础设施。
在本教程中,您将学习如何将Python与QML应用程序集成。 这种机制将帮助我们理解如何使用Python作为QML界面中UI元素某些信号的后端。此外,您还将学习如何使用Qt Quick Controls 2中的一项功能为您的QML应用程序提供现代外观。
本教程基于一个允许您设置许多文本属性的应用程序,例如增加字体大小、更改颜色、更改样式等。在开始之前,请安装PySide6 Python包。
以下逐步过程将引导您了解基于QML的应用程序和PySide6集成的关键元素:
首先,让我们从以下基于QML的用户界面开始:
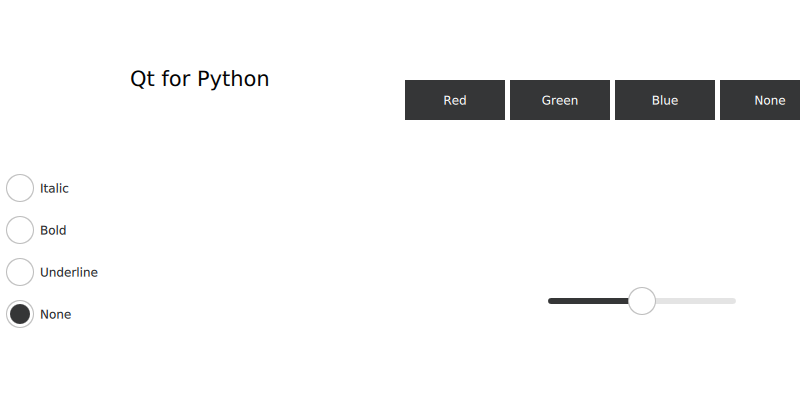
该设计基于GridLayout,包含两个ColumnLayout。 在用户界面中,你会发现许多RadioButton、Button和一个Slider。
有了QML文件后,你可以从Python中加载它:
 1if __name__ == '__main__':
 2    app = QGuiApplication(sys.argv)
 3    QQuickStyle.setStyle("Material")
 4    engine = QQmlApplicationEngine()
 5    # 将当前目录添加到导入路径并加载主模块。
 6    engine.addImportPath(sys.path[0])
 7    engine.loadFromModule("QmlIntegration", "Main")
 8
 9    if not engine.rootObjects():
10        sys.exit(-1)
11
12    exit_code = app.exec()
13    del engine
14    sys.exit(exit_code)
注意,我们只需要一个
QQmlApplicationEngine来加载QML文件。Define the
Bridgeclass, containing all the logic for the element that will be register in QML:1# To be used on the @QmlElement decorator 2# (QML_IMPORT_MINOR_VERSION is optional) 3QML_IMPORT_NAME = "io.qt.textproperties" 4QML_IMPORT_MAJOR_VERSION = 1 5 6 7@QmlElement 8class Bridge(QObject): 9 10 @Slot(str, result=str) 11 def getColor(self, s): 12 if s.lower() == "red": 13 return "#ef9a9a" 14 if s.lower() == "green": 15 return "#a5d6a7" 16 if s.lower() == "blue": 17 return "#90caf9" 18 return "white" 19 20 @Slot(float, result=int) 21 def getSize(self, s): 22 size = int(s * 34) 23 return max(1, size) 24 25 @Slot(str, result=bool) 26 def getItalic(self, s): 27 return s.lower() == "italic" 28 29 @Slot(str, result=bool) 30 def getBold(self, s): 31 return s.lower() == "bold" 32 33 @Slot(str, result=bool) 34 def getUnderline(self, s): 35 return s.lower() == "underline" 36
Notice that the registration happens thanks to the
QmlElementdecorator, that underneath uses the reference to theBridgeclass and the variablesQML_IMPORT_NAMEandQML_IMPORT_MAJOR_VERSION.现在,回到QML文件并将信号连接到
Bridge类中定义的槽:Bridge { id: bridge }
在
ApplicationWindow内部,我们声明了一个与Python类同名的组件,并提供了一个id:。这个id将帮助你获取从Python注册的元素的引用。1 RadioButton { 2 id: italic 3 Layout.alignment: Qt.AlignLeft 4 text: "Italic" 5 onToggled: { 6 leftlabel.font.italic = bridge.getItalic(italic.text) 7 leftlabel.font.bold = bridge.getBold(italic.text) 8 leftlabel.font.underline = bridge.getUnderline(italic.text) 9 10 } 11 }
属性Italic、Bold和Underline是互斥的,这意味着任何时候只能有一个是活动的。为了实现这一点,每次我们选择其中一个选项时,我们通过QML元素属性检查这三个属性,正如你在上面的代码片段中看到的那样。只有其中一个会返回True,而其他两个会返回False,这就是我们确保只有一个属性被应用到文本上的方式。
将文件放入名为
QmlIntegration的目录中,同时放入一个名为qmldir的文件来描述一个基本的 QML 模块:module QmlIntegration Main 254.0 Main.qml
每个插槽验证所选选项是否包含与属性相关的文本:
1    @Slot(str, result=bool)
2    def getBold(self, s):
3        return s.lower() == "bold"
返回 True 或 False 允许您激活和停用 QML UI 元素的属性。
也可以返回非 Boolean 的其他值,例如负责返回字体大小的插槽:
1    @Slot(float, result=int)
2    def getSize(self, s):
3        size = int(s * 34)
4        return max(1, size)
现在,为了改变我们应用程序的外观,你有两个选择:
使用命令行:执行python文件时添加选项,
--style:python main.py --style material
使用
qtquickcontrols2.conf文件:1[Controls] 2Style=Material 3 4[Universal] 5Theme=System 6Accent=Red 7 8[Material] 9Theme=Dark 10Accent=Red
然后将其添加到你的
.qrc文件中:1
2 3 5qtquickcontrols2.conf 4通过运行
pyside6-rcc style.qrc -o rc_style.py生成rc文件 最后从你的main.py脚本中导入它。
1import sys
2
3from PySide6.QtCore import QObject, Slot
4from PySide6.QtGui import QGuiApplication
5from PySide6.QtQml import QQmlApplicationEngine, QmlElement
6from PySide6.QtQuickControls2 import QQuickStyle
7
8import rc_style  # noqa F401
你可以阅读更多关于这个配置文件的信息 这里。
你的应用程序的最终外观将是:
