服务模型#
SkyServe 是 SkyPilot 的模型服务库。SkyServe 采用现有的服务框架,并将其部署在一个或多个区域或云中。
为什么选择SkyServe?
使用任何服务框架 (vLLM, TGI, FastAPI, …) 并在跨区域/云环境中扩展它
降低成本并提高服务副本的可用性,通过利用多个/更便宜的位置和硬件(spot instances)
开箱即用的负载均衡和自动扩展服务副本
隐私与控制:所有内容都在您的云账户和VPC内启动
使用单一控制平面管理多云、多区域部署
它是如何工作的:
每个服务都会获得一个端点,该端点会自动将请求分发到其副本。
同一服务的副本可以在不同的区域和云中运行——降低云成本并提高可用性。
SkyServe 处理副本的负载均衡、恢复和自动扩展。
提示
要开始使用SkyServe,请使用SkyPilot的夜间构建版本:pip install -U skypilot-nightly
快速指南:LLM服务#
这是一个简单的LLM模型服务示例(在vLLM上使用Mixtral-8x7B-Instruct-v0.1或在TGI上使用lmsys/vicuna-13b-v1.5):
# service.yaml
service:
  readiness_probe: /v1/models
  replicas: 2

# Fields below describe each replica.
resources:
  ports: 8080
  accelerators: {L4:8, A10g:8, A100:4, A100:8, A100-80GB:2, A100-80GB:4, A100-80GB:8}

setup: |
  conda create -n vllm python=3.9 -y
  conda activate vllm
  pip install vllm

run: |
  conda activate vllm
  python -m vllm.entrypoints.openai.api_server \
    --tensor-parallel-size $SKYPILOT_NUM_GPUS_PER_NODE \
    --host 0.0.0.0 --port 8080 \
    --model mistralai/Mixtral-8x7B-Instruct-v0.1
# service.yaml
service:
  readiness_probe: /health
  replicas: 2

# Fields below describe each replica.
resources:
  ports: 8080
  accelerators: A100

run: |
  docker run --gpus all --shm-size 1g -p 8080:80 -v ~/data:/data \
    ghcr.io/huggingface/text-generation-inference \
    --model-id lmsys/vicuna-13b-v1.5
运行 sky serve up service.yaml 以部署具有自动价格和容量优化功能的服务。一旦部署完成,使用 sky serve status 来检查服务的状态:


提示
请注意,这两个副本在不同的区域/云中启动,以实现最低成本和最高的GPU可用性。
这是自动执行的,就像常规的sky launch一样。
如果你看到STATUS列变为READY,那么服务已准备好接受流量!
只需curl服务端点,它会自动在两个副本之间进行负载均衡:
$ curl 3.84.15.251:30001/v1/chat/completions \
    -X POST \
    -d '{"model": "mistralai/Mixtral-8x7B-Instruct-v0.1", "messages": [{"role": "user", "content": "Who are you?"}]}' \
    -H 'Content-Type: application/json'

# Example output:
{"id":"cmpl-80b2bfd6f60c4024884c337a7e0d859a","object":"chat.completion","created":1005,"model":"mistralai/Mixtral-8x7B-Instruct-v0.1","choices":[{"index":0,"message":{"role":"assistant","content":" I am a helpful AI assistant designed to provide information, answer questions, and engage in conversation with users. I do not have personal experiences or emotions, but I am programmed to understand and process human language, and to provide helpful and accurate responses."},"finish_reason":"stop"}],"usage":{"prompt_tokens":13,"total_tokens":64,"completion_tokens":51}}
$ curl 44.211.131.51:30001/generate \
    -X POST \
    -d '{"inputs":"What is Deep Learning?","parameters":{"max_new_tokens":20}}' \
    -H 'Content-Type: application/json'

# Example output:
{"generated_text":"\n\nDeep learning is a subset of machine learning that uses artificial neural networks to model and solve"}
教程: 你好, SkyServe!#
这里我们将通过一个示例来使用SkyServe部署一个简单的HTTP服务器。要启动一个服务,您可以简单地重用您的任务YAML,只需满足以下两个要求:
一个HTTP端点(在
run命令中启动)及其监听的端口;在您的任务YAML中添加一个额外的
service部分来描述服务配置。
建议首先使用sky launch进行测试。例如,我们有以下任务YAML与sky launch配合使用:
resources:
  ports: 8080
  cpus: 2

workdir: .

run: python -m http.server 8080
在同一目录下,我们有一个 index.html:
<html>
<head>
    <title>My First SkyServe Service</title>
</head>
<body>
    <p>Hello, SkyServe!</p>
</body>
</html>
注意
workdir 和 file mounts with local files 将自动上传到 cloud bucket。该存储桶将被创建,并在服务终止后清理。
请注意,任务 YAML 已经在 8080 端口上运行了一个 HTTP 端点,并通过 resources 下的 ports 部分暴露出来。假设我们想要使用 SkyServe 将其扩展到多个区域/云中的多个副本。我们可以简单地在 YAML 中添加一个 service 部分:
# hello-sky-serve.yaml
service:
  readiness_probe: /
  replicas: 2

resources:
  ports: 8080
  cpus: 2

workdir: .

run: python -m http.server 8080
此示例将启动服务的两个副本,每个副本都在端口8080上监听。当副本响应GET /并返回200状态码时,该副本被视为就绪。您可以通过在readiness_probe字段中指定不同的路径来自定义就绪探针。您可以在Service YAML Specification中找到更多配置。
使用 sky serve up 来启动服务:
$ sky serve up hello-sky-serve.yaml
SkyServe 将启动(或重用)一个集中式控制器/负载均衡器,并将服务副本部署到价格和可用性最佳的云位置。SkyServe 还将监控服务状态,并在其中一个副本失败时重新启动一个新的副本。
在底层,sky serve up:
启动一个控制器,用于处理自动扩展、监控和负载均衡;
返回一个服务端点,该端点将用于接受流量;
同时,控制器配置副本虚拟机,这些虚拟机稍后运行服务;
一旦任何副本准备就绪,发送到服务端点的请求将被分发到其中一个端点副本。
注意
SkyServe 使用最小负载负载均衡来将流量分配到副本。它会跟踪每个副本处理的请求数量,并将下一个请求路由到负载最小的副本。
控制器配置完成后,您将在sky serve status输出中看到以下内容:
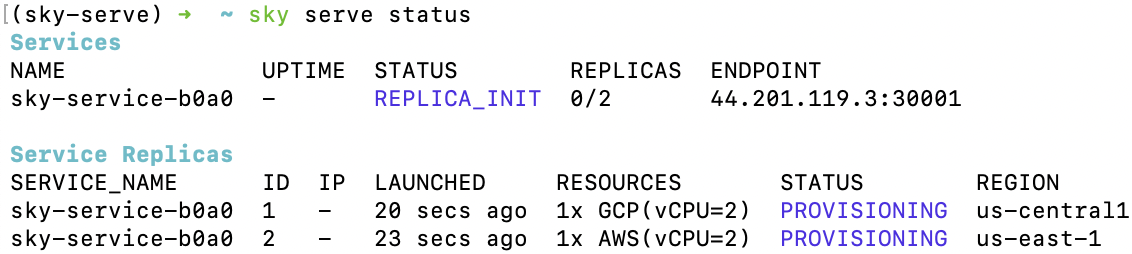
你可以使用 watch 来监控服务状态:
$ watch -n10 sky serve status
一旦任何副本准备好服务(READY),你就可以开始向44.201.119.3:30001)发送请求:
$ curl <endpoint-url>
<html>
<head>
    <title>My First SkyServe Service</title>
</head>
<body>
    <p>Hello, SkyServe!</p>
</body>
</html>
教程:部署一个聊天机器人LLM!#
让我们使用 FastChat + Vicuna 启动一个真实的 LLM 聊天服务。我们将以 Vicuna OpenAI API Endpoint YAML 为例:
resources:
  ports: 8080
  accelerators: A100:1
  disk_size: 1024
  disk_tier: best

setup: |
  conda activate chatbot
  if [ $? -ne 0 ]; then
    conda create -n chatbot python=3.9 -y
    conda activate chatbot
  fi

  # Install dependencies
  pip install "fschat[model_worker,webui]==0.2.24"
  pip install protobuf

run: |
  conda activate chatbot

  echo 'Starting controller...'
  python -u -m fastchat.serve.controller --host 127.0.0.1 > ~/controller.log 2>&1 &
  sleep 10
  echo 'Starting model worker...'
  python -u -m fastchat.serve.model_worker \
            --model-path lmsys/vicuna-${MODEL_SIZE}b-v1.3 2>&1 \
            --host 127.0.0.1 \
            | tee model_worker.log &

  echo 'Waiting for model worker to start...'
  while ! `cat model_worker.log | grep -q 'Uvicorn running on'`; do sleep 1; done

  echo 'Starting openai api server...'
  python -u -m fastchat.serve.openai_api_server \
    --host 0.0.0.0 --port 8080 | tee ~/openai_api_server.log

envs:
  MODEL_SIZE: 7
上述的SkyPilot任务YAML将启动一个带有Vicuna 7B模型的OpenAI API端点。这个YAML可以与常规的sky launch一起使用,以启动服务的单个副本。
然而,通过在YAML中添加一个service部分,我们可以将其扩展到多个区域/云中的多个副本:
# vicuna.yaml
service:
  readiness_probe: /v1/models
  replicas: 3

resources:
  ports: 8080
  # Here goes other resources config

# Here goes other task config
现在我们有一个可以与SkyServe一起使用的Service YAML!只需运行
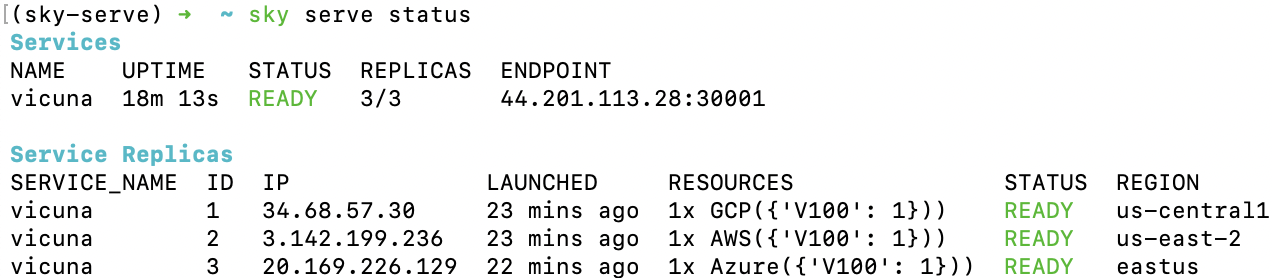
$ sky serve up vicuna.yaml -n vicuna
部署服务(使用-n为您的服务命名!)。一段时间后,将有一个OpenAI兼容的API端点准备好接受流量(在以下示例中为44.201.113.28:30001):
使用以下cURL命令发送请求:
$ curl http://<endpoint-url>/v1/chat/completions \
    -X POST \
    -d '{"model":"vicuna-7b-v1.3","messages":[{"role":"system","content":"You are a helpful assistant."},{"role":"user","content":"Who are you?"}],"temperature":0}' \
    -H 'Content-Type: application/json'

# Example output:
{"id":"chatcmpl-gZ8SfgUwcm9Xjbuv4xfefq","object":"chat.completion","created":1702082533,"model":"vicuna-7b-v1.3","choices":[{"index":0,"message":{"role":"assistant","content":"I am Vicuna, a language model trained by researchers from Large Model Systems Organization (LMSYS)."},"finish_reason":"stop"}],"usage":{"prompt_tokens":19,"total_tokens":43,"completion_tokens":24}}
你也可以使用一个简单的聊天机器人Python脚本来发送请求:
import openai

stream = True
model = 'vicuna-7b-v1.3' # This is aligned with the MODEL_SIZE env in the YAML
init_prompt = 'You are a helpful assistant.'
history = [{'role': 'system', 'content': init_prompt}]
endpoint = input('Endpoint: ')
openai.api_base = f'http://{endpoint}/v1'
openai.api_key = 'placeholder'

try:
    while True:
        user_input = input('[User] ')
        history.append({'role': 'user', 'content': user_input})
        resp = openai.ChatCompletion.create(model=model,
                                            messages=history,
                                            stream=True)
        print('[Chatbot]', end='', flush=True)
        tot = ''
        for i in resp:
            dlt = i['choices'][0]['delta']
            if 'content' not in dlt:
                continue
            print(dlt['content'], end='', flush=True)
            tot += dlt['content']
        print()
        history.append({'role': 'assistant', 'content': tot})
except KeyboardInterrupt:
    print('\nBye!')
有用的CLI#
以下是一些用于SkyServe的命令。查看sky serve --help以获取更多详细信息。
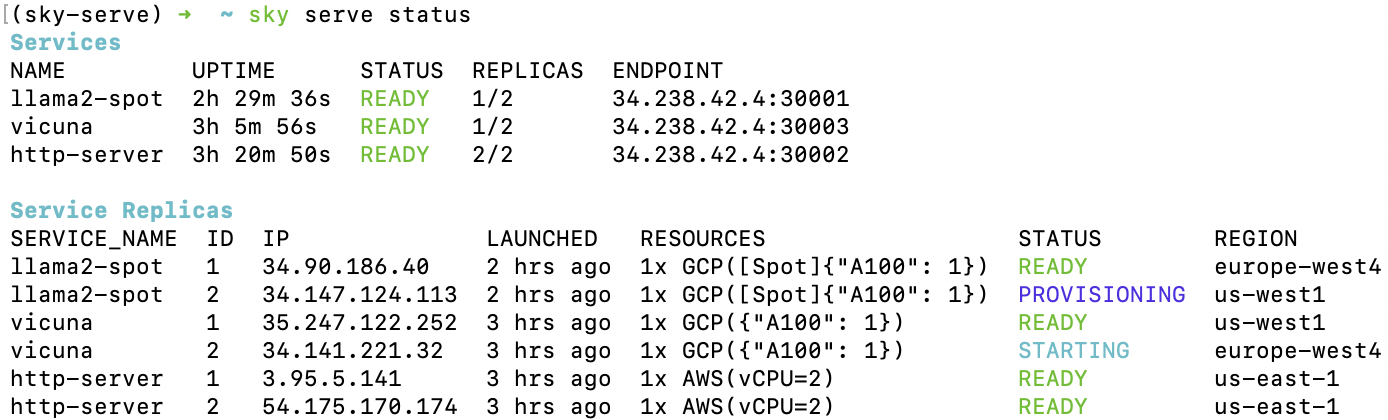
查看所有正在运行的服务:
$ sky serve status
流式传输服务的日志:
$ sky serve logs vicuna 1 # tail logs of replica 1, including provisioning and running logs
$ sky serve logs vicuna --controller # tail controller logs
$ sky serve logs vicuna --load-balancer --no-follow # print the load balancer logs so far, and exit
终止服务:
$ sky serve down http-server # terminate the http-server service
$ sky serve down --all # terminate all services
自动扩展#
有关更多信息,请参见Autoscaling。
SkyServe 架构#
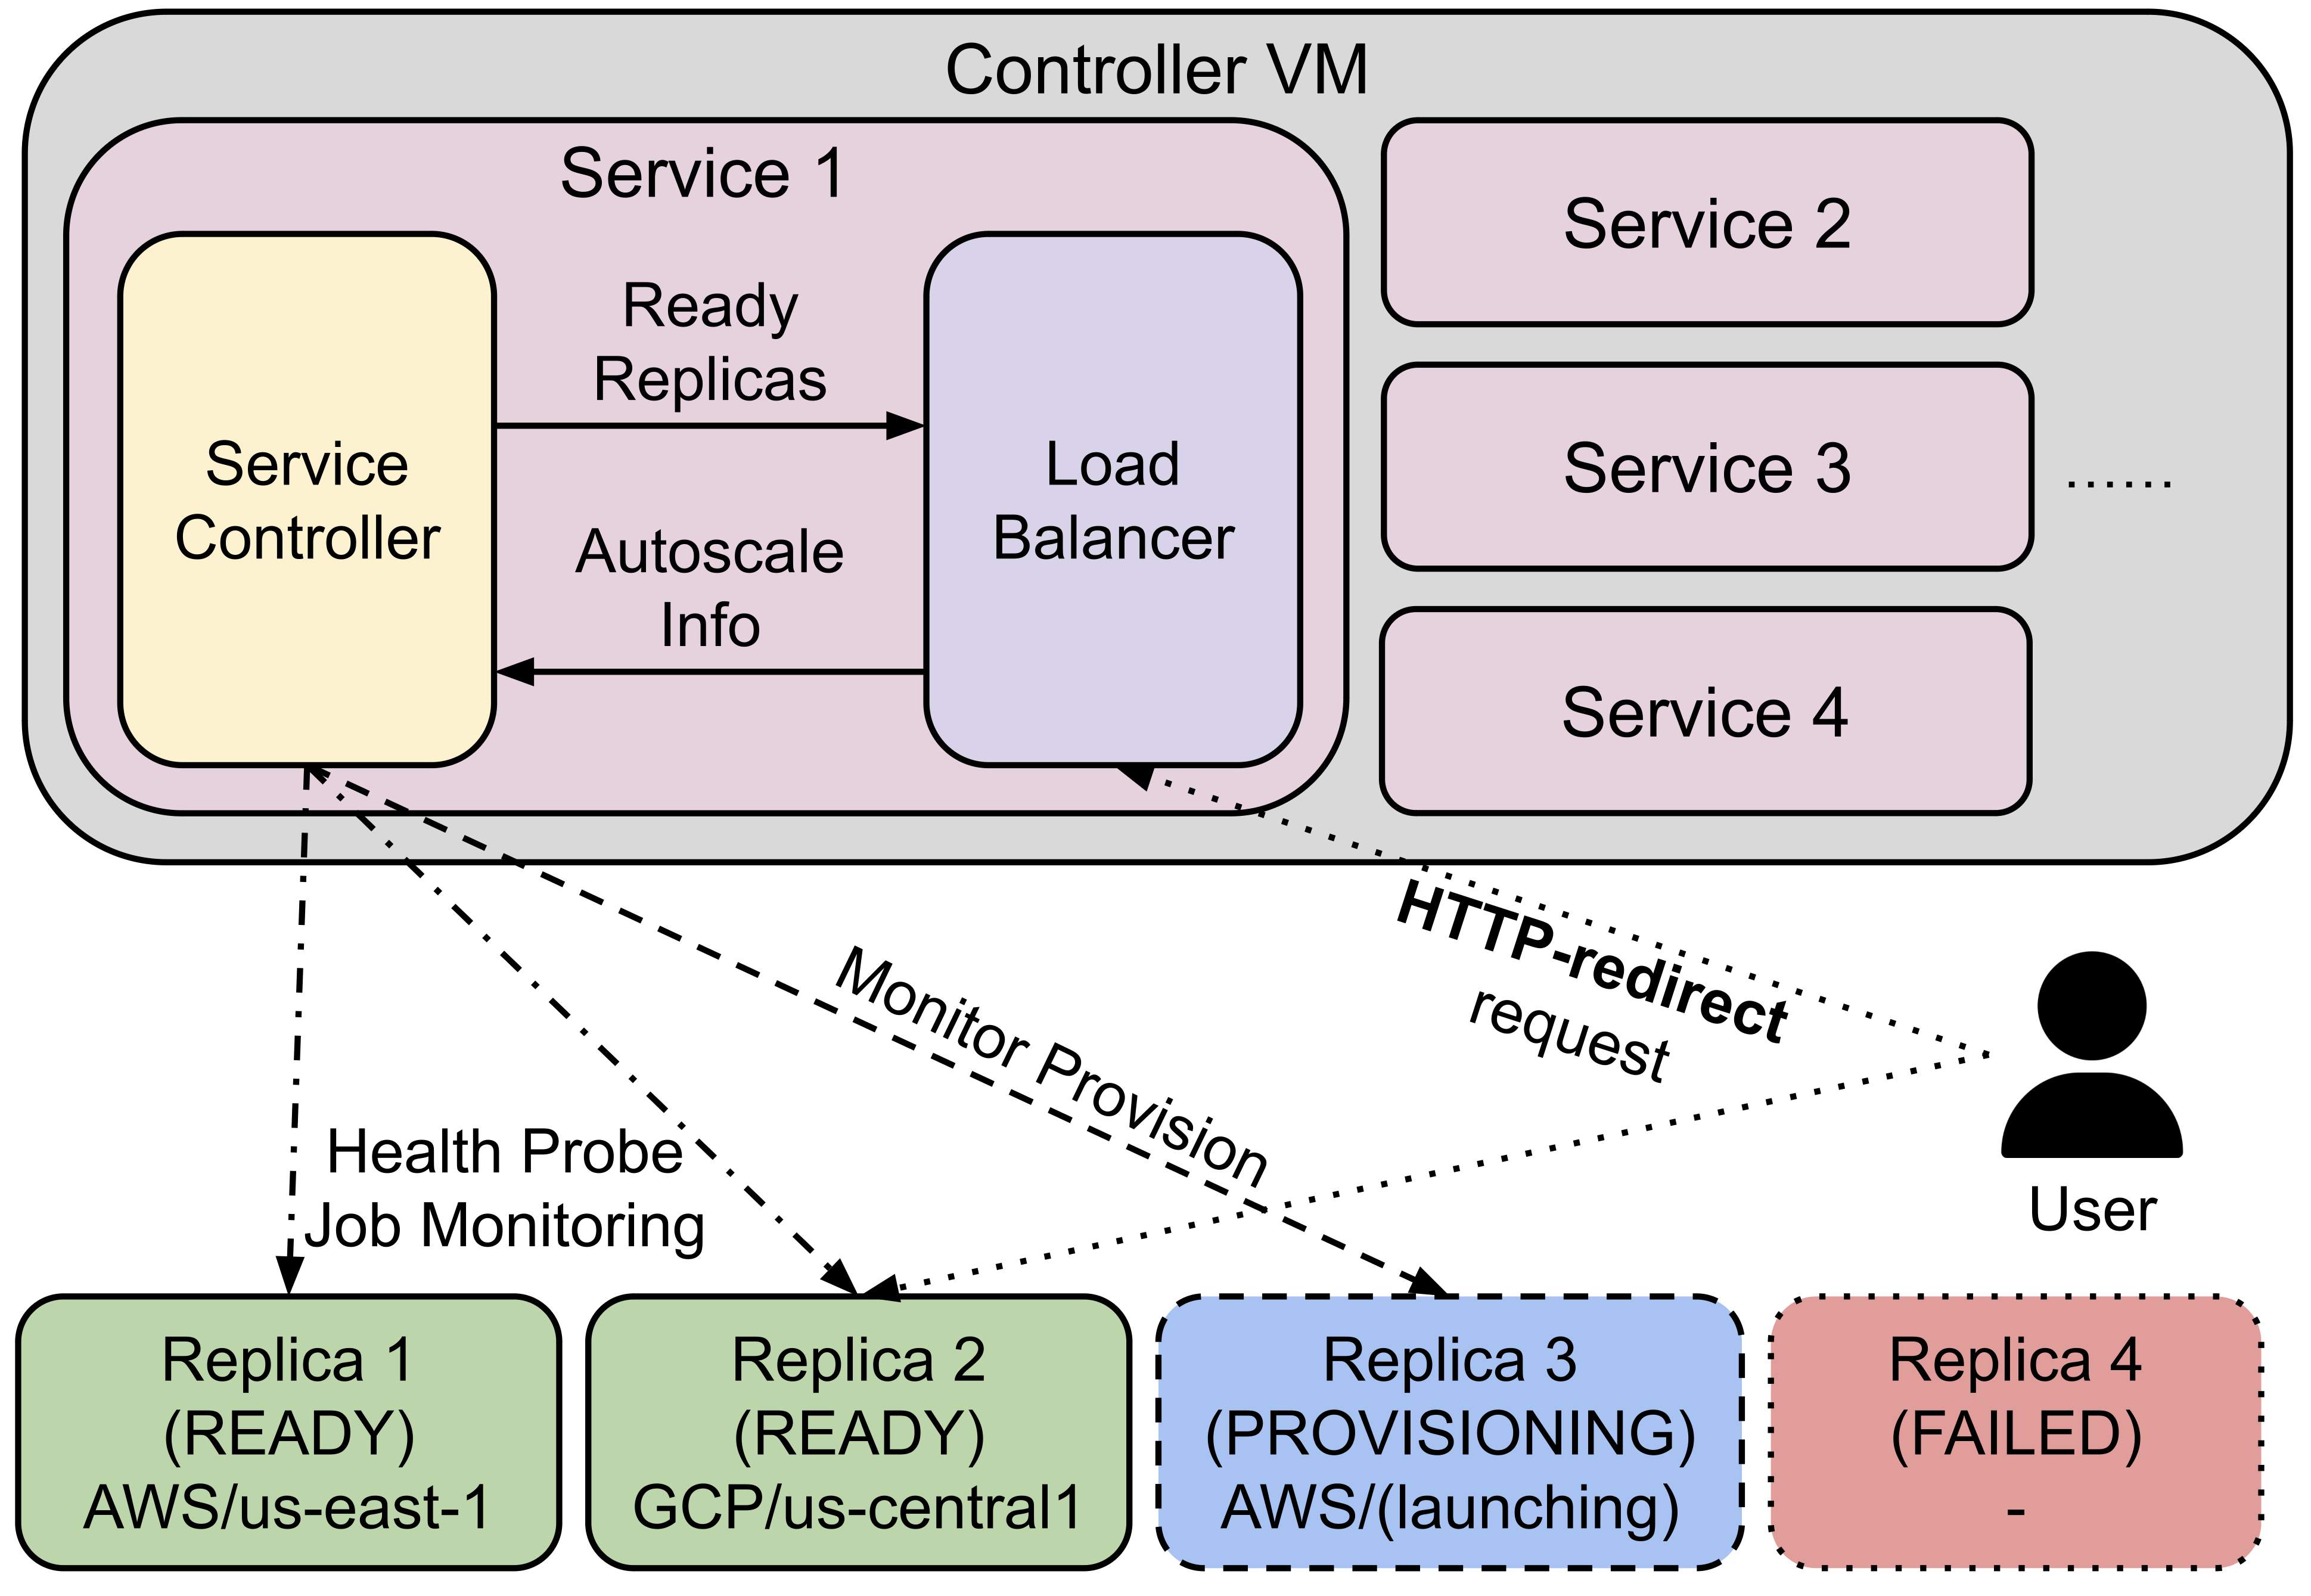
SkyServe 有一个集中控制的虚拟机,用于管理您的服务部署。每个服务将有一个进程组来管理其副本并将流量路由到它们。
它由以下组件组成:
控制器: 控制器将监控副本的状态,并在其中一个副本失败时重新启动一个新的副本。如果设置了自动扩展配置,它还会自动扩展副本的数量(更多信息请参见服务YAML规范)。
负载均衡器:负载均衡器将流量路由到所有准备好的副本。它是一个轻量级的HTTP服务器,监听服务端点并将请求分发到其中一个副本。
所有进程组共享一个控制器虚拟机。控制器虚拟机将在性价比最高的云中启动。您还可以根据需求自定义控制器资源。
SkyServe 控制器#
SkyServe 控制器是一个在云中运行的小型按需 CPU 虚拟机,它:
管理您的服务部署;
监控您的服务状态;
将流量路由到您的服务副本。
当第一个服务部署时,它会自动启动,并且在空闲10分钟后(即所有服务终止后)自动停止。 因此,不需要用户操作来管理其生命周期。
你可以使用sky status查看控制器,并通过使用-r/--refresh标志刷新其状态。
自定义SkyServe控制器资源#
您可能出于多种原因想要自定义SkyServe控制器的资源:
使用成本较低的控制器。(如果您运行的服务较少)
强制控制器在特定位置运行。这在您希望服务端点在特定地理区域内时特别有用。(默认:最便宜的位置)
更改可以同时运行的最大服务数量,这是控制器vCPU数量的4倍与控制器内存(以GiB为单位)之间的最小值。(默认值:16)
更改控制器的磁盘大小以存储更多日志。(默认值:200GB)
为了实现上述目标,您可以在~/.sky/config.yaml中指定自定义配置,包含以下字段:
serve:
  # NOTE: these settings only take effect for a new SkyServe controller, not if
  # you have an existing one.
  controller:
    resources:
      # All configs below are optional.
      # Specify the location of the SkyServe controller.
      cloud: gcp
      region: us-central1
      # Specify the maximum number of services that can be run concurrently.
      cpus: 2+  # number of vCPUs, max concurrent services = min(4 * cpus, memory in GiB)
      # Specify the disk_size in GB of the SkyServe controller.
      disk_size: 1024
resources 字段与普通的 SkyPilot 作业具有相同的规范;请参阅 这里。
注意
如果您已经有一个现有的控制器(无论是停止还是运行中),这些设置将不会生效。要使它们生效,首先需要拆除现有的控制器,这要求所有服务都被终止。