LLM评估:比较四种自动检测错误的方法

大型语言模型(LLMs)面临的一个持续挑战是它们容易产生幻觉。它们可以生成输入中不存在的内容,可以捏造数据,还会犯下各种难以评估的其他错误。
人工监督是目前解决这些问题最有效的方式,从构建一个稳健的基础事实数据集开始,通过反馈循环进行迭代式LLM训练。然而,这个过程虽然有效,却需要付出巨大努力,对于大型数据集而言尤其难以实现。
在本文中,我们将探讨四种自动化LLM错误检测技术。我们将使用示例数据集来测试和分析每种技术,分享结果和权衡取舍,以便您能为自己的项目选择最佳方案。
什么是LLM错误?
LLM错误(或幻觉)是指与给定输入或上下文不符的意外输出。这些错误可能从细微的不准确到大规模的事实扭曲,常常导致输出不可靠、具有误导性,甚至有害。
示例场景:分析产品评论的有用性
如果您曾在网上购物,您一定对商品评价不陌生。
一家公司可能希望根据这些评论的有用程度对其进行分类。他们可能对什么样的评论算作"有用"有自己独特的标准。然而,根据这些标准手动评估每一条评论会过于耗费人力且成本高昂。
相反,让我们看看他们如何使用LLM来自动化评估流程。
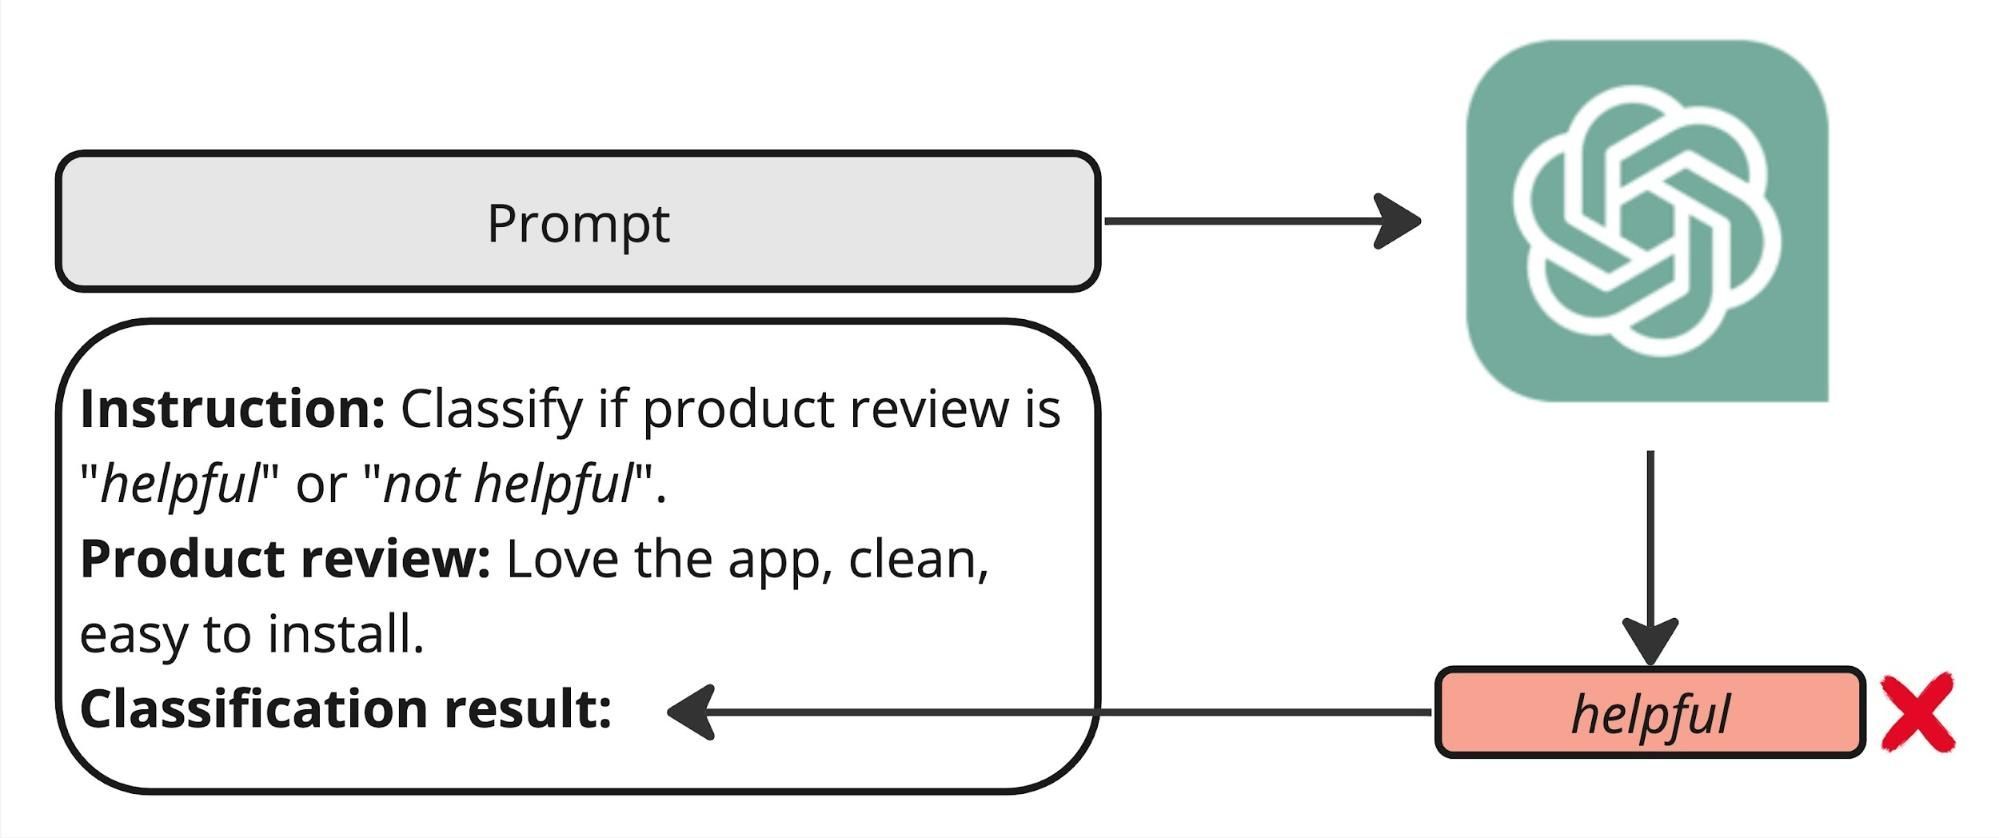
举个具体例子,我们来看一下Shopify应用商店评论数据集:
!pip install opendatasets --upgrade --quietimport opendatasets as od
dataset_url = 'https://www.kaggle.com/datasets/usernam3/shopify-app-store'
od.download(dataset_url)Please provide your Kaggle credentials to download this dataset. Learn more: http://bit.ly/kaggle-creds
Your Kaggle username:import pandas as pd
df = pd.read_csv('./shopify-app-store/reviews.csv') \
.groupby('rating') \
.apply(lambda x: x.sample(n=2000, replace=True)) \
.reset_index(drop=True)[['body', 'rating']] \
.sample(frac=1)
df.head()快速入门:使用Llama 3实现自动化初始分析
本示例的目标是确保LLM能够自动化产品评论分析。
首先,机器学习或提示工程师可能会使用简单的提示和文本,并在像Llama 3这样的模型上运行。然而,如果没有机制来引导生成过程,模型的响应可能无法始终与预定义的类别(如helpful和not_helpful类标签)保持一致。
instruction = '''\
Classify the review as "helpful" or "not helpful". \
A "helpful" review should provide specific details about the user's experience, \
include clear suggestions or useful feedback, seem genuine and reflect a real user experience, \
be well-written and easy to understand, and directly pertain to the app's functionality.'''

labels = sorted(["helpful", "not helpful"])为了实现对大语言模型(LLM)输出的精准控制,我们采用了一种称为"约束生成"的技术。这意味着根据特定规则、标准或约束来限制或引导LLM的输出。为了帮助您实现这一目标,您可以使用诸如sglang库等工具,它不仅支持约束生成,还能提供优化的吞吐量。
设置sglang服务器非常简单。只需按照他们的安装步骤并使用配备GPU的机器。安装完成后,使用以下命令启动服务器:
!python -m sglang.launch_server --model-path meta-llama/Meta-Llama-3-8B-Instruct --port 30000该命令启动监听30000端口的服务器,允许推理客户端连接并开始处理。
!pip install "sglang[openai]"from sglang import RuntimeEndpoint, function, gen, set_default_backend
HOST_URL = 'http://35.184.60.123:30000'
set_default_backend(RuntimeEndpoint(HOST_URL))我们需要定义一个推理函数,根据预定义的选择集给出受限的大语言模型响应:
from transformers import AutoTokenizer

model_id = "meta-llama/Meta-Llama-3-8B-Instruct"
tokenizer = AutoTokenizer.from_pretrained(model_id)

@function
def run_sglang_gen(s, instruction, input_text, choices, temperature):
    messages = [{
        'role': 'user',
        'content': f'Instruction:\n\n{instruction}\n\nInput text:\n"""\n{input_text}\n"""\n'
    }]
    prompt = tokenizer.apply_chat_template(messages, add_generation_prompt=True, tokenize=False)
    s += prompt + gen(
        "answer",
        temperature=temperature,
        choices=choices,
)tokenizer_config.json:100%|██████████|51.0k/51.0k [00:00<00:00, 1.12MB/s]
tokenizer.json:100%|██████████|9.09M/9.09M [00:00<00:00, 43.6MB/s]
special_tokens_map.json:100%|██████████|73.0/73.0 [00:00<00:00, 2.09kB/s]
Special tokens have been added in the vocabulary, make sure the associated word embeddings are fine-tuned or trained.随着sglang服务器现已运行,我们可以使用Llama 3模型来自动化我们的产品评论标注任务。通过定义具体的输入指令和目标标签集,可以在整个数据集上运行这个大型语言模型。
但首先,为了在此过程中管理GPU上的内存消耗,我们将相应调整batch_size参数。
作为我们分析的一部分,我们还将收集token概率分数,这是每个LLM都会生成的内容,下文将进行更深入的讨论。
import numpy as np
from tqdm import tqdm

batch_size = 10

def run_on_dataset(instruction, choices, texts):
    predictions = []
    for i in tqdm(range(0, len(texts), batch_size), total=len(texts) // batch_size):
        states = run_sglang_gen.run_batch([{
            'instruction': instruction,
            'input_text': t,
            'choices': choices,
            'temperature': 0.0
        } for t in texts[i:i+batch_size]])

        # collect outputs
        for state in states:
            meta_info = state.get_meta_info("answer")
            # convert log likelihoods to probabilities
            prob = np.exp(meta_info['normalized_prompt_logprob']) / np.sum(np.exp(meta_info['normalized_prompt_logprob']))
            predictions.append({
                'label': state['answer'],
                'prob': prob
            })
return pd.DataFrame(predictions)在配备A100 40GB GPU的机器上运行Llama 3,标注10000个样本大约需要3.5分钟:
df[['label', 'prob']] = run_on_dataset(
    instruction=instruction,
    choices=labels,
    texts=df.body.tolist()
)100%|██████████| 1000/1000 [03:30<00:00, 4.75it/s]为了快速验证,让我们展示由LLM创建的标签分布:
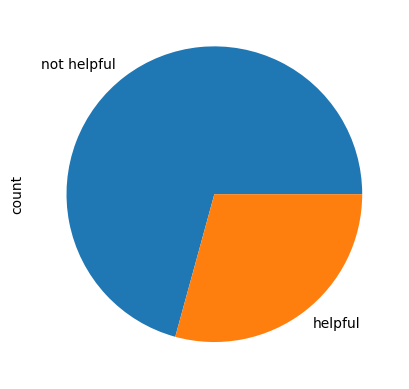
在审查Llama 3生成的标签分布时,我们观察到分布呈现不均匀状态。这种不均匀性可能表明模型存在普遍偏差,这可能会影响其输出结果的可靠性。
让我们仔细看看是什么可能导致这个问题。
探索四种错误检测技术
检测错误对于评估模型质量和指导改进至关重要。最简单且最准确的方法是手动检查每个预测以确定其正确性。
然而,这种方法不具备可扩展性;人工检查数千个样本将耗费标注人员大量时间和资源。
为了简化这一流程,我们可以采用自动化技术来优先处理最可能存在的错误以供人工审核。通过建立"错误可能性"的衡量标准或错误存在的二元指标,我们能够有效地对需要人工优先关注的案例进行排序和优先级划分。
以下是四种不同的错误检测策略,每种策略在成本和质量方面都有各自的权衡。
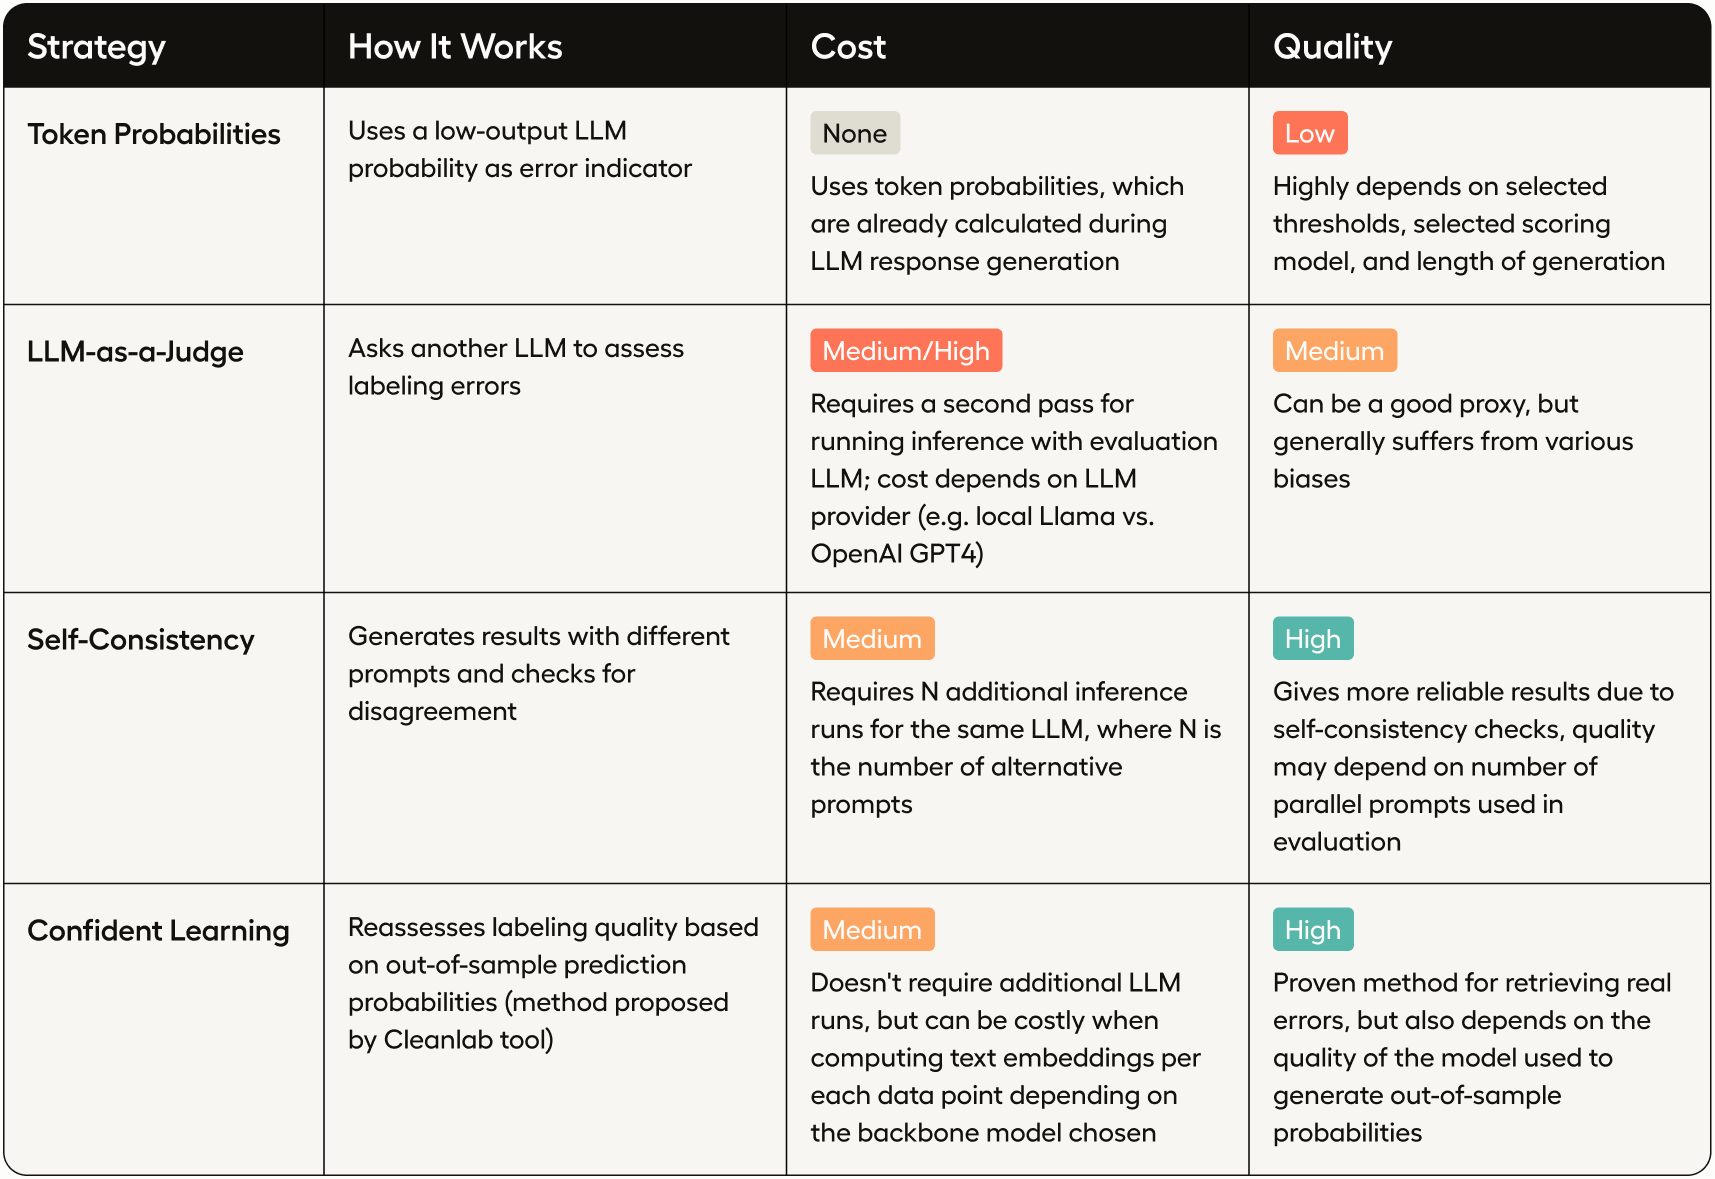
技巧 #1:通过分析词元概率进行错误检测
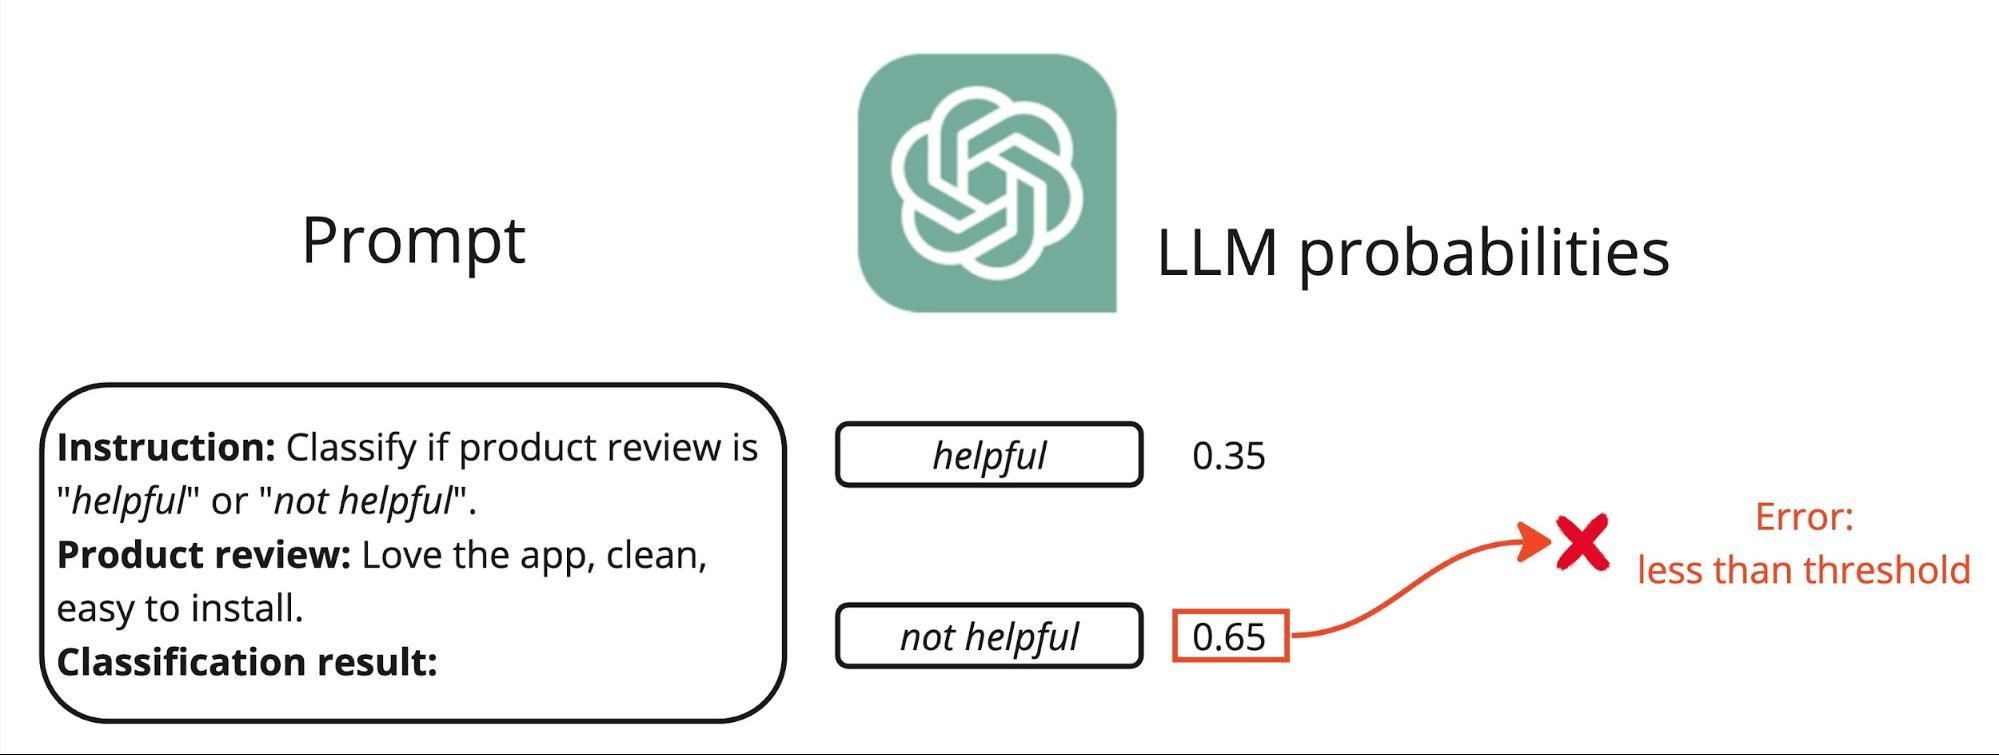
检测大语言模型(LLM)响应中潜在错误的一个相对简单有效的方法是分析token概率分数。这些分数被分配给模型生成的每个token,表示模型对该token正确性的置信度,从而为潜在的不准确性提供有价值的洞察。
我们已经收集了每个评分分类的概率分数。为了将这些综合成一个单一的置信度指标,可以采用以下几种方法:
- 最大概率: 预测中分配给任何token的最高概率,表示整体置信度。
- 最高分概率差:最高和第二高概率分数之间的差值,可以反映在竞争分类情况下的置信度。
- 预测熵:衡量所有标记概率的不确定性指标,熵值越高表示置信度越低。
这些技术中的每一种都能让我们根据错误可能性优先审查哪些响应,从而提高人工错误检查的效率。虽然概率边际和预测熵可以提供更细致的模型置信度情况,但为了简单起见,在我们的示例中我们将使用最大概率。
df['prob'] = df.prob.apply(max)为了识别哪些分数可能预示潜在错误,我们首先来看分数分布:
df['prob'].plot(kind='hist', bins=50)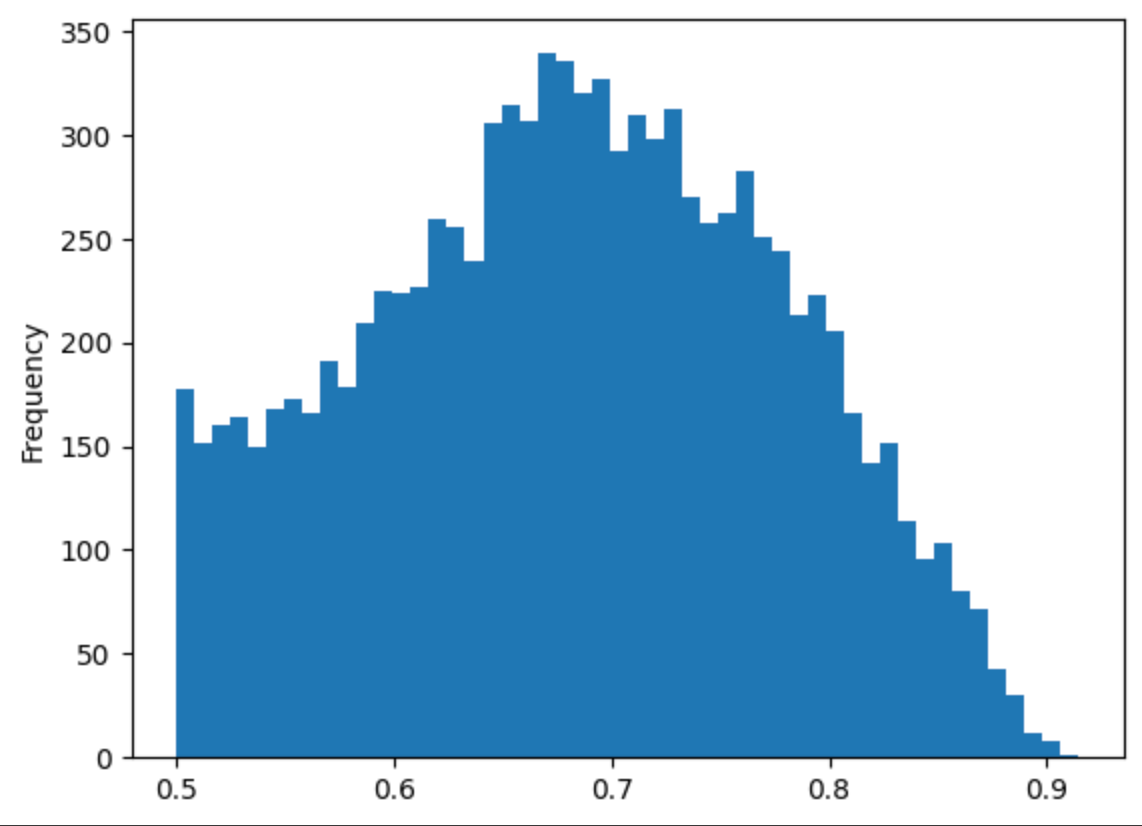
在0.5附近有一个可疑的峰值,这是探索潜在错误的一个好候选点。
df['issue_tp'] = df['prob'] < 0.51

print(f'Potential issues based on low token probability: {df["issue_tp"].sum()}')

Potential issues based on low token probability: 211请注意,在更复杂的场景中,可能需要为每个预测标签单独设置阈值,因为不同标签的分类准确率可能存在差异。
技巧 #2: 大语言模型作为评判者

这是一种创新方法,它通过使用次级大语言模型(LLM)来评估主LLM的标注准确性。该方法充分利用了LLMs的能力来提供元评估——本质上是用一个LLM来评判另一个LLM的表现。关于基本原理和实验结果的深入讨论,请参阅原始研究论文。
该流程首先为评判大语言模型设计特定的提示词。这段提示词指示次级模型根据其对首个大语言模型提供的初始标注和输入文本的评估,分配"正确"或"错误"标签。以下是该提示词可能呈现的示例:
- 标注提示: "检查此产品描述,并确定第一个LLM应用的标签是否准确。"
- 输入文本与响应: [实际产品评论文本及首个LLM分配的标签,例如"有用"或"无用"]
- 评判提示响应: [次级大语言模型根据输入文本中的内容和上下文评估标签的适当性。]
该方法通过利用大语言模型的分析能力,为自动化标注系统提供了一层质量控制,实现了更强大且可扩展的错误检测方法。
eval_instruction = '''Please act as an impartial judge and evaluate the response of the first language model. \
Assess if the model correctly classifies a product review based on the initial instruction as "helpful" or "not helpful". \
Check if the classification meets these criteria: specificity of user experience details, clarity and usefulness of feedback, \
authenticity and relevance to the app's functionality, and overall clarity and comprehension of the text. \
Label the response "Correct" if it fully meets all criteria, and "Incorrect" if it does not meet one or more of these criteria.'''@function
def run_llm_eval(s, input_text, predicted_label):
messages = [{
'role': 'user',
'content': (
f'{eval_instruction}\n\n'
f'Initial instruction:\n"""\n{instruction}\n"""\n\n'
f'Product review:\n"""\n{input_text}\n"""\n\n'
f'Classification result: {predicted_label}\n\n'
'Evaluation result: '
)
}]
prompt = tokenizer.apply_chat_template(messages, add_generation_prompt=True, tokenize=False)
s += prompt + gen(
"answer",
temperature=0,
choices=['Correct', 'Incorrect'],
)
def run_eval_on_dataset(texts, labels):
predictions = []
texts_and_labels = list(zip(texts, labels))
for i in tqdm(range(0, len(texts_and_labels), batch_size), total=len(texts) // batch_size):
states = run_llm_eval.run_batch([{
'input_text': t,
'predicted_label': l,
} for t, l in texts_and_labels[i:i+batch_size]])
for state in states:
# Identify errors
predictions.append(True if state['answer'] == 'Incorrect' else False)
return pd.DataFrame(predictions)
df['issue_lj'] = run_eval_on_dataset(df.body.tolist(), df.label.tolist())
print(f'Potential issues identified by cleanlab: {df["issue_lj"].sum()}')100%|██████████| 1000/1000 [04:02<00:00, 4.12it/s]
值得注意的是,相比使用可能效果欠佳的相同Llama 3模型,采用企业级LLM(如OpenAI GPT-4)可获得更高质量的评估结果。
技巧 #3: 自我一致性

自洽技术通过使用与原提示略有不同、经过改写的多个版本,对同一大型语言模型(LLM)进行多次运行。其目的是观察模型在这些变体之间产生相同标签的一致性程度,这可以表明其预测的可靠性。
流程如下所示:
- 改写提示词:首先创建原始标注提示的多个改写版本。这些变体应保留原意的核心,但改变措辞或结构以测试模型的鲁棒性。
- 运行多重推理: 将每个改写后的提示输入LLM并收集其分配的标签。此步骤至关重要,因为它测试模型在略微变化的输入条件下的稳定性。
- 计算共识: 分析不同提示生成标签的范围。结果间高度一致表明对模型准确性有较高信心。相反,显著差异可能意味着模型在某些领域难以做出连贯判断,暗示潜在的不准确性。
自一致性的优势:
- 提高可靠性:通过验证模型在不同输入下能产生一致的结果,我们可以增强对其预测能力的信任。
- 错误检测:模型显示不一致的区域会被标记以供进一步审查,帮助精确定位错误更可能发生的位置。
- 模型调优:通过自一致性检查获得的洞察可以指导模型的进一步优化,提升其整体性能和可靠性。
# prepare the list of alternative instructions
instructions = [
    "Classify the review as \"helpful\" or \"not helpful\". A \"helpful\" review should offer specific details about the user's experience, contain clear suggestions or valuable feedback, appear genuine and reflect an authentic user experience, be well-composed and easy to comprehend, and directly relate to the app's functionality.",
    "Classify the review as \"helpful\" or \"not helpful\". A \"helpful\" review should present specific details about the user's experience, provide clear suggestions or beneficial feedback, seem authentic and mirror a real user experience, be well-crafted and straightforward to understand, and directly connect to the app's functionality.",
    "Classify the review as \"helpful\" or \"not helpful\". A \"helpful\" review should deliver specific details about the user's experience, include precise suggestions or advantageous feedback, appear genuine and reflect a true user experience, be well-written and simple to comprehend, and directly relate to the app's features."
]

# run each instruction through the same LLM
for i, instruction in enumerate(instructions):
  print(f'Running on instruction: "{instruction}"')
  df[[f'label_{i}', f'prob_{i}']] = run_on_dataset(
      instruction=instruction,
      choices=labels,
      texts=df.body.tolist()
)Running on instruction: "Classify the review as "helpful" or "not helpful". A "helpful" review should offer specific details about the user's experience, contain clear suggestions or valuable feedback, appear genuine and reflect an authentic user experience, be well-composed and easy to comprehend, and directly relate to the app's functionality."
100%|██████████| 1000/1000 [03:17<00:00, 5.07it/s]
Running on instruction: "Classify the review as "helpful" or "not helpful". A "helpful" review should present specific details about the user's experience, provide clear suggestions or beneficial feedback, seem authentic and mirror a real user experience, be well-crafted and straightforward to understand, and directly connect to the app's functionality."
100%|██████████| 1000/1000 [03:19<00:00, 5.02it/s]
Running on instruction: "Classify the review as "helpful" or "not helpful". A "helpful" review should deliver specific details about the user's experience, include precise suggestions or advantageous feedback, appear genuine and reflect a true user experience, be well-written and simple to comprehend, and directly relate to the app's features."
100%|██████████| 1000/1000 [03:22<00:00, 4.94it/s]我们可以推断出各种有用的统计数据,以揭示潜在的标签错误。例如,相关矩阵可以让我们了解数据集中不同标签共同出现的频率。
import seaborn as sns
import matplotlib.pyplot as plt
from collections import Counter

label_cols = [col for col in df.columns if col.startswith('label')]
label_to_num = {label: i for i, label in enumerate(sorted(labels))}
df['agreement'] = df[label_cols].apply(lambda x: max(Counter(x).values()) / len(x), axis=1)
corr = df[label_cols].replace(label_to_num).corr()
sns.heatmap(corr, annot=True, fmt=".2f", cmap='coolwarm')
plt.title('Label Correlation Heatmap')
plt.show()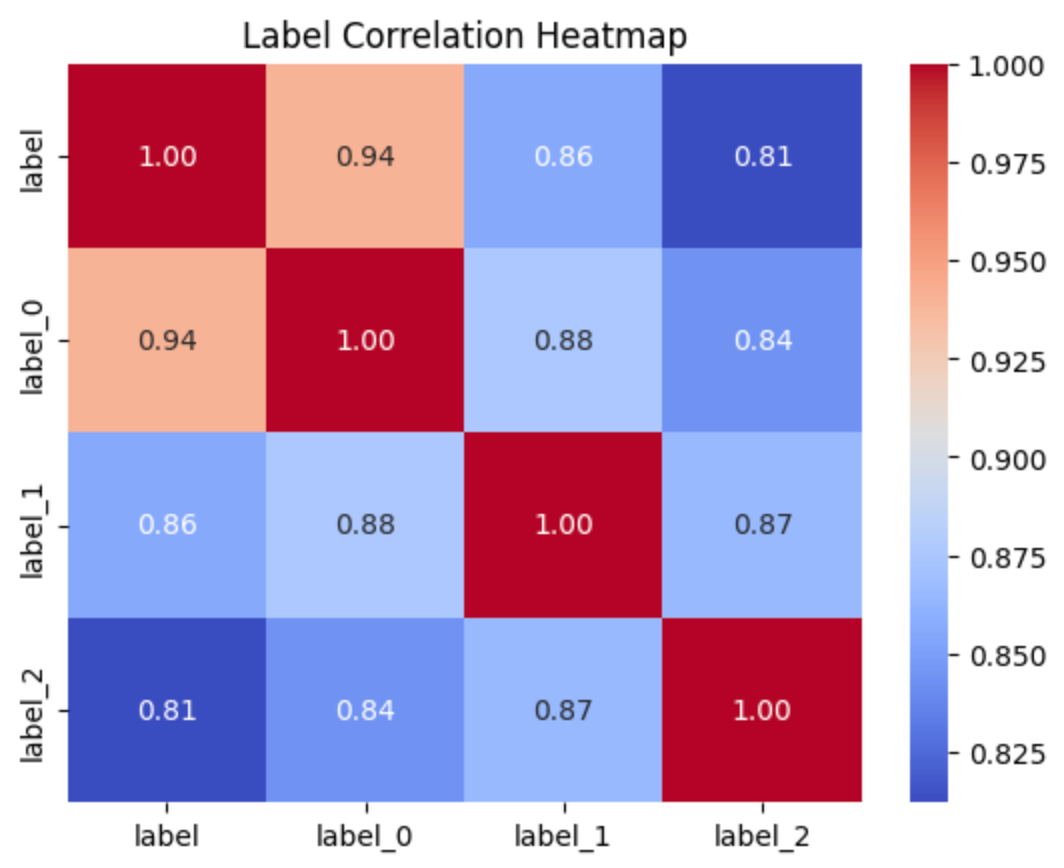
当指令彼此差异显著时,最终结果的相关性较低并不令人意外,这表明模型缺乏自洽性。我们可以得出结论:当初始标签与多数投票结果不匹配时,更容易出现错误:
from collections import Counter

df['issue_sc'] = df[label_cols].apply(lambda x: Counter(x).most_common(1)[0][0] != x['label'], axis=1)
print(f'Potential issues based on self consistency: {df["issue_sc"].sum()}')Potential issues based on self consistency: 157你可以根据需求调整这种方法。例如,可以增加备选提示的数量进行测试,并检查标注大语言模型与备选大语言模型响应100%多数投票不一致的案例。
技巧 #4:使用Cleanlab进行置信学习
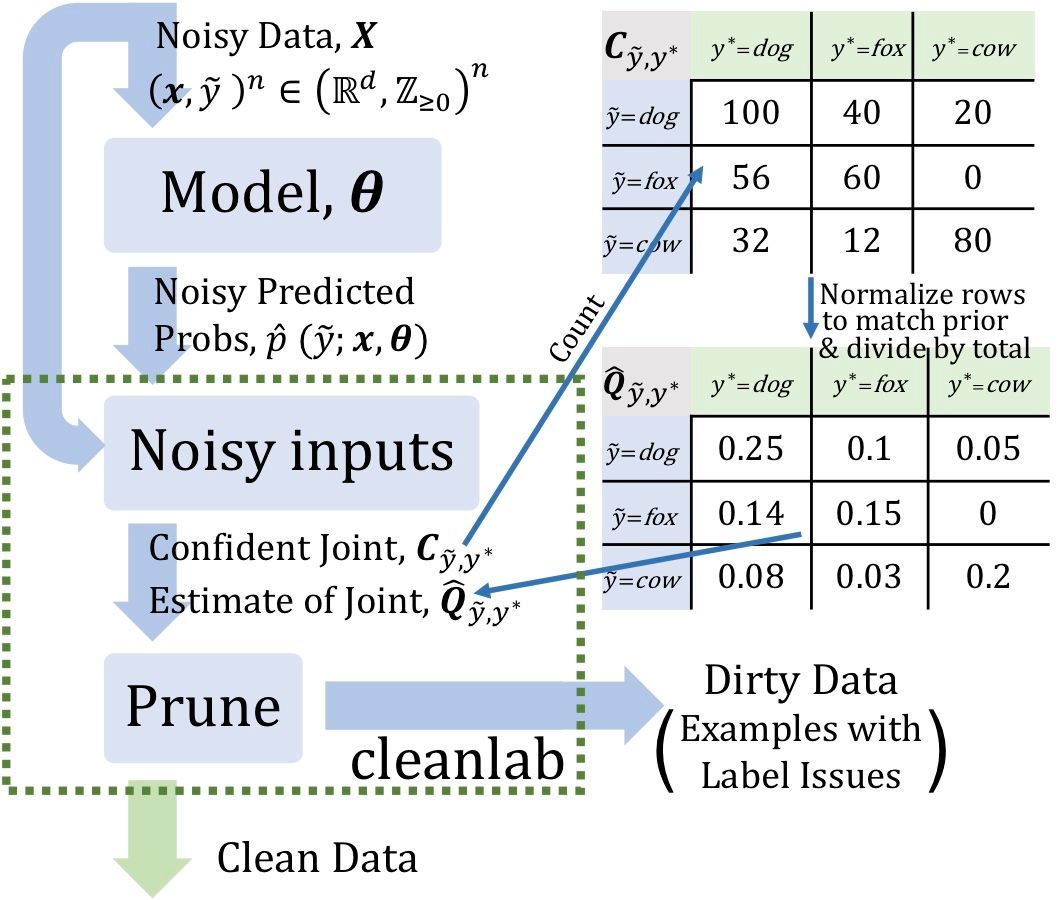
另一种检测基于LLM标注错误的方法是使用开源工具Cleanlab提供的置信学习技术。其核心思想是构建一个辅助分类模型,为每个数据点提供样本外概率。这些概率随后被用于发现LLM响应中的不一致性,从而提示可能的标注错误。更多细节请参阅Northcutt C., Jiang L., Chuang I., 2022
首先,我们将为每条产品评论收集嵌入向量:
import os
from openai import OpenAI
from google.colab import userdata

os.environ['OPENAI_API_KEY'] = userdata.get('OPENAI_API_KEY')
client = OpenAI()

def get_embeddings(texts, model="text-embedding-3-small"):
    inputs = [str(text).replace("\n", " ") for text in texts]
    return [i.embedding for i in client.embeddings.create(input=inputs, model=model).data]

embs = []
for i in tqdm(range(0, len(df), 100)):
    embs.extend(get_embeddings(df.body.iloc[i:i + 100]))
embs = np.array(embs)
embs.shape100%|██████████| 100/100 [01:15<00:00, 1.32it/s]
(10000, 1536)然后利用这些嵌入向量,在原始数据的嵌入和标签上拟合一个逻辑回归模型,采用10折交叉验证
from sklearn.linear_model import LogisticRegression
from sklearn.model_selection import cross_val_predict

model = LogisticRegression(max_iter=1000)

labels_num = np.array([label_to_num[label] for label in df.label])
pred_probs = cross_val_predict(estimator=model, X=embs, y=labels_num, cv=10, method="predict_proba")获取pred_probs中每个样本的样本外概率,使我们能够利用Cleanlab发现潜在的标签问题:
!pip install cleanlabfrom cleanlab.filter import find_label_issues
issue_idx = find_label_issues(labels_num, pred_probs, return_indices_ranked_by='self_confidence')
df['issue_cl'] = False
df.loc[issue_idx, 'issue_cl'] = True
print(f'Potential issues identified by cleanlab: {df["issue_cl"].sum()}')Potential issues identified by cleanlab: 1556错误分析与LLM评估
现在我们已经尝试了每种错误检测技术,让我们保存数据框以便进一步分析:
cols_to_save = label_cols + ['body', 'issue_tp', 'issue_sc', 'issue_cl', 'issue_lj', 'prob', 'agreement']

df[cols_to_save].to_csv('finding_errors_in_llm_responses.csv', index=False)文件 finding_errors_in_llm_responses.csv 现已准备就绪,可集成到更具交互性的错误分析工具中。为此,我们将使用 Label Studio,这是一个用于数据标注任务的灵活工具:
1. 安装Label Studio: 首先在您的机器上安装Label Studio,然后使用以下命令启动它:
# Install the package
$ pip install -U label-studio
# Launch Label Studio
$ label-studio2. 导入数据:当Label Studio运行后,在浏览器中打开它(默认地址为http://localhost:8080)。创建一个新项目,并通过导入对话框中的拖放界面导入finding_errors_in_llm_responses.csv文件。
3. 探索数据: Label Studio 提供了一个包含搜索和筛选功能的数据查看器,便于审查数据集及检测到的错误。
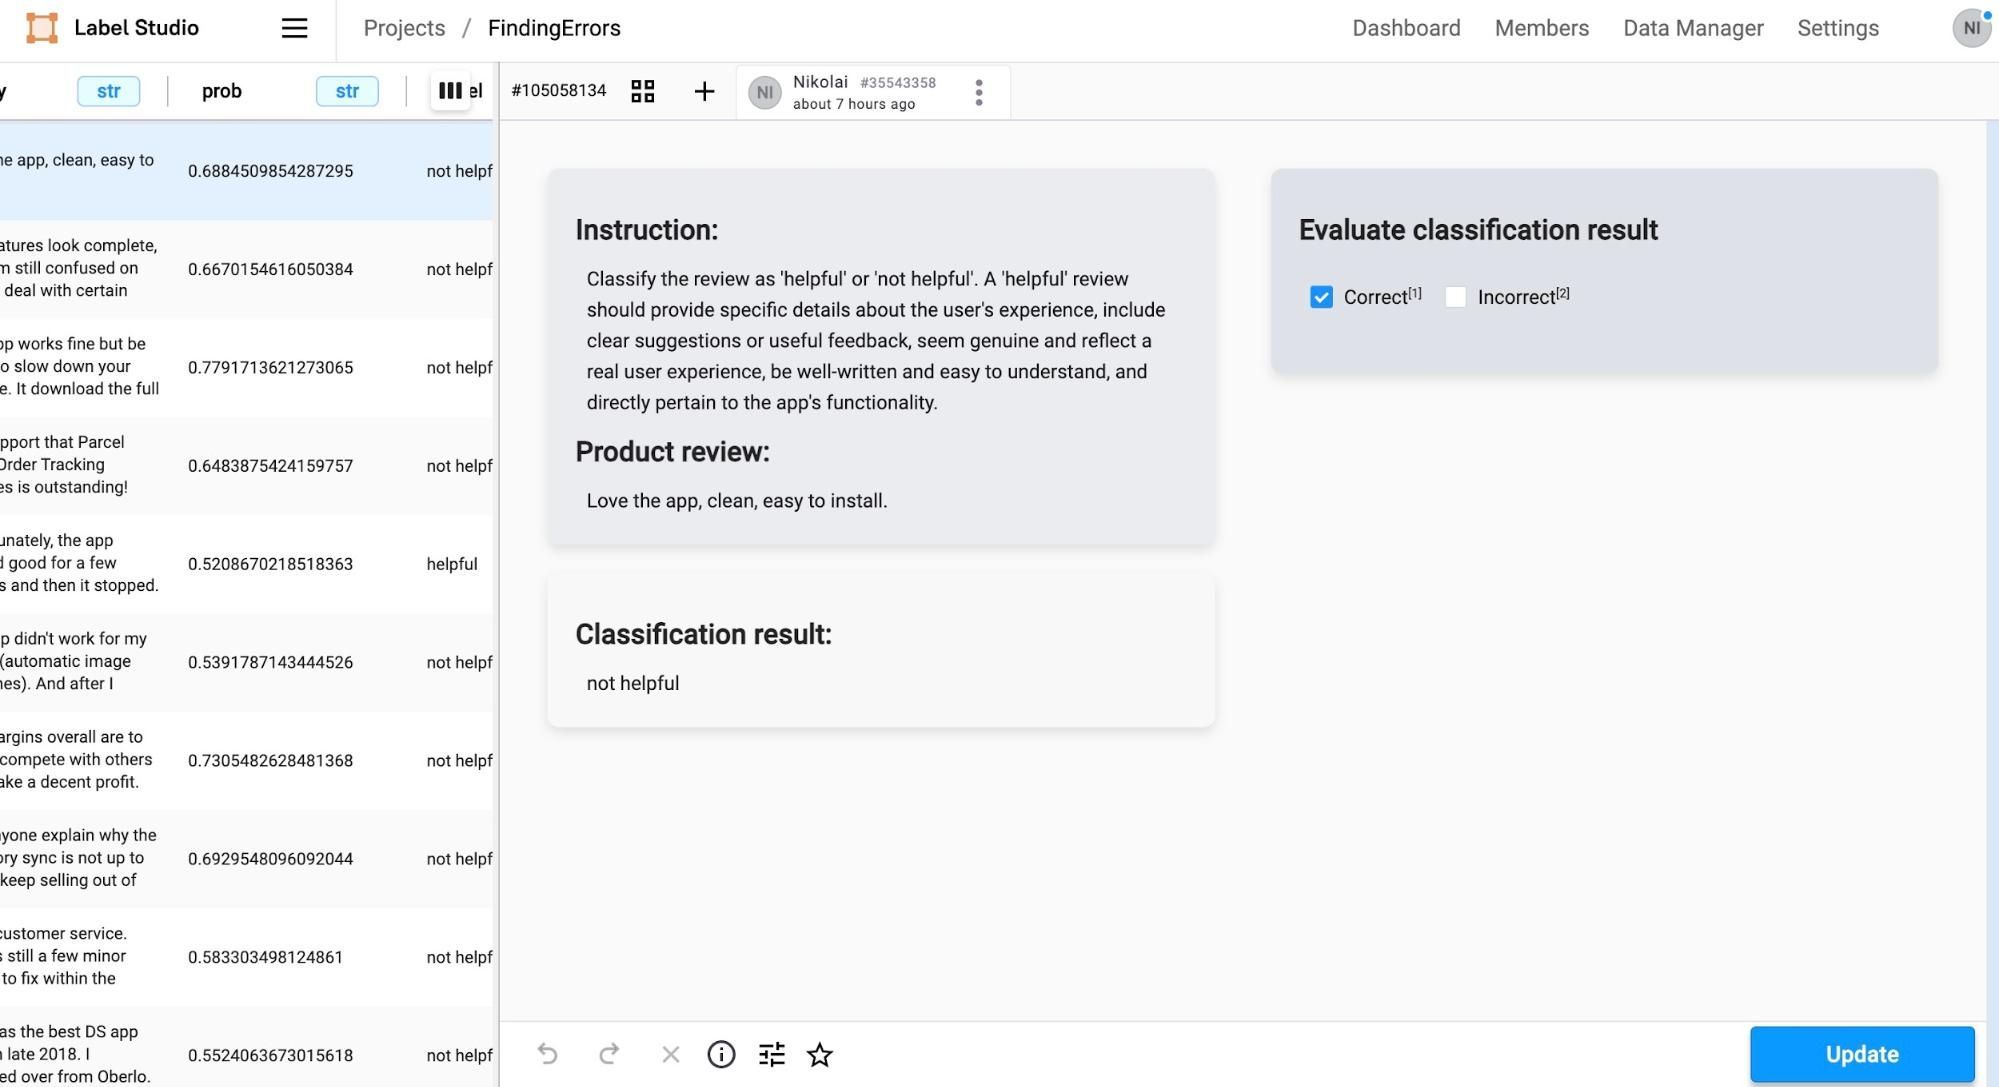
我们评估的下一阶段涉及关键的人工监督环节。这里的主要目标不是构建一个详尽的基准,而是高效抽样并仔细检查我们方法识别出的潜在错误。这种针对性方法使我们能够直接解决模型性能中的模糊或关注区域,从而提高审查过程的整体效率:
- 评估误报指的是评估该方法在实际上没有出现标注错误时,错误地建议存在标注错误的频率。减少此类错误可以提高人工审核流程的效率
- 评估假阴性 指的是该方法漏标标注错误的频率。提高这一指标可增强所选方法的可靠性。
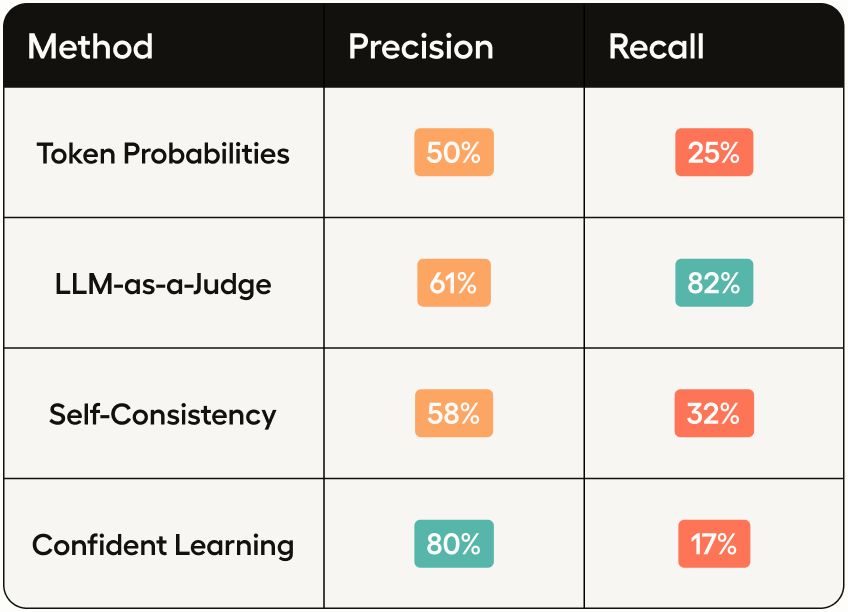
在手动检查每种可能错误类型的80个示例后,我们可以使用精确率和召回率数据生成不同指标间的对比结果。
结论
各种错误识别方法的有效性可以通过我们分析得出的分数来评估。但需要注意的是,这些分数(尤其是前三个)会受到所使用的基础模型影响,在本例中是Llama 3 7B。虽然该模型性能稳健,但它并非当前最强大的大语言模型,这可能会影响错误检测方法的整体表现。
在我们研究的技术中,由cleanlab实现的置信学习方法在需要最大化精确度时展现出最有前景的结果。该方法通过提供样本外概率估计表现出色,这对于更准确地识别错误标注至关重要。尽管它依赖于底层模型的能力(如本教程所示,这些能力有时可能不够理想),但通过减少通常需要人工评估每个LLM响应和提示的工作量,仍标志着显著改进。LLM-as-a-judge这种自动评估器在处理高召回率要求时表现更好,这归功于其准确理解评估指令的能力(这些指令也用于收集真实数据)。但需注意,由于缺乏测试数据和人为设计的任务未包含领域专业知识,本评估实验仅提供表面定性分析。需要进一步实验来验证这些发现。


