在Azure ML管道中运行流程#
作者:
为什么使用Azure机器学习(ML)管道在云上运行您的流程?#
在现实世界的场景中,流程服务于各种目的。例如,考虑一个设计用于评估人类和代理之间通信会话的相关性得分的流程。假设您希望每晚触发此流程以评估今天的表现,并避免LLM(语言模型)端点的峰值时段。在这种常见场景中,人们经常会遇到以下需求:
处理大数据输入:一次性运行包含数千或数百万数据输入的流程。
可扩展性和效率:需要一个可扩展、高效且具有弹性的平台以确保成功。
自动化:当上游数据准备就绪或按固定间隔自动触发批量流程。
Azure ML 管道 有效地解决了所有这些离线需求。通过将提示流与 Azure ML 管道集成,流用户可以非常轻松地实现上述目标,在本教程中,您可以学习:
如何使用python SDK自动将您的流程转换为Azure ML管道中的一个“步骤”。
如何将数据输入管道以触发批处理流程运行。
如何在提示流步骤之前或之后构建其他管道步骤。例如,数据预处理或结果聚合。
如何在我的管道上设置一个简单的调度器。
如何将管道部署到Azure ML批处理端点。然后我可以在需要时用新数据调用它。
在开始之前,请考虑以下先决条件:
Azure ML平台介绍:
了解什么是Azure ML管道和组件。
Azure 云设置:
拥有有效订阅的 Azure 账户 - 免费创建账户
从 Azure 门户创建 Azure ML 资源 - 创建 Azure ML 工作区
连接到您的工作区,然后设置一个基本的计算机集群 - 配置工作区
本地环境设置:
一个Python环境
已安装Azure Machine Learning Python SDK v2 - 安装说明 - 查看入门部分并确保‘azure-ai-ml’的版本高于
1.12.0
1. 连接到 Azure 机器学习工作区#
workspace 是 Azure 机器学习的顶级资源,提供了一个集中化的地方来处理您在使用 Azure 机器学习时创建的所有工件。在本节中,我们将连接到将运行作业的工作区。
1.1 导入所需的库#
# import required libraries
from azure.identity import DefaultAzureCredential, InteractiveBrowserCredential
from azure.ai.ml import MLClient, load_component, Input, Output
from azure.ai.ml.constants import AssetTypes
from azure.ai.ml.dsl import pipeline
1.2 配置凭证#
我们正在使用DefaultAzureCredential来获取对工作区的访问权限。
DefaultAzureAzureCredential应该能够处理大多数Azure SDK认证场景。
如果这对您不起作用,请参考更多可用的凭据:configure credential example, azure-identity reference doc.
try:
    credential = DefaultAzureCredential()
    # Check if given credential can get token successfully.
    credential.get_token("https://management.azure.com/.default")
except Exception as ex:
    # Fall back to InteractiveBrowserCredential in case DefaultAzureCredential not work
    credential = InteractiveBrowserCredential()
1.3 获取工作区的句柄#
我们使用‘配置文件’来连接到您的工作区。请查看此笔记本以从Azure ML工作区门户获取您的配置文件并将其粘贴到此文件夹中。然后,如果您通过了下一个代码块,您的环境就已经设置好了。
# Get a handle to workspace
ml_client = MLClient.from_config(credential=credential)

# Retrieve an already attached Azure Machine Learning Compute.
cluster_name = "cpu-cluster"
print(ml_client.compute.get(cluster_name))
2. 作为组件的负载流#
如果您已经使用Promptflow SDK或门户编写了一个流程,您可以在流程文件夹中找到flow.dag.yaml文件。这个YAML规范对于将您的流程加载到Azure ML组件中至关重要。
备注: 要使用
load_component函数与 flow.dag.yaml 一起使用,请确保以下事项:
应在目标DAG yaml文件中定义
$schema。例如:$schema: https://azuremlschemas.azureedge.net/promptflow/latest/Flow.schema.json。必须通过验证文件‘
/.promptflow/flow.tools.json’来生成并保持流元数据的最新状态。如果该文件不存在,请运行以下命令来生成并更新它: pf flow validate --source。
flow_component = load_component("../../flows/standard/web-classification/flow.dag.yaml")
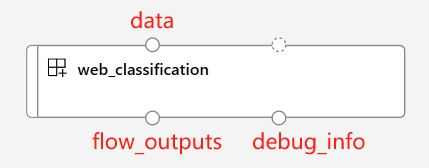
当使用load_component函数和流程YAML规范时,您的流程会自动转换为并行组件。这个并行组件专为大规模、离线、并行化处理设计,具有高效性和弹性。以下是这个自动转换组件的一些关键特性:
预定义的输入和输出端口:
端口名称 |
类型 |
描述 |
|---|---|---|
数据 |
uri_folder 或 uri_file |
接受批量数据输入到您的流程中。如果您的数据是单个文件,可以使用 |
flow_outputs |
uri_file |
生成一个名为parallel_run_step.jsonl的单一输出文件。此数据文件中的每一行对应一个表示流程返回的JSON对象,并附带一个名为line_number的额外列,指示其在原始文件中的位置。 |
debug_info |
uri_folder |
如果您在调试模式下运行您的流程组件,此端口为您每次运行的行提供调试信息。例如,步骤之间的中间输出,或LLM响应和令牌使用情况。 |
注意:
flow_outputs和debug_info输出在您使用多个节点运行 pf 组件时需要设置为mount模式作为输出模式。
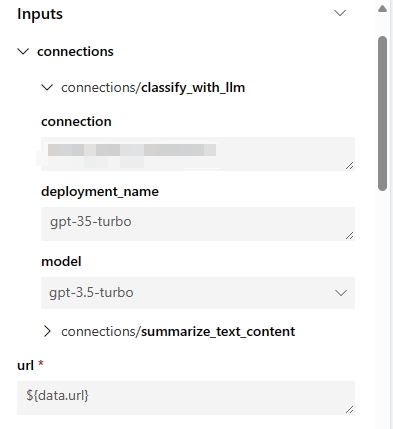
自动生成的参数
这些参数代表与您的流程步骤相关的所有流程输入和连接。您可以在流程/运行定义中设置默认值,并且它们可以在作业提交期间进一步自定义。以‘web-classification’示例流程为例,该流程只有一个名为‘url’的输入和两个LLM步骤‘summarize_text_content’和‘classify_with_llm’。此流程组件的输入参数为:
自动生成的环境
创建的组件的环境将由最新的promptflow运行时镜像继承。用户可以通过在
flow.dag.yaml中指定environment属性,并在同一流程文件夹下放置一个‘requirements.txt’文件来包含自定义包:... environment: python_requirements_txt: requirements.txt
3. 构建你的管道#
3.1 声明输入和输出#
要为您的管道提供数据,您需要使用path、type和mode属性声明一个输入。请注意:mount是文件或文件夹数据输入的默认和建议模式。
声明管道输出是可选的。但是,如果您需要在云中自定义输出路径,您可以按照以下示例在数据存储上设置路径。有关有效路径值的更多详细信息,请参阅此文档 - manage pipeline inputs outputs。
data_input = Input(
    path="../../flows/standard/web-classification/data.jsonl",
    type=AssetTypes.URI_FILE,
    mode="mount",
)

pipeline_output = Output(
    # Provide custom flow output file path if needed
    # path="azureml://datastores/<data_store_name>/paths/<path>",
    type=AssetTypes.URI_FOLDER,
    # rw_mount is suggested for flow output
    mode="rw_mount",
)
3.2.1 使用单一流程组件运行管道#
由于所有Promptflow组件都基于Azure ML并行组件,用户可以利用特定的运行设置来控制流程运行的并行化。以下是一些有用的设置:
运行设置 |
描述 |
允许的值 |
默认值 |
|---|---|---|---|
PF_INPUT_FORMAT |
当使用 |
json, jsonl, csv, tsv |
jsonl |
compute |
定义将使用Azure ML工作区中的哪个计算集群来执行此任务。 |
||
instance_count |
定义从您的计算集群中分配多少个节点给此作业。 |
从1到计算集群的节点数。 |
1 |
max_concurrency_per_instance |
定义在1个节点上并行运行流程的专用处理器数量。当与‘instance_count’设置结合使用时,流程的总并行化将为instance_count*max_concurrency_per_instance。 |
>1 |
1 |
mini_batch_size |
定义每个小批量的行数。小批量是通过并行化处理完整数据的基本粒度。每个工作处理器一次处理一个小批量,所有工作处理器在不同节点上并行工作。 |
> 0 |
1 |
max_retries |
定义如果任何小批次遇到内部异常时的重试次数。备注:重试的粒度基于小批次。例如,使用之前的设置,您可以设置每个小批次100行。当一行执行遇到暂时性问题或未处理的异常时,这100行将一起重试,即使剩下的99行是成功的。此外,在大多数情况下,状态码为429的LLM响应将在内部处理流程运行,不会触发小批次失败。 |
>= 0 |
3 |
error_threshold |
定义可以接受多少失败的行。如果失败的行数超过此阈值,作业将停止并标记为失败。设置为‘-1’以禁用此失败检查。 |
-1 或 >=0 |
-1 |
mini_batch_error_threshold |
定义了在所有重试后可以容忍的最大失败小批量数量。设置为‘-1’以禁用此失败检查。 |
-1 或 >=0 |
-1 |
logging_level |
确定并行作业如何将日志保存到磁盘。将流组件的设置设为‘DEBUG’允许该组件将中间流日志输出到‘debug_info’端口。 |
INFO, WARNING, DEBUG |
INFO |
timeout |
设置每个小批量执行的超时检查器,单位为毫秒。如果一个小批量的运行时间超过此阈值,它将被标记为失败并触发下一次重试。请根据您的小批量大小和LLM端点的总流量吞吐量考虑设置更高的值。 |
> 0 |
600 |
# Define the pipeline as a function
@pipeline()
def pipeline_func_with_flow(
    # Function inputs will be treated as pipeline input data or parameters.
    # Pipeline input could be linked to step inputs to pass data between steps.
    # Users are not required to define pipeline inputs.
    # With pipeline inputs, user can provide the different data or values when they trigger different pipeline runs.
    pipeline_input_data: Input,
    parallel_node_count: int = 1,
):
    # Declare pipeline step 'flow_node' by using flow component
    flow_node = flow_component(
        # Bind the pipeline intput data to the port 'data' of the flow component
        # If you don't have pipeline input, you can directly pass the 'data_input' object to the 'data'
        # But with this approach, you can't provide different data when you trigger different pipeline runs.
        # data=data_input,
        data=pipeline_input_data,
        # Declare which column of input data should be mapped to flow input
        # the value pattern follows ${data.<column_name_from_data_input>}
        url="${data.url}",
        # Provide the connection values of the flow component
        # The value of connection and deployment_name should align with your workspace connection settings.
        connections={
            "summarize_text_content": {
                "connection": "azure_open_ai_connection",
                "deployment_name": "gpt-35-turbo",
            },
            "classify_with_llm": {
                "connection": "azure_open_ai_connection",
                "deployment_name": "gpt-35-turbo",
            },
        },
    )

    # Provide run settings of your flow component
    # Only 'compute' is required and other setting will keep default value if not provided.
    flow_node.environment_variables = {
        "PF_INPUT_FORMAT": "jsonl",
    }
    flow_node.compute = "cpu-cluster"
    flow_node.resources = {"instance_count": parallel_node_count}
    flow_node.mini_batch_size = 5
    flow_node.max_concurrency_per_instance = 2
    flow_node.retry_settings = {
        "max_retries": 1,
        "timeout": 1200,
    }
    flow_node.error_threshold = -1
    flow_node.mini_batch_error_threshold = -1
    flow_node.logging_level = "DEBUG"

    # Function return will be treated as pipeline output. This is not required.
    return {"flow_result_folder": flow_node.outputs.flow_outputs}


# create pipeline instance
pipeline_job_def = pipeline_func_with_flow(pipeline_input_data=data_input)
pipeline_job_def.outputs.flow_result_folder = pipeline_output
将管道作业提交到您的工作区,然后通过输出中的链接在UI上检查作业的状态。
# Submit the pipeline job to your workspace
pipeline_job_run = ml_client.jobs.create_or_update(
    pipeline_job_def, experiment_name="Single_flow_component_pipeline_job"
)
pipeline_job_run

ml_client.jobs.stream(pipeline_job_run.name)
注意:
选择
mini_batch_size会显著影响流作业的效率。由于每个小批次中的行是顺序运行的,设置较高的值会增加块大小,从而减少并行化。另一方面,较大的批次大小也会增加重试的成本,因为重试是基于整个小批次的。相反,选择最低值(例如,mini_batch_size=1)可能会引入额外的开销,影响编排或结果汇总期间多个小批次的效率。因此,建议从10到100之间的值开始,然后根据您的具体需求进行微调。
max_concurrency_per_instance设置可以显著提高单个计算节点内的并行效率。然而,它也可能带来几个潜在问题:1) 增加内存耗尽的风险,2) 当同时到达的请求过多时,LLM 端点可能会遇到限流。一般来说,建议将 max_concurrency_per_instance 设置为等于计算核心数,以在并行性和资源限制之间取得平衡。
3.2.2 运行包含多个组件的复杂管道#
在一个典型的管道中,你会发现多个步骤涵盖了所有你的离线业务需求。如果你的目标是构建一个更复杂的生产管道,请探索以下资源:
各种组件类型:
此外,考虑以下示例代码,它从存储库加载两个额外的命令组件以构建单个离线管道:
data_prep_component : 这个虚拟的数据预处理步骤执行简单的数据采样。
result_parser_component: 结合源数据、流程结果和调试输出,生成一个包含原始查询、LLM预测和LLM令牌使用情况的单一文件。
# load Azure ML components
data_prep_component = load_component("./components/data-prep/data-prep.yaml")
result_parser_component = load_component(
    "./components/result-parser/result-parser.yaml"
)

# load flow as component
flow_component = load_component("../../flows/standard/web-classification/flow.dag.yaml")


@pipeline()
def pipeline_func_with_flow(pipeline_input_data):
    data_prep_node = data_prep_component(
        input_data_file=pipeline_input_data,
    )
    data_prep_node.compute = "cpu-cluster"

    flow_node = flow_component(
        # Feed the output of data_prep_node to the flow component
        data=data_prep_node.outputs.output_data_folder,
        url="${data.url}",
        connections={
            "summarize_text_content": {
                "connection": "azure_open_ai_connection",
                "deployment_name": "gpt-35-turbo",
            },
            "classify_with_llm": {
                "connection": "azure_open_ai_connection",
                "deployment_name": "gpt-35-turbo",
            },
        },
    )

    flow_node.environment_variables = {"PF_INPUT_FORMAT": "csv"}
    flow_node.compute = "cpu-cluster"
    flow_node.mini_batch_size = 5
    flow_node.max_concurrency_per_instance = 2
    flow_node.resources = {"instance_count": 1}
    flow_node.logging_level = "DEBUG"

    # set output mode to 'mount'
    # This is required for the flow component when the 'instance_count' is set higher than 1
    flow_node.outputs.flow_outputs.mode = "mount"
    flow_node.outputs.debug_info.mode = "mount"

    result_parser_node = result_parser_component(
        source_data=data_prep_node.outputs.output_data_folder,
        pf_output_data=flow_node.outputs.flow_outputs,
        pf_debug_data=flow_node.outputs.debug_info,
    )

    flow_node.retry_settings = {
        "max_retries": 1,
        "timeout": 6000,
    }

    result_parser_node.compute = "cpu-cluster"

    return {"flow_result_folder": result_parser_node.outputs.merged_data}


# create pipeline instance
pipeline_job_def = pipeline_func_with_flow(pipeline_input_data=data_input)
pipeline_job_def.outputs.flow_result_folder = pipeline_output
将管道作业提交到您的工作区,然后通过输出中的链接在UI上检查作业的状态。
# submit job to workspace
pipeline_job_run = ml_client.jobs.create_or_update(
    pipeline_job_def, experiment_name="Complex_flow_component_pipeline_job"
)
pipeline_job_run

ml_client.jobs.stream(pipeline_job_run.name)
4 下一步#
4.1 下一步 - 为您的管道设置调度器#
Azure 机器学习管道支持原生的调度器,以帮助用户通过预定义的时间触发器定期运行管道作业。以下是一个使用流组件在新创建的管道上设置调度器的代码示例。
让我们首先声明一个具有自定义重复模式的调度器。
from datetime import datetime
from azure.ai.ml.entities import JobSchedule, RecurrenceTrigger, RecurrencePattern
from azure.ai.ml.constants import TimeZone

schedule_name = "simple_sdk_create_schedule_recurrence"
schedule_start_time = datetime.utcnow()

recurrence_trigger = RecurrenceTrigger(
    frequency="day",  # could accept "hour", "minute", "day", "week", "month"
    interval=1,
    schedule=RecurrencePattern(hours=10, minutes=[0, 1]),
    start_time=schedule_start_time,
    time_zone=TimeZone.UTC,
)

job_schedule = JobSchedule(
    name=schedule_name,
    trigger=recurrence_trigger,
    # Declare the pipeline job to be scheduled. Here we uses the pipeline job created in previous example.
    create_job=pipeline_job_def,
)
要启动调度器,请按照以下示例操作:
job_schedule = ml_client.schedules.begin_create_or_update(
    schedule=job_schedule
).result()
print(job_schedule)
要查看所有预定的作业,请导航到Azure机器学习工作区UI中的作业列表页面。由调度器触发的任何作业将具有以下格式的显示名称:
要禁用或关闭正在运行的调度程序,请按照以下示例操作:
job_schedule = ml_client.schedules.begin_disable(name=schedule_name).result()
job_schedule.is_enabled
要探索有关调度Azure机器学习管道作业的更多详细信息,请访问这篇文章如何调度管道作业
4.2 下一步 - 将管道部署到端点#
Azure Machine Learning 还提供批量端点,使您能够将管道部署到端点以实现高效的操作化。如果您需要使用外部编排器(如 Azure Data Factory 或 Microsoft Fabric)为您的流管道安排调度,使用批量端点是您流管道的最佳推荐。
让我们从在您的工作区中创建一个新的批处理端点开始。
from azure.ai.ml.entities import BatchEndpoint, PipelineComponentBatchDeployment

# from azure.ai.ml.entities import ModelBatchDeployment, ModelBatchDeploymentSettings, Model, AmlCompute, Data, BatchRetrySettings, CodeConfiguration, Environment, Data
# from azure.ai.ml.constants import BatchDeploymentOutputAction


endpoint_name = "hello-my-pipeline-endpoint"
endpoint = BatchEndpoint(
    name=endpoint_name,
    description="A hello world endpoint for pipeline",
)

ml_client.batch_endpoints.begin_create_or_update(endpoint).result()
每个端点可以支持多个部署,每个部署与不同的管道相关联。在这种情况下,我们使用我们的流程管道作业启动一个新的部署,目标是最近建立的端点。
deployment = PipelineComponentBatchDeployment(
    name="my-pipeline-deployment",
    description="A hello world deployment with a pipeline job.",
    endpoint_name=endpoint.name,
    # Make sure 'pipeline_job_run' run successfully before deploying the endpoint
    job_definition=pipeline_job_run,
    settings={"default_compute": "cpu-cluster", "continue_on_step_failure": False},
)

ml_client.batch_deployments.begin_create_or_update(deployment).result()

# Refresh the default deployment to the latest one at our endpoint.
endpoint = ml_client.batch_endpoints.get(endpoint.name)
endpoint.defaults.deployment_name = deployment.name
ml_client.batch_endpoints.begin_create_or_update(endpoint).result()
使用适当的数据调用默认部署到目标端点:
batch_endpoint_job = ml_client.batch_endpoints.invoke(
    endpoint_name=endpoint.name,
    inputs={"pipeline_input_data": data_input},
)
最后,使用以下链接在工作空间UI上验证调用:
ml_client.jobs.get(batch_endpoint_job.name)
要探索有关Azure机器学习批量端点的更多详细信息,请访问这篇文章how-to-use-batch-pipeline-deployments