使用VSCode调试PySide(Linux + Windows)
VSCode 允许你在一个调试会话中使用多个调试器。 这意味着我们可以在一个会话中使用 Python PDB 和 GDB(或 Windows 的 MSVC 调试器)。 使用 VSCode,你可以做到以下几点:
查看Python和C++的调用堆栈。
在Python和C++代码中都设置断点。
从Python代码到C++代码的步骤,反之亦然。
对于Windows,请参阅创建调试版本。
让我们开始设置一切并调试一个Python进程。
设置Python解释器
为了调试Python代码,有必要在VSCode中设置正确的Python解释器 - 这将确保VSCode的所有Python集成使用相同的解释器。然而,这不会影响C++调试,并且必须为相应的启动目标单独设置Python可执行路径(请参见下面的部分)。
要设置Python解释器,请打开一个Python文件并点击VSCode状态栏右侧的相应选项,它应该看起来像这样:

或者,打开VSCode命令面板(F1或Ctrl + Shift + P)并搜索“Python: Select Interpreter”。
在launch.json中创建配置
运行 -> 添加 配置 -> Python -> Python 文件
这应该会创建一个看起来像这样的launch.json文件:
{
    // Use IntelliSense to learn about possible attributes.
    // Hover to view descriptions of existing attributes.
    // For more information, visit: https://go.microsoft.com/fwlink/?linkid=830387
    "version": "0.2.0",
    "configurations": [
        {
            "name": "Python: Current File",
            "type": "python",
            "request": "launch",
            "program": "${file}",
            "console": "integratedTerminal"
        }
    ]
}
它应该已经包含一个名为“Python: Current File”的配置, 这允许我们调试当前打开的Python文件。
现在,我们需要添加一个配置,将C++调试器附加到已经在调试模式下运行的Python进程。如果您已安装C/C++扩展并为您的系统安装了适当的调试器,VSCode应该能够自动提供添加配置的建议。在Linux上,这个建议的名称是
“C/C++: (gdb) 附加”
在Windows上,名称为
“C/C++: (Windows) 附加”
您的 launch.json 现在在 Linux 上应该看起来像这样:
{
    // Use IntelliSense to learn about possible attributes.
    // Hover to view descriptions of existing attributes.
    // For more information, visit: https://go.microsoft.com/fwlink/?linkid=830387
    "version": "0.2.0",
    "configurations": [
        {
            "name": "Python: Current File",
            "type": "python",
            "request": "launch",
            "program": "${file}",
            "console": "integratedTerminal"
        },
        {
            "name": "(gdb) Attach",
            "type": "cppdbg",
            "request": "attach",
            "program": "/path/to/python",
            "processId": "${command:pickProcess}",
            "MIMode": "gdb", "setupCommands": [
                {
                    "description": "Enable pretty-printing for gdb",
                    "text": "-enable-pretty-printing",
                    "ignoreFailures": true
                }
            ]
        }
    ]
}
在Windows上也是如此:
{
    // Use IntelliSense to learn about possible attributes.
    // Hover to view descriptions of existing attributes.
    // For more information, visit: https://go.microsoft.com/fwlink/?linkid=830387
    "version": "0.2.0",
    "configurations": [
        {
            "name": "Python: Current File",
            "type": "python",
            "request": "launch",
            "program": "${file}",
            "console": "integratedTerminal"
        },
        {
            "name": "(Windows) Attach",
            "type": "cppvsdbg",
            "request": "attach",
            "processId": "${command:pickProcess}",
        }
    ]
}
对于Linux,还要确保“program”的值指向虚拟环境中的Python解释器(对于Windows则不需要)。我们需要processId来将gdb调试器附加到进程。使用“${command:pickProcess}”,我们可以即时找到processId,稍后我们会看到。
现在,我们准备好进行调试了。
调试过程
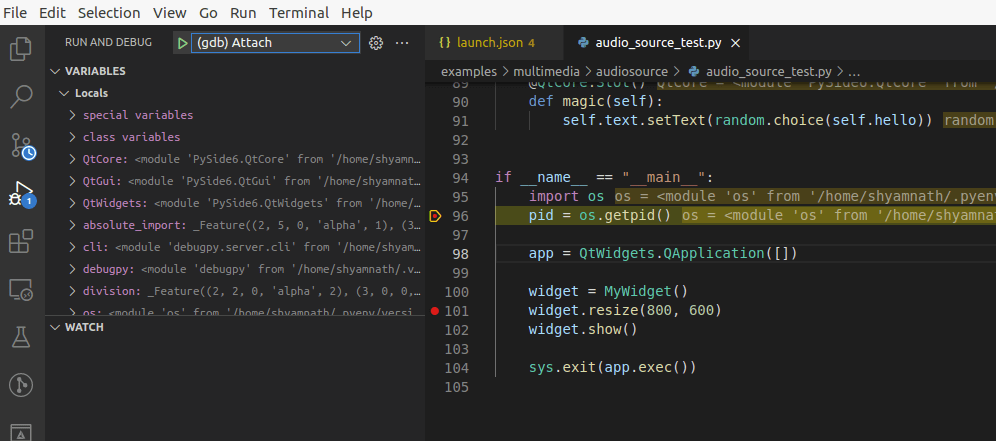
在Python代码中设置断点。
转到
运行 和 调试(Ctrl + Shift + D) 并通过点击运行符号(绿色右箭头)运行“Python: 当前文件”。这将触发断点并使Python调试器暂停。使用下拉菜单将“Python: 当前文件”更改为“(gdb) 附加”或“(Windows) 附加”。您的设置现在应该看起来像这样。
运行“(gdb) Attach”或“(Windows) Attach”,这将要求你输入要附加C++调试器的Python进程的processId。VSCode还允许你通过进程名称搜索进程。
提示
你可以通过运行
ps aux | grep python来找到processId。
VSCode 现在可能会要求您提供超级用户权限。在这种情况下,输入‘y’并输入您的密码。
需要超级用户权限来附加到进程。以超级用户身份附加可能会对您的计算机造成潜在危害。您要继续吗?
[y/N]_
就是这样。你现在应该能够命中你在C++对应部分设置的断点。
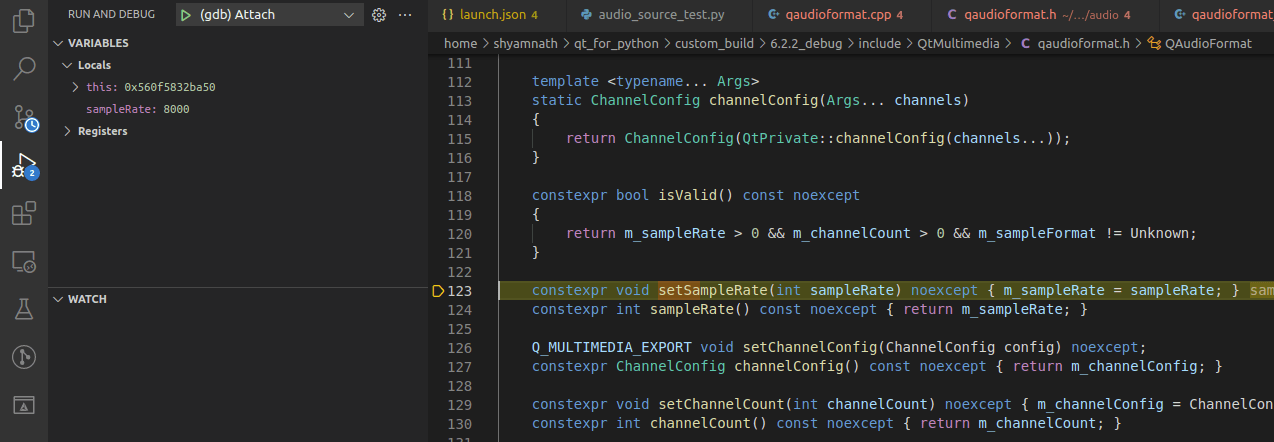
在shiboken包装类上设置的断点
在C++实现上设置的断点