财务经理教程 - 第一部分
在本教程中,我们将使用QtQuick和PySide6创建一个财务管理应用程序。该应用程序将允许您添加您的支出,并根据支出类别使用饼图进行可视化。该应用程序的设计使其兼容桌面和Android平台。

要下载本教程的完整源代码,请访问 Finance Manager Example - Part 1。
先决条件
在我们开始之前,首先确保您的Python环境中已安装Python 3.9+和PySide6。您可以使用pip进行安装:
pip install PySide6
项目设计
财务经理应用程序是一个简单的应用程序,展示了如何使用PySide6将QtQuick与Python集成,从而实现用户界面的QML和后端逻辑的Python的无缝结合。它将包含以下组件:
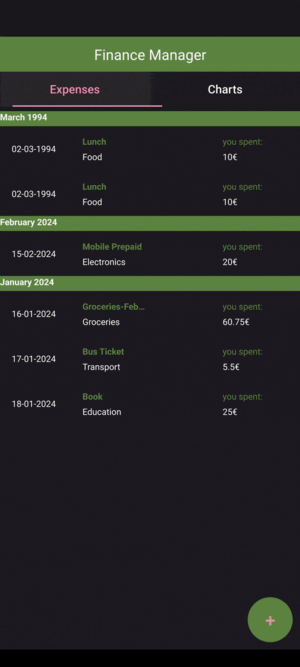
费用列表:此列表将显示所有输入的费用,显示费用名称、金额、类别和日期。费用按月份和年份组织。
PieChart: 该图表将根据类别可视化支出,为用户提供清晰的消费习惯概览。
添加支出:一个允许用户添加新支出的对话框。
整体项目结构如下:
finance_manager/
├── main.py
├── financemodel.py
├── Finance/
│   ├── Main.qml
│   ├── FinanceView.qml
│   ├── FinanceDelegate.qml
│   ├── FinancePieChart.qml
│   ├── AddDialog.qml
│   └── qmldir
让我们开始吧!
组件概述
在本教程的第一部分中,我们将从使用一些预定义的费用创建费用列表开始。为此,我们将创建一个新的Python文件financemodel.py,该文件定义了一个类FinanceModel,该类将用于从Python管理费用并将其暴露给QML。
financemodel.py
 1# Copyright (C) 2024 The Qt Company Ltd.
 2# SPDX-License-Identifier: LicenseRef-Qt-Commercial OR BSD-3-Clause
 3
 4from datetime import datetime
 5from dataclasses import dataclass
 6from enum import IntEnum
 7from collections import defaultdict
 8
 9from PySide6.QtCore import (QAbstractListModel, QEnum, Qt, QModelIndex, Slot,
10                            QByteArray)
11from PySide6.QtQml import QmlElement
12
13QML_IMPORT_NAME = "Finance"
14QML_IMPORT_MAJOR_VERSION = 1
15
16
17@QmlElement
18class FinanceModel(QAbstractListModel):
19
20    @QEnum
21    class FinanceRole(IntEnum):
22        ItemNameRole = Qt.DisplayRole
23        CategoryRole = Qt.UserRole
24        CostRole = Qt.UserRole + 1
25        DateRole = Qt.UserRole + 2
26        MonthRole = Qt.UserRole + 3
27
28    @dataclass
29    class Finance:
30        item_name: str
31        category: str
32        cost: float
33        date: str
34
35        @property
36        def month(self):
37            return datetime.strptime(self.date, "%d-%m-%Y").strftime("%B %Y")
38
39    def __init__(self, parent=None) -> None:
40        super().__init__(parent)
41        self.m_finances = []
42        self.m_finances.append(self.Finance("Mobile Prepaid", "Electronics", 20.00, "15-02-2024"))
43        self.m_finances.append(self.Finance("Groceries-Feb-Week1", "Groceries", 60.75,
44                                            "16-01-2024"))
45        self.m_finances.append(self.Finance("Bus Ticket", "Transport", 5.50, "17-01-2024"))
46        self.m_finances.append(self.Finance("Book", "Education", 25.00, "18-01-2024"))
47
48    def rowCount(self, parent=QModelIndex()):
49        return len(self.m_finances)
50
51    def data(self, index: QModelIndex, role: int):
52        row = index.row()
53        if row < self.rowCount():
54            finance = self.m_finances[row]
55            if role == FinanceModel.FinanceRole.ItemNameRole:
56                return finance.item_name
57            if role == FinanceModel.FinanceRole.CategoryRole:
58                return finance.category
59            if role == FinanceModel.FinanceRole.CostRole:
60                return finance.cost
61            if role == FinanceModel.FinanceRole.DateRole:
62                return finance.date
63            if role == FinanceModel.FinanceRole.MonthRole:
64                return finance.month
65        return None
66
67    @Slot(result=dict)
68    def getCategoryData(self):
69        category_data = defaultdict(float)
70        for finance in self.m_finances:
71            category_data[finance.category] += finance.cost
72        return dict(category_data)
73
74    def roleNames(self):
75        roles = super().roleNames()
76        roles[FinanceModel.FinanceRole.ItemNameRole] = QByteArray(b"item_name")
77        roles[FinanceModel.FinanceRole.CategoryRole] = QByteArray(b"category")
78        roles[FinanceModel.FinanceRole.CostRole] = QByteArray(b"cost")
79        roles[FinanceModel.FinanceRole.DateRole] = QByteArray(b"date")
80        roles[FinanceModel.FinanceRole.MonthRole] = QByteArray(b"month")
81        return roles
82
83    @Slot(int, result='QVariantMap')
84    def get(self, row: int):
85        finance = self.m_finances[row]
86        return {"item_name": finance.item_name, "category": finance.category,
87                "cost": finance.cost, "date": finance.date}
88
89    @Slot(str, str, float, str)
90    def append(self, item_name: str, category: str, cost: float, date: str):
91        finance = self.Finance(item_name, category, cost, date)
92        self.beginInsertRows(QModelIndex(), 0, 0)  # Insert at the front
93        self.m_finances.insert(0, finance)  # Insert at the front of the list
94        self.endInsertRows()
以下是FinanceModel类、其组件和方法的简要概述:
QML 类型注册
FinanceModel类使用@QmlElement装饰器注册为 QML 类型。此装饰器用于将 Python 类定义为 QML 类型,使其可以在 QML 文件中使用。QML_IMPORT_NAME变量用于定义在 QML 中导入以访问FinanceModel类的模块名称。
成员
FinanceRole 枚举: 定义模型数据的自定义角色,例如
ItemNameRole,CategoryRole,CostRole,DateRole和MonthRole.Finance 数据类: 表示一个单独的支出,具有属性
item_name,category,cost,date和month.init 方法: 使用一些预定义的支出初始化模型。
rowCount 方法: 返回模型中项目的数量。
data 方法: 返回模型中给定角色和索引的数据。
getCategoryData 方法: 返回模型中每个类别的总成本的字典。此方法具有
@Slot装饰器,使其可以从 QML 访问。roleNames 方法: 将角色名称映射到它们的
QByteArray值。get 方法: 一个
@Slot方法,用于获取给定索引的支出数据。append 方法: 一个
@Slot方法,用于向模型追加新的支出。
为了在QML中的ListView组件中用作数据模型,需要rowCount、data和roleNames方法。
既然我们已经定义了FinanceModel类,让我们创建QML组件来显示支出。首先,我们创建Finance/Main.qml文件,它将是我们应用程序的主QML文件。
Main.qml
  1// Copyright (C) 2024 The Qt Company Ltd.
  2// SPDX-License-Identifier: LicenseRef-Qt-Commercial OR BSD-3-Clause
  3
  4import QtQuick
  5import QtQuick.Controls
  6import QtQuick.Layouts
  7import QtQuick.Controls.Material
  8import Finance
  9
 10ApplicationWindow {
 11    id: window
 12    Material.theme: Material.Dark
 13    Material.accent: Material.Gray
 14    width: Screen.width * 0.3
 15    height: Screen.height * 0.5
 16    visible: true
 17    title: qsTr("Finance Manager")
 18
 19    // Add a toolbar for the application, only visible on mobile
 20    header: ToolBar {
 21        Material.primary: "#5c8540"
 22        visible: Qt.platform.os == "android"
 23        RowLayout {
 24            anchors.fill: parent
 25            Label {
 26                text: qsTr("Finance Manager")
 27                font.pixelSize: 20
 28                Layout.alignment: Qt.AlignCenter
 29            }
 30        }
 31    }
 32
 33    ColumnLayout {
 34        anchors.fill: parent
 35
 36        TabBar {
 37            id: tabBar
 38            Layout.fillWidth: true
 39
 40            TabButton {
 41                text: qsTr("Expenses")
 42                font.pixelSize: Qt.platform.os == "android" ?
 43                    Math.min(window.width, window.height) * 0.04 :
 44                    Math.min(window.width, window.height) * 0.02
 45                onClicked: stackView.currentIndex = 0
 46            }
 47
 48            TabButton {
 49                text: qsTr("Charts")
 50                font.pixelSize: Qt.platform.os == "android" ?
 51                    Math.min(window.width, window.height) * 0.04 :
 52                    Math.min(window.width, window.height) * 0.02
 53                onClicked: stackView.currentIndex = 1
 54            }
 55        }
 56
 57        StackLayout {
 58            id: stackView
 59            Layout.fillWidth: true
 60            Layout.fillHeight: true
 61
 62            Item {
 63                id: expensesView
 64                Layout.fillWidth: true
 65                Layout.fillHeight: true
 66
 67                FinanceView {
 68                    id: financeView
 69                    anchors.fill: parent
 70                    financeModel: finance_model
 71                }
 72            }
 73
 74            Item {
 75                id: chartsView
 76                Layout.fillWidth: true
 77                Layout.fillHeight: true
 78
 79                FinancePieChart {
 80                    id: financePieChart
 81                    anchors.fill: parent
 82                    Component.onCompleted: {
 83                        var categoryData = finance_model.getCategoryData()
 84                        updateChart(categoryData)
 85                    }
 86                }
 87            }
 88        }
 89    }
 90
 91    // Model to store the finance data. Created from Python.
 92    FinanceModel {
 93        id: finance_model
 94    }
 95
 96    // Add a dialog to add new entries
 97    AddDialog {
 98        id: addDialog
 99        onFinished: function(item_name, category, cost, date) {
100            finance_model.append(item_name, category, cost, date)
101            var categoryData = finance_model.getCategoryData()
102            financePieChart.updateChart(categoryData)
103        }
104    }
105
106    // Add a button to open the dialog
107    ToolButton {
108        id: roundButton
109        text: qsTr("+")
110        highlighted: true
111        Material.elevation: 6
112        width: Qt.platform.os === "android" ?
113            Math.min(parent.width * 0.2, Screen.width * 0.15) :
114            Math.min(parent.width * 0.060, Screen.width * 0.05)
115        height: width  // Keep the button circular
116        anchors.margins: 10
117        anchors.right: parent.right
118        anchors.bottom: parent.bottom
119        background: Rectangle {
120            color: "#5c8540"
121            radius: roundButton.width / 2
122        }
123        font.pixelSize: width * 0.4
124        onClicked: {
125            addDialog.createEntry()
126        }
127    }
128}
在Main.qml中,我们导入了创建的Finance QML模块文件,该文件包含以下组件:
ApplicationWindow:
应用程序的主窗口。
将主题设置为
Material.Dark并将强调色设置为Material.Gray。根据屏幕尺寸调整窗口大小。
包含标题“Finance Manager”。
工具栏:
一个仅在移动平台(Android 和 iOS)上可见的工具栏。请注意,PySide6 仅支持 Android,但您可以使用相同的代码与 Qt C++ 用于 iOS。
包含一个带有文本“Finance Manager”的
标签。
ColumnLayout:
一种将其子元素排列成一列的布局。
填满整个窗口。
TabBar:
包含两个
TabButton组件,用于在Expense和Charts视图之间切换。
StackLayout:
一种布局,将其子元素堆叠在一起。
包含两个
Item组件,用于“Expenses”和“Charts”视图。
FinanceView:
一个自定义组件,用于显示支出列表。
绑定到
finance_model。该组件定义在
FinanceView.qml文件中。
FinancePieChart:
一个自定义组件,用于按类别显示支出的饼图。
当组件完成时,使用
finance_model.getCategoryData()中的数据更新图表。该组件定义在
FinancePieChart.qml文件中。
FinanceModel:
从Python创建的数据模型,用于存储财务数据。这是通过在
Main.qml文件中导入QML模块Finance来实现的。
AddDialog:
用于添加新支出条目的对话框。
将新条目附加到
finance_model并更新饼图。
RoundButton:
一个圆形按钮,用于打开
AddDialog.qml。位于窗口的右下角。
包含一个“+”符号,并具有高亮外观。
现在我们有了主QML文件的基本结构,让我们创建FinanceView.qml文件:
FinanceView.qml
 1// Copyright (C) 2024 The Qt Company Ltd.
 2// SPDX-License-Identifier: LicenseRef-Qt-Commercial OR BSD-3-Clause
 3
 4import QtQuick
 5import QtQuick.Controls
 6import QtQuick.Controls.Material
 7
 8ListView {
 9    id: listView
10    anchors.fill: parent
11    height: parent.height
12    property var financeModel
13
14    delegate: FinanceDelegate {
15        id: delegate
16        width: listView.width
17    }
18
19    model: financeModel
20
21    section.property: "month"  // Group items by the "month" property
22    section.criteria: ViewSection.FullString
23    section.delegate: Component {
24        id: sectionHeading
25        Rectangle {
26            width: listView.width
27            height:  Qt.platform.os == "android" ?
28                Math.min(window.width, window.height) * 0.05 :
29                Math.min(window.width, window.height) * 0.03
30            color: "#5c8540"
31
32            required property string section
33
34            Text {
35                text: parent.section
36                font.bold: true
37                // depending on the screen density, adjust the font size
38                font.pixelSize: Qt.platform.os == "android" ?
39                    Math.min(window.width, window.height) * 0.03 :
40                    Math.min(window.width, window.height) * 0.02
41                color: Material.primaryTextColor
42            }
43        }
44    }
45
46    ScrollBar.vertical: ScrollBar { }
47}
FinanceView.qml 包含以下组件:
ListView:
用于显示项目列表的主要容器。
使用
anchors.fill: parent填充整个父容器。使用
financeModel属性作为其数据模型。
property var financeModel:
一个属性,用于保存列表的数据模型。
这个模型预期从父组件传递过来。在这种情况下,它是从
Main.qml文件传递过来的。
delegate:
定义如何在
ListView中显示每个项目。使用自定义组件
FinanceDelegate来渲染每个项目。该组件在FinanceDelegate.qml文件中定义。设置每个委托的宽度以匹配
ListView的宽度。
model:
将
ListView绑定到financeModel属性。ListView将根据financeModel中的数据显示项目。
section:
section 属性用于根据支出的月份对列表视图中的项目进行分组。
ScrollBar.vertical:
向
ListView添加垂直滚动条。确保如果内容超出可见区域,用户可以滚动列表。
这些组件共同创建了一个可滚动的列表视图,用于显示财务数据,每个项目都使用FinanceDelegate组件进行渲染。
接下来,让我们创建FinanceDelegate.qml文件:
FinanceDelegate.qml
 1// Copyright (C) 2024 The Qt Company Ltd.
 2// SPDX-License-Identifier: LicenseRef-Qt-Commercial OR BSD-3-Clause
 3
 4import QtQuick
 5import QtQuick.Layouts
 6import QtQuick.Controls
 7import QtQuick.Controls.Material
 8
 9ItemDelegate {
10    id: delegate
11    checkable: true
12    width: parent.width
13    height: Qt.platform.os == "android" ?
14        Math.min(window.width, window.height) * 0.15 :
15        Math.min(window.width, window.height) * 0.1
16
17    contentItem:
18    RowLayout {
19        Label {
20            id: dateLabel
21            font.pixelSize: Qt.platform.os == "android" ?
22                Math.min(window.width, window.height) * 0.03 :
23                Math.min(window.width, window.height) * 0.02
24            text: date
25            elide: Text.ElideRight
26            Layout.fillWidth: true
27            Layout.preferredWidth: 1
28            color: Material.primaryTextColor
29        }
30
31        ColumnLayout {
32            spacing: 5
33            Layout.fillWidth: true
34            Layout.preferredWidth: 1
35
36            Label {
37                text: item_name
38                color: "#5c8540"
39                font.bold: true
40                elide: Text.ElideRight
41                font.pixelSize:  Qt.platform.os == "android" ?
42                    Math.min(window.width, window.height) * 0.03 :
43                    Math.min(window.width, window.height) * 0.02
44                Layout.fillWidth: true
45            }
46
47            Label {
48                text: category
49                elide: Text.ElideRight
50                Layout.fillWidth: true
51                font.pixelSize:  Qt.platform.os == "android" ?
52                    Math.min(window.width, window.height) * 0.03 :
53                    Math.min(window.width, window.height) * 0.02
54            }
55        }
56
57        Item {
58        Layout.fillWidth: true  // This item will take up the remaining space
59        }
60
61        ColumnLayout {
62            spacing: 5
63            Layout.fillWidth: true
64            Layout.preferredWidth: 1
65
66            Label {
67                text: "you spent:"
68                color: "#5c8540"
69                elide: Text.ElideRight
70                Layout.fillWidth: true
71                font.pixelSize:  Qt.platform.os == "android" ?
72                    Math.min(window.width, window.height) * 0.03 :
73                    Math.min(window.width, window.height) * 0.02
74            }
75
76            Label {
77                text: cost + "€"
78                elide: Text.ElideRight
79                Layout.fillWidth: true
80                font.pixelSize:  Qt.platform.os == "android" ?
81                    Math.min(window.width, window.height) * 0.03 :
82                    Math.min(window.width, window.height) * 0.02
83            }
84        }
85    }
86}
FinanceDelegate.qml 包含以下组件:
ItemDelegate:
委托的根元素。
表示
ListView中的单个项目。
RowLayout:
一种将其子元素水平排列的布局。
包含多个元素以显示财务数据的不同部分。
标签 (dateLabel):
显示费用的日期。
ColumnLayout:
一种将其子元素垂直排列的布局。
包含项目名称和类别的标签。
标签 (item_name):
显示项目的名称。
标签(类别):
显示交易的类别。
项目:
一个占位符项目,用于占据
RowLayout中的剩余空间,以便最后一个标签右对齐。
ColumnLayout(成本部分):
一种将其子元素垂直排列的布局。
包含成本描述和实际成本的标签。
标签 (“you spent:”):
显示静态文本 “you spent:”
标签(成本):
显示交易的成本。
这些组件共同创建了一个详细且结构化的视觉表示,用于在ListView中展示每笔财务交易,以可读的格式显示日期、项目名称、类别和成本。
然后我们创建FinancePieChart.qml文件:
FinancePieChart.qml
 1// Copyright (C) 2024 The Qt Company Ltd.
 2// SPDX-License-Identifier: LicenseRef-Qt-Commercial OR BSD-3-Clause
 3
 4pragma ComponentBehavior: Bound
 5import QtQuick
 6import QtGraphs
 7import QtQuick.Controls.Material
 8
 9Item {
10    width: Screen.width
11    height: Screen.height
12
13    GraphsView {
14        id: chart
15        anchors.fill: parent
16        antialiasing: true
17
18        theme: GraphsTheme {
19            colorScheme: Qt.Dark
20            theme: GraphsTheme.Theme.QtGreenNeon
21        }
22
23        PieSeries {
24            id: pieSeries
25        }
26    }
27
28    Text {
29        id: chartTitle
30        text: "Total Expenses Breakdown by Category"
31        color: "#5c8540"
32        font.pixelSize: Qt.platform.os == "android" ?
33            Math.min(window.width, window.height) * 0.04 :
34            Math.min(window.width, window.height) * 0.03
35        anchors.horizontalCenter: parent.horizontalCenter
36        anchors.top: parent.top
37        anchors.topMargin: 20
38    }
39
40    function updateChart(data) {
41        pieSeries.clear()
42        for (var category in data) {
43            var slice = pieSeries.append(category, data[category])
44            slice.label = category + ": " + data[category] + "€"
45            slice.labelVisible = true
46        }
47    }
48}
FinancePieChart.qml 包含以下组件:
项目:
QML文件的根元素。
设置宽度和高度以匹配屏幕尺寸。
GraphsView:
用于显示图表的容器。这是在Qt 6.8中引入的,带有Qt Graphs模块。
PieSeries:
用于创建饼图的系列类型。这也是Qt Graphs模块的一部分。
文本
饼图的标题。
updateChart(data):
一个用于用新数据更新饼图的JavaScript函数。
清除PieSeries中现有的切片。
遍历提供的数据以创建新的切片。
每个切片都标有类别名称和以欧元表示的值。
这些组件共同创建了一个响应式饼图,可以使用新数据动态更新。
最后,我们创建AddDialog.qml文件:
AddDialog.qml
  1// Copyright (C) 2024 The Qt Company Ltd.
  2// SPDX-License-Identifier: LicenseRef-Qt-Commercial OR BSD-3-Clause
  3
  4import QtQuick
  5import QtQuick.Controls
  6import QtQuick.Layouts
  7
  8Dialog {
  9    id: dialog
 10
 11    signal finished(string itemName, string category, real cost, string date)
 12
 13    contentItem: ColumnLayout {
 14        id: form
 15        spacing: 10
 16        property alias itemName: itemName
 17        property alias category: category
 18        property alias cost: cost
 19        property alias date: date
 20
 21        GridLayout {
 22            columns: 2
 23            columnSpacing: 20
 24            rowSpacing: 10
 25            Layout.fillWidth: true
 26
 27            Label {
 28                text: qsTr("Item Name:")
 29                Layout.alignment: Qt.AlignLeft | Qt.AlignBaseline
 30            }
 31
 32            TextField {
 33                id: itemName
 34                focus: true
 35                Layout.fillWidth: true
 36                Layout.alignment: Qt.AlignLeft | Qt.AlignBaseline
 37            }
 38
 39            Label {
 40                text: qsTr("Category:")
 41                Layout.alignment: Qt.AlignLeft | Qt.AlignBaseline
 42            }
 43
 44            TextField {
 45                id: category
 46                focus: true
 47                Layout.fillWidth: true
 48                Layout.alignment: Qt.AlignLeft | Qt.AlignBaseline
 49            }
 50
 51            Label {
 52                text: qsTr("Cost:")
 53                Layout.alignment: Qt.AlignLeft | Qt.AlignBaseline
 54            }
 55
 56            TextField {
 57                id: cost
 58                focus: true
 59                Layout.fillWidth: true
 60                Layout.alignment: Qt.AlignLeft | Qt.AlignBaseline
 61                placeholderText: qsTr("€")
 62                inputMethodHints: Qt.ImhFormattedNumbersOnly
 63            }
 64
 65            Label {
 66                text: qsTr("Date:")
 67                Layout.alignment: Qt.AlignLeft | Qt.AlignBaseline
 68            }
 69
 70            TextField {
 71                id: date
 72                Layout.fillWidth: true
 73                Layout.alignment: Qt.AlignLeft | Qt.AlignBaseline
 74                // placeholderText: qsTr("dd-mm-yyyy")
 75                validator: RegularExpressionValidator { regularExpression: /^[0-3]?\d-[01]?\d-\d{4}$/ }
 76                // code to add the - automatically
 77                onTextChanged: {
 78                    if (date.text.length === 2 || date.text.length === 5) {
 79                        date.text += "-"
 80                    }
 81                }
 82                Component.onCompleted: {
 83                var today = new Date();
 84                var day = String(today.getDate()).padStart(2, '0');
 85                var month = String(today.getMonth() + 1).padStart(2, '0'); // Months are zero-based
 86                var year = today.getFullYear();
 87                date.placeholderText = day + "-" + month + "-" + year;
 88                }
 89            }
 90        }
 91    }
 92
 93    function createEntry() {
 94        form.itemName.clear()
 95        form.category.clear()
 96        form.cost.clear()
 97        form.date.clear()
 98        dialog.title = qsTr("Add Finance Item")
 99        dialog.open()
100    }
101
102    x: parent.width / 2 - width / 2
103    y: parent.height / 2 - height / 2
104
105    focus: true
106    modal: true
107    title: qsTr("Add Finance Item")
108    standardButtons: Dialog.Ok | Dialog.Cancel
109
110    Component.onCompleted: {
111        dialog.visible = false
112        Qt.inputMethod.visibleChanged.connect(adjustDialogPosition)
113    }
114
115    function adjustDialogPosition() {
116        if (Qt.inputMethod.visible) {
117            // If the keyboard is visible, move the dialog up
118            dialog.y = parent.height / 4 - height / 2
119        } else {
120            // If the keyboard is not visible, center the dialog
121            dialog.y = parent.height / 2 - height / 2
122        }
123    }
124
125    onAccepted: {
126        finished(form.itemName.text, form.category.text, parseFloat(form.cost.text), form.date.text)
127    }
128}
AddDialog.qml 包含以下组件:
对话框:
对话框的根元素:对话框的标识符。
signal finished(...): 当对话框被接受时发出的自定义信号。在这种情况下,当用户添加新费用时发出。
ColumnLayout:
对话框字段的容器。
TextField:
输入项目名称、类别、成本和日期的输入字段。
函数
createEntry():清除表单字段。
设置对话框标题。
打开对话框。
对话框属性:
title: qsTr("添加 财务 项目"): 设置对话框标题。standardButtons: Dialog.Ok | Dialog.Cancel: 添加标准的确定和取消按钮。Component.onCompleted: 当组件首次完成时隐藏对话框。onAccepted: 当对话框被接受时,调用finished函数并传递表单数据。
函数
adjustDialogPosition:当虚拟键盘显示时,调整对话框位置使其稍微上移。这仅适用于移动平台。
主Python文件
现在我们已经创建了主QML文件和必要的组件,我们可以运行应用程序来查看费用列表视图的实际效果。创建一个新的Python文件main.py并添加以下代码:
main.py
# Copyright (C) 2024 The Qt Company Ltd.
# SPDX-License-Identifier: LicenseRef-Qt-Commercial OR BSD-3-Clause

import sys
from pathlib import Path
from PySide6.QtWidgets import QApplication
from PySide6.QtQml import QQmlApplicationEngine

from financemodel import FinanceModel  # noqa: F401

if __name__ == '__main__':
    app = QApplication(sys.argv)
    QApplication.setOrganizationName("QtProject")
    QApplication.setApplicationName("Finance Manager")
    engine = QQmlApplicationEngine()

    engine.addImportPath(Path(__file__).parent)
    engine.loadFromModule("Finance", "Main")

    if not engine.rootObjects():
        sys.exit(-1)

    exit_code = app.exec()
    del engine
    sys.exit(exit_code)
在main.py文件中,我们创建了一个QApplication实例,加载了Main.qml文件。Python的导入语句from financemodel import FinanceModel将FinanceModel类注册为QML类型,使其可以在QML文件中使用。
运行应用程序
要运行应用程序,请使用Python执行main.py文件:
python main.py
部署应用程序
要在桌面上部署应用程序,您可以使用pyside6-deploy: the deployment tool for Qt for Python工具。从项目目录运行以下命令:
pyside6-deploy --name FinanceManager
这将在项目目录中为应用程序创建一个独立的可执行文件。
要部署到Android,你可以使用pyside6-android-deploy: the Android deployment tool for Qt for Python工具。从项目目录运行以下命令:
pyside6-android-deploy --name FinanceManager --wheel-pyside=<path_to_pyside6_wheel>
                       --wheel-shiboken=<path_to_shiboken_wheel>
这将在项目目录中创建一个可以在Android设备上安装的APK文件。
总结
在本教程的这一部分中,我们创建了一个基本的财务管理应用程序,包括按月份和年份分类的支出列表视图、饼图以及添加支出对话框。我们还定义了FinanceModel类,用于管理财务数据并将其暴露给QML。在教程的下一部分中,我们将继续在此基础上,将支出数据移动到基于sqlalchemy Python包的数据库中。