基础概念
本教程将引导您了解Airflow的一些基本概念、对象,以及在编写第一个DAG时的使用方法。
示例流水线定义
这是一个基础流水线定义的示例。如果看起来复杂请不要担心,下面会有逐行解释。
import textwrap
from datetime import datetime, timedelta

# The DAG object; we'll need this to instantiate a DAG
from airflow.models.dag import DAG

# Operators; we need this to operate!
from airflow.operators.bash import BashOperator
with DAG(
"tutorial",
# These args will get passed on to each operator
# You can override them on a per-task basis during operator initialization
default_args={
    "depends_on_past": False,
    "email": ["airflow@example.com"],
    "email_on_failure": False,
    "email_on_retry": False,
    "retries": 1,
    "retry_delay": timedelta(minutes=5),
    # 'queue': 'bash_queue',
    # 'pool': 'backfill',
    # 'priority_weight': 10,
    # 'end_date': datetime(2016, 1, 1),
    # 'wait_for_downstream': False,
    # 'sla': timedelta(hours=2),
    # 'execution_timeout': timedelta(seconds=300),
    # 'on_failure_callback': some_function, # or list of functions
    # 'on_success_callback': some_other_function, # or list of functions
    # 'on_retry_callback': another_function, # or list of functions
    # 'sla_miss_callback': yet_another_function, # or list of functions
    # 'on_skipped_callback': another_function, #or list of functions
    # 'trigger_rule': 'all_success'
},
description="A simple tutorial DAG",
schedule=timedelta(days=1),
start_date=datetime(2021, 1, 1),
catchup=False,
tags=["example"],
) as dag:
# t1, t2 and t3 are examples of tasks created by instantiating operators
t1 = BashOperator(
task_id="print_date",
bash_command="date",
)
t2 = BashOperator(
task_id="sleep",
depends_on_past=False,
bash_command="sleep 5",
retries=3,
)
t1.doc_md = textwrap.dedent(
"""\
#### Task Documentation
You can document your task using the attributes `doc_md` (markdown),
`doc` (plain text), `doc_rst`, `doc_json`, `doc_yaml` which gets
rendered in the UI's Task Instance Details page.

**Image Credit:** Randall Munroe, [XKCD](https://xkcd.com/license.html)
"""
)
dag.doc_md = __doc__ # providing that you have a docstring at the beginning of the DAG; OR
dag.doc_md = """
This is a documentation placed anywhere
""" # otherwise, type it like this
templated_command = textwrap.dedent(
"""
{% for i in range(5) %}
echo "{{ ds }}"
echo "{{ macros.ds_add(ds, 7)}}"
{% endfor %}
"""
)
t3 = BashOperator(
task_id="templated",
depends_on_past=False,
bash_command=templated_command,
)
t1 >> [t2, t3]
这是一个DAG定义文件
需要理解的一点是(可能一开始对某些人来说不太直观),这个Airflow Python脚本实际上只是一个用代码指定DAG结构的配置文件。这里定义的实际任务将在与脚本不同的上下文中运行。不同的任务在不同的时间点由不同的工作节点执行,这意味着该脚本不能用于任务间的交叉通信。请注意,为此我们有一个更高级的功能叫XComs。
人们有时会误以为DAG定义文件可以用于实际的数据处理——事实并非如此! 该脚本的目的是定义一个DAG对象。它需要快速执行(以秒计,而非分钟),因为调度程序会定期执行它以反映可能的更改。
导入模块
Airflow管道只是一个定义了Airflow DAG对象的Python脚本。让我们从导入所需的库开始。
import textwrap
from datetime import datetime, timedelta
# The DAG object; we'll need this to instantiate a DAG
from airflow.models.dag import DAG
# Operators; we need this to operate!
from airflow.operators.bash import BashOperator
有关Python和Airflow如何管理模块的详细信息,请参阅模块管理。
默认参数
我们将要创建一个DAG和一些任务,可以选择显式地将一组参数传递给每个任务的构造函数(这会变得冗余),或者(更好的做法!)我们可以定义一个默认参数字典,在创建任务时使用。
# These args will get passed on to each operator
# You can override them on a per-task basis during operator initialization
default_args={
"depends_on_past": False,
"email": ["airflow@example.com"],
"email_on_failure": False,
"email_on_retry": False,
"retries": 1,
"retry_delay": timedelta(minutes=5),
# 'queue': 'bash_queue',
# 'pool': 'backfill',
# 'priority_weight': 10,
# 'end_date': datetime(2016, 1, 1),
# 'wait_for_downstream': False,
# 'sla': timedelta(hours=2),
# 'execution_timeout': timedelta(seconds=300),
# 'on_failure_callback': some_function, # or list of functions
# 'on_success_callback': some_other_function, # or list of functions
# 'on_retry_callback': another_function, # or list of functions
# 'sla_miss_callback': yet_another_function, # or list of functions
# 'on_skipped_callback': another_function, #or list of functions
# 'trigger_rule': 'all_success'
},
有关BaseOperator参数及其作用的更多信息,
请参阅airflow.models.baseoperator.BaseOperator文档。
另外需要注意的是,您可以轻松定义不同的参数集以满足不同需求。例如,可以在生产环境和开发环境之间设置不同的配置。
实例化一个DAG
我们需要一个DAG对象来嵌套我们的任务。这里我们传递一个字符串来定义dag_id,它作为DAG的唯一标识符。我们还传递了刚才定义的默认参数字典,并为DAG定义了1天的schedule。
with DAG(
    "tutorial",
    # These args will get passed on to each operator
    # You can override them on a per-task basis during operator initialization
    default_args={
        "depends_on_past": False,
        "email": ["airflow@example.com"],
        "email_on_failure": False,
        "email_on_retry": False,
        "retries": 1,
        "retry_delay": timedelta(minutes=5),
        # 'queue': 'bash_queue',
        # 'pool': 'backfill',
        # 'priority_weight': 10,
        # 'end_date': datetime(2016, 1, 1),
        # 'wait_for_downstream': False,
        # 'sla': timedelta(hours=2),
        # 'execution_timeout': timedelta(seconds=300),
        # 'on_failure_callback': some_function, # or list of functions
        # 'on_success_callback': some_other_function, # or list of functions
        # 'on_retry_callback': another_function, # or list of functions
        # 'sla_miss_callback': yet_another_function, # or list of functions
        # 'on_skipped_callback': another_function, #or list of functions
        # 'trigger_rule': 'all_success'
    },
    description="A simple tutorial DAG",
    schedule=timedelta(days=1),
    start_date=datetime(2021, 1, 1),
    catchup=False,
    tags=["example"],
) as dag:
操作符
操作符(operator)定义了Airflow需要完成的工作单元。使用操作符是在Airflow中定义工作的经典方法。对于某些使用场景,更好的做法是使用TaskFlow API在Python环境中定义工作,如Working with TaskFlow所述。目前,使用操作符有助于在我们的DAG代码中可视化任务依赖关系。
所有操作器都继承自BaseOperator,它包含了在Airflow中运行工作所需的所有参数。在此基础上,每个操作器还包含针对其完成工作类型的独特参数。一些最常用的操作器包括PythonOperator、BashOperator和KubernetesPodOperator。
Airflow根据传递给操作器的参数来完成工作。在本教程中,我们使用BashOperator来运行一些bash脚本。
任务
要在DAG中使用操作符,您需要将其实例化为任务。任务决定了如何在DAG上下文中执行操作符的工作。
在以下示例中,我们将BashOperator实例化为两个独立的任务,以运行两个不同的bash脚本。每次实例化的第一个参数task_id作为该任务的唯一标识符。
t1 = BashOperator(
    task_id="print_date",
    bash_command="date",
)

t2 = BashOperator(
    task_id="sleep",
    depends_on_past=False,
    bash_command="sleep 5",
    retries=3,
)
注意我们如何向操作符的构造函数传递操作符特定参数(bash_command)和从BaseOperator继承的通用参数(retries)的组合。这比每次构造函数调用传递所有参数更简单。另外,注意在第二个任务中我们用3覆盖了retries参数。
任务的优先级规则如下:
显式传递的参数
存在于
default_args字典中的值操作符的默认值(如果存在)
注意
任务必须包含或继承参数task_id和owner,
否则Airflow会抛出异常。新安装的Airflow会
将owner的默认值设为'airflow',因此您实际上只需要
确保task_id有值即可。
使用Jinja模板
Airflow 利用 Jinja 模板的强大功能,为 流水线开发者 提供了一系列内置参数和宏。Airflow 还允许 流水线开发者通过钩子定义自己的参数、宏和 模板。
本教程仅浅显地介绍了Airflow模板功能的冰山一角,但本节的目标是让您了解这一特性的存在,熟悉双大括号的用法,并指出最常用的模板变量:{{ ds }}(今天的"日期戳")。
templated_command = textwrap.dedent(
    """
{% for i in range(5) %}
    echo "{{ ds }}"
    echo "{{ macros.ds_add(ds, 7)}}"
{% endfor %}
"""
)

t3 = BashOperator(
    task_id="templated",
    depends_on_past=False,
    bash_command=templated_command,
)
注意templated_command中包含位于{% %}代码块中的逻辑,
引用了类似{{ ds }}的参数,并调用了如
{{ macros.ds_add(ds, 7)}}的函数。
文件也可以传递给bash_command参数,例如
bash_command='templated_command.sh',其中文件位置相对于
包含流水线文件的目录(本例中为tutorial.py)。这样做
可能出于多种原因,比如分离脚本逻辑和
流水线代码,允许在不同语言编写的文件中实现正确的代码高亮,以及在构建流水线时提供
更大的灵活性。还可以在DAG构造函数调用中将
template_searchpath定义为指向任何文件夹位置。
通过相同的DAG构造函数调用,可以定义user_defined_macros来允许您指定自己的变量。
例如,将dict(foo='bar')传递给此参数后,您就可以
在模板中使用{{ foo }}。此外,指定
user_defined_filters允许您注册自己的过滤器。例如,
传递dict(hello=lambda name: 'Hello %s' % name)给此参数后,
您就可以在模板中使用{{ 'world' | hello }}。如需了解更多
关于自定义过滤器的信息,请参阅
Jinja文档。
要了解更多关于模板中可以引用的变量和宏的信息,请务必阅读Templates reference。
添加DAG和任务文档
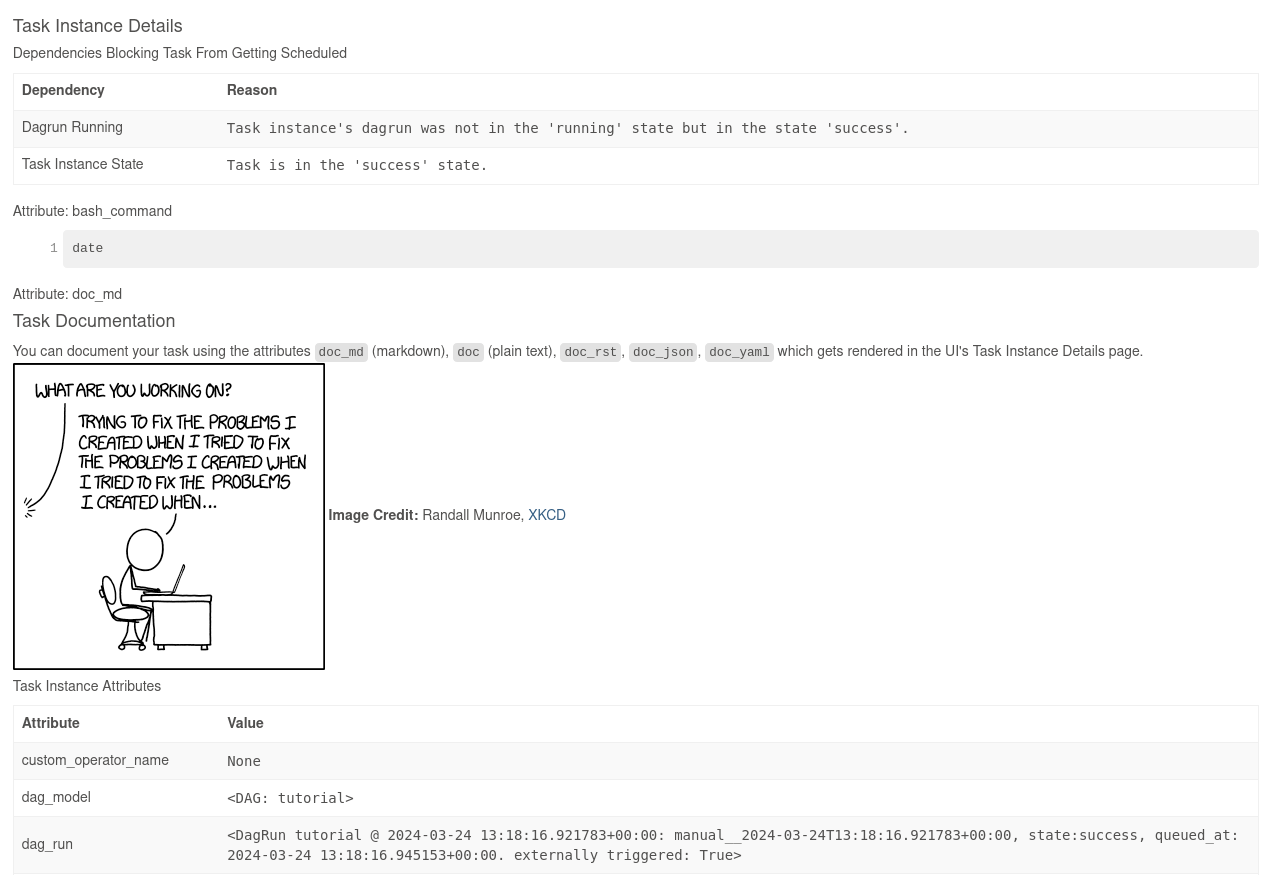
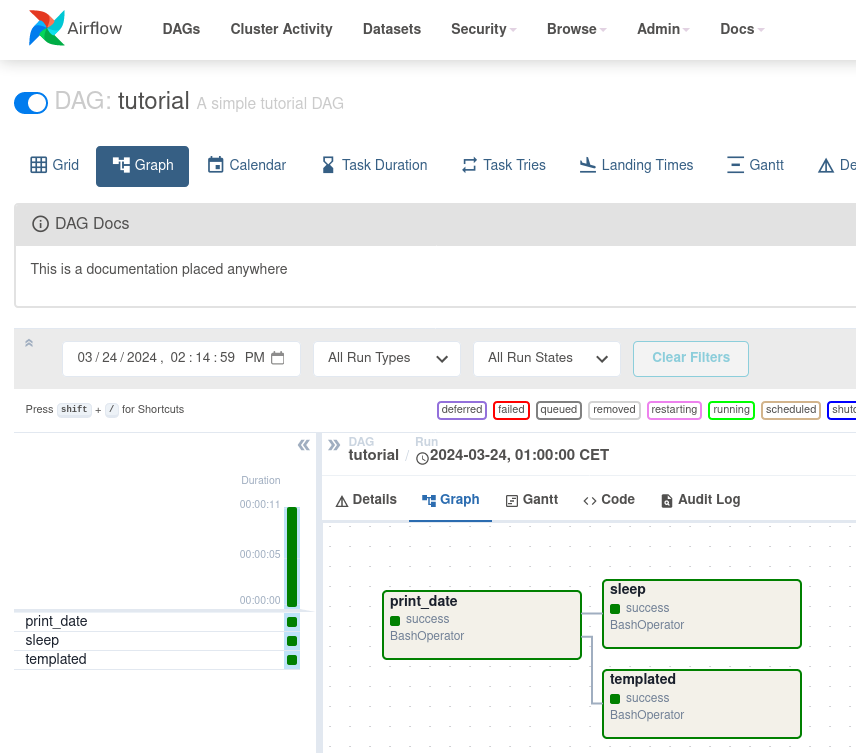
我们可以为DAG或每个单独的任务添加文档说明。目前DAG文档仅支持markdown格式,而任务文档支持纯文本、markdown、reStructuredText、json和yaml格式。DAG文档可以写在DAG文件开头的文档字符串中(推荐),也可以写在文件的其他位置。以下是一些实现任务和DAG文档的示例及截图:
t1.doc_md = textwrap.dedent(
"""\
#### Task Documentation
You can document your task using the attributes `doc_md` (markdown),
`doc` (plain text), `doc_rst`, `doc_json`, `doc_yaml` which gets
rendered in the UI's Task Instance Details page.

**Image Credit:** Randall Munroe, [XKCD](https://xkcd.com/license.html)
"""
)
dag.doc_md = __doc__ # providing that you have a docstring at the beginning of the DAG; OR
dag.doc_md = """
This is a documentation placed anywhere
""" # otherwise, type it like this


设置依赖项
我们有任务 t1、t2 和 t3,它们相互依赖。以下是定义它们之间依赖关系的几种方法:
t1.set_downstream(t2)

# This means that t2 will depend on t1
# running successfully to run.
# It is equivalent to:
t2.set_upstream(t1)

# The bit shift operator can also be
# used to chain operations:
t1 >> t2

# And the upstream dependency with the
# bit shift operator:
t2 << t1

# Chaining multiple dependencies becomes
# concise with the bit shift operator:
t1 >> t2 >> t3

# A list of tasks can also be set as
# dependencies. These operations
# all have the same effect:
t1.set_downstream([t2, t3])
t1 >> [t2, t3]
[t2, t3] << t1
请注意,当执行脚本时,如果Airflow在您的DAG中发现循环依赖或某个依赖被多次引用,它将抛出异常。
使用时区
创建一个时区感知的DAG非常简单。只需确保使用pendulum提供时区感知的日期。不要尝试使用标准库的timezone,因为已知它们存在限制,我们特意禁止在DAG中使用它们。
回顾
好的,现在我们有一个相当基础的DAG。此时你的代码应该看起来像这样:
import textwrap
from datetime import datetime, timedelta
# The DAG object; we'll need this to instantiate a DAG
from airflow.models.dag import DAG
# Operators; we need this to operate!
from airflow.operators.bash import BashOperator
with DAG(
"tutorial",
# These args will get passed on to each operator
# You can override them on a per-task basis during operator initialization
default_args={
"depends_on_past": False,
"email": ["airflow@example.com"],
"email_on_failure": False,
"email_on_retry": False,
"retries": 1,
"retry_delay": timedelta(minutes=5),
# 'queue': 'bash_queue',
# 'pool': 'backfill',
# 'priority_weight': 10,
# 'end_date': datetime(2016, 1, 1),
# 'wait_for_downstream': False,
# 'sla': timedelta(hours=2),
# 'execution_timeout': timedelta(seconds=300),
# 'on_failure_callback': some_function, # or list of functions
# 'on_success_callback': some_other_function, # or list of functions
# 'on_retry_callback': another_function, # or list of functions
# 'sla_miss_callback': yet_another_function, # or list of functions
# 'on_skipped_callback': another_function, #or list of functions
# 'trigger_rule': 'all_success'
},
description="A simple tutorial DAG",
schedule=timedelta(days=1),
start_date=datetime(2021, 1, 1),
catchup=False,
tags=["example"],
) as dag:
# t1, t2 and t3 are examples of tasks created by instantiating operators
t1 = BashOperator(
task_id="print_date",
bash_command="date",
)
t2 = BashOperator(
task_id="sleep",
depends_on_past=False,
bash_command="sleep 5",
retries=3,
)
t1.doc_md = textwrap.dedent(
"""\
#### Task Documentation
You can document your task using the attributes `doc_md` (markdown),
`doc` (plain text), `doc_rst`, `doc_json`, `doc_yaml` which gets
rendered in the UI's Task Instance Details page.

**Image Credit:** Randall Munroe, [XKCD](https://xkcd.com/license.html)
"""
)
dag.doc_md = __doc__ # providing that you have a docstring at the beginning of the DAG; OR
dag.doc_md = """
This is a documentation placed anywhere
""" # otherwise, type it like this
templated_command = textwrap.dedent(
"""
{% for i in range(5) %}
echo "{{ ds }}"
echo "{{ macros.ds_add(ds, 7)}}"
{% endfor %}
"""
)
t3 = BashOperator(
task_id="templated",
depends_on_past=False,
bash_command=templated_command,
)
t1 >> [t2, t3]
测试
运行脚本
是时候运行一些测试了。首先,让我们确保管道能够成功解析。
假设我们将上一步的代码保存在您airflow.cfg中引用的DAGs文件夹内的tutorial.py文件中。
默认的DAGs存放路径是~/airflow/dags。
python ~/airflow/dags/tutorial.py
如果脚本没有引发异常,则意味着您没有犯任何严重错误,并且您的Airflow环境基本正常。
命令行元数据验证
让我们运行几个命令来进一步验证这个脚本。
# initialize the database tables
airflow db migrate

# print the list of active DAGs
airflow dags list

# prints the list of tasks in the "tutorial" DAG
airflow tasks list tutorial

# prints the hierarchy of tasks in the "tutorial" DAG
airflow tasks list tutorial --tree
测试
让我们通过运行特定日期的实际任务实例来测试。在这个上下文中指定的日期称为逻辑日期(由于历史原因也称为执行日期),它模拟调度程序在特定日期和时间运行你的任务或DAG,尽管它实际上会在现在(或一旦满足其依赖关系)运行。
我们说过调度器是为特定日期和时间运行任务,而不是在那个时间点运行。 这是因为每次DAG运行在概念上代表的不是具体日期和时间,而是两个时间点之间的间隔,称为 数据间隔。DAG运行的逻辑日期是其数据间隔的开始时间。
# command layout: command subcommand [dag_id] [task_id] [(optional) date]

# testing print_date
airflow tasks test tutorial print_date 2015-06-01

# testing sleep
airflow tasks test tutorial sleep 2015-06-01
还记得我们之前用模板做了什么吗?运行以下命令看看这个模板是如何被渲染和执行的:
# testing templated
airflow tasks test tutorial templated 2015-06-01
这将显示详细的事件日志,最终运行您的bash命令并打印结果。
请注意,airflow tasks test命令会在本地运行任务实例,将其日志输出到标准输出(屏幕上),不处理依赖关系,也不会将状态(运行中、成功、失败等)记录到数据库。它仅用于测试单个任务实例。
同样适用于airflow dags test,但这是在DAG级别上。它会执行给定DAG ID的单个DAG运行。虽然它会考虑任务依赖关系,但不会在数据库中注册状态。这对于本地测试DAG的完整运行非常方便,例如,如果您的一个任务期望某个位置有数据,那么数据是可用的。
回填
一切看起来运行正常,现在让我们执行一次回填操作。
backfill 会遵循您的依赖关系,将日志输出到文件中,并与数据库通信记录状态。如果您已经启动了网页服务器,就可以跟踪进度。airflow webserver 会启动一个网页服务器,如果您想直观地查看回填进度的话。
请注意,如果使用depends_on_past=True,单个任务实例将依赖于其前一个任务实例的成功(即根据逻辑日期的前一个实例)。逻辑日期等于start_date的任务实例会忽略此依赖关系,因为此时尚未为它们创建过去的历史任务实例。
在使用depends_on_past=True时,您可能还需要考虑wait_for_downstream=True。
虽然depends_on_past=True会使任务实例依赖于其前一个任务实例的成功,
但wait_for_downstream=True会使任务实例同时等待前一个任务实例直接下游的所有任务实例都成功完成。
在此上下文中,日期范围包含一个start_date和可选的end_date,
它们用于根据该DAG中的任务实例填充运行计划。
# optional, start a web server in debug mode in the background
# airflow webserver --debug &

# start your backfill on a date range
airflow dags backfill tutorial \
    --start-date 2015-06-01 \
    --end-date 2015-06-07
下一步是什么?
搞定!你已经编写、测试并回填了你的第一个Airflow流水线。将你的代码合并到运行着调度程序的代码库后,它应该会被触发并每天运行。
以下是您接下来可能想做的几件事:
另请参阅
继续教程的下一步:使用TaskFlow
跳转到核心概念部分,详细了解Airflow的核心概念,如DAGs(有向无环图)、Tasks(任务)、Operators(操作器)等