代码执行器
![]()
在上一章中,我们使用了两个由大型语言模型(LLM)驱动的代理通过交换信息来玩游戏。在本章中,我们引入了代码执行器,它使得代理不仅能够聊天,还能与环境互动,执行有用的计算并采取行动。
概述
在AutoGen中,代码执行器是一个组件,它接收输入消息(例如,包含代码块的消息),执行代码,并输出带有结果的消息。AutoGen提供了两种类型的内置代码执行器,一种是命令行代码执行器,它在命令行环境(如UNIX shell)中运行代码,另一种是Jupyter执行器,它在交互式的Jupyter内核中运行代码。
对于每种类型的执行器,AutoGen 提供了两种执行代码的方式:本地执行和在 Docker 容器中执行。一种方式是直接在运行 AutoGen 的主机平台上执行代码,即本地操作系统。这种方式适用于开发和测试,但由于 LLM 可能生成任意代码,因此不适合生产环境。另一种方式是在 Docker 容器中执行代码。下表显示了代码执行器和执行环境的组合。
Code Executor (autogen.coding) | Environment | Platform |
|---|---|---|
LocalCommandLineCodeExecutor | Shell | Local |
DockerCommandLineCodeExecutor | Shell | Docker |
jupyter.JupyterCodeExecutor | Jupyter Kernel (e.g., python3) | Local/Docker |
在本章中,我们将重点介绍命令行代码执行器。关于Jupyter代码执行器,请参考Jupyter代码执行器的主题页面。
本地执行
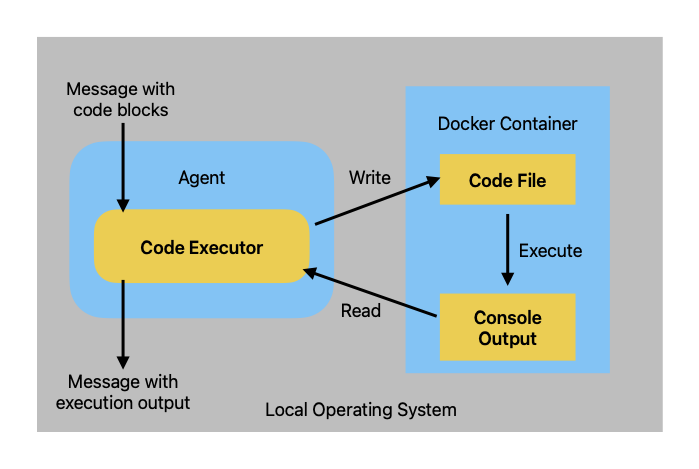
下图展示了本地命令行代码执行器的架构
(autogen.coding.LocalCommandLineCodeExecutor).
执行LLM生成的代码会对您的主机环境造成安全风险。

在接收到带有代码块的消息时,本地命令行代码执行器首先将代码块写入一个代码文件,然后启动一个新的子进程来执行该代码文件。执行器读取代码执行的控制台输出,并将其作为回复消息发送回去。
这里是一个使用代码执行器运行Python代码块的示例,该代码块会打印一个随机数。首先,我们创建一个带有代码执行器的代理,该代理使用一个临时目录来存储代码文件。我们指定了human_input_mode="ALWAYS"以手动验证所执行代码的安全性。
import tempfile

from autogen import ConversableAgent
from autogen.coding import LocalCommandLineCodeExecutor

# Create a temporary directory to store the code files.
temp_dir = tempfile.TemporaryDirectory()

# Create a local command line code executor.
executor = LocalCommandLineCodeExecutor(
    timeout=10,  # Timeout for each code execution in seconds.
    work_dir=temp_dir.name,  # Use the temporary directory to store the code files.
)

# Create an agent with code executor configuration.
code_executor_agent = ConversableAgent(
    "code_executor_agent",
    llm_config=False,  # Turn off LLM for this agent.
    code_execution_config={"executor": executor},  # Use the local command line code executor.
    human_input_mode="ALWAYS",  # Always take human input for this agent for safety.
)
在运行此示例之前,我们需要确保已安装 matplotlib 和
numpy。
! pip install -qqq matplotlib numpy
现在我们让代理生成一个带有Python代码块的回复消息。
message_with_code_block = """This is a message with code block.
The code block is below:
```python
import numpy as np
import matplotlib.pyplot as plt
x = np.random.randint(0, 100, 100)
y = np.random.randint(0, 100, 100)
plt.scatter(x, y)
plt.savefig('scatter.png')
print('Scatter plot saved to scatter.png')
```
This is the end of the message.
"""

# Generate a reply for the given code.
reply = code_executor_agent.generate_reply(messages=[{"role": "user", "content": message_with_code_block}])
print(reply)
>>>>>>>> NO HUMAN INPUT RECEIVED.

>>>>>>>> USING AUTO REPLY...

>>>>>>>> EXECUTING CODE BLOCK (inferred language is python)...
exitcode: 0 (execution succeeded)
Code output:
Scatter plot saved to scatter.png
在生成响应过程中,请求了人工输入以提供拦截代码执行的机会。在这种情况下,我们选择继续执行,代理的回复包含了代码执行的输出。
我们可以在临时目录中查看生成的图表。
import os

print(os.listdir(temp_dir.name))
# We can see the output scatter.png and the code file generated by the agent.
['scatter.png', '6507ea07b63b45aabb027ade4e213de6.py']
清理工作目录以避免影响未来的对话。
temp_dir.cleanup()
Docker 执行
为了减轻在本地运行LLM生成代码的安全风险,我们可以使用docker命令行代码执行器(autogen.coding.DockerCommandLineCodeExecutor)在docker容器中执行代码。这样,生成的代码只能访问明确提供给它的资源。
下图展示了docker执行的工作原理。
与本地命令行代码执行器类似,docker执行器从输入消息中提取代码块,将其写入代码文件。对于每个代码文件,它启动一个docker容器来执行代码文件,并读取代码执行的控制台输出。
要使用docker执行,您需要在您的机器上安装Docker。一旦您安装并运行了Docker,您就可以按照以下方式设置您的代码执行器代理:
from autogen.coding import DockerCommandLineCodeExecutor

# Create a temporary directory to store the code files.
temp_dir = tempfile.TemporaryDirectory()

# Create a Docker command line code executor.
executor = DockerCommandLineCodeExecutor(
    image="python:3.12-slim",  # Execute code using the given docker image name.
    timeout=10,  # Timeout for each code execution in seconds.
    work_dir=temp_dir.name,  # Use the temporary directory to store the code files.
)

# Create an agent with code executor configuration that uses docker.
code_executor_agent_using_docker = ConversableAgent(
    "code_executor_agent_docker",
    llm_config=False,  # Turn off LLM for this agent.
    code_execution_config={"executor": executor},  # Use the docker command line code executor.
    human_input_mode="ALWAYS",  # Always take human input for this agent for safety.
)

# When the code executor is no longer used, stop it to release the resources.
# executor.stop()
构造函数中的work_dir指向本地文件系统目录,就像在本地执行情况下一样。docker 容器将挂载此目录,执行器会将代码文件和输出写入其中。
在对话中使用代码执行
编写和执行代码对于许多任务(如数据分析、机器学习和数学建模)是必要的。在AutoGen中,编码可以是代码编写者代理和代码执行者代理之间的对话,类似于程序员和代码解释器之间的交互。
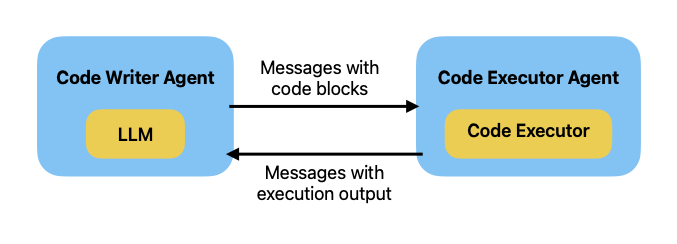
代码编写代理可以由具有代码编写能力的LLM(如GPT-4)提供支持。而代码执行代理则由代码执行器提供支持。
以下是一个具有代码编写者角色的代理,使用
system_message指定。系统消息包含关于如何在代码执行器代理中使用代码执行器的重要指令。
# The code writer agent's system message is to instruct the LLM on how to use
# the code executor in the code executor agent.
code_writer_system_message = """You are a helpful AI assistant.
Solve tasks using your coding and language skills.
In the following cases, suggest python code (in a python coding block) or shell script (in a sh coding block) for the user to execute.
1. When you need to collect info, use the code to output the info you need, for example, browse or search the web, download/read a file, print the content of a webpage or a file, get the current date/time, check the operating system. After sufficient info is printed and the task is ready to be solved based on your language skill, you can solve the task by yourself.
2. When you need to perform some task with code, use the code to perform the task and output the result. Finish the task smartly.
Solve the task step by step if you need to. If a plan is not provided, explain your plan first. Be clear which step uses code, and which step uses your language skill.
When using code, you must indicate the script type in the code block. The user cannot provide any other feedback or perform any other action beyond executing the code you suggest. The user can't modify your code. So do not suggest incomplete code which requires users to modify. Don't use a code block if it's not intended to be executed by the user.
If you want the user to save the code in a file before executing it, put # filename: <filename> inside the code block as the first line. Don't include multiple code blocks in one response. Do not ask users to copy and paste the result. Instead, use 'print' function for the output when relevant. Check the execution result returned by the user.
If the result indicates there is an error, fix the error and output the code again. Suggest the full code instead of partial code or code changes. If the error can't be fixed or if the task is not solved even after the code is executed successfully, analyze the problem, revisit your assumption, collect additional info you need, and think of a different approach to try.
When you find an answer, verify the answer carefully. Include verifiable evidence in your response if possible.
Reply 'TERMINATE' in the end when everything is done.
"""

code_writer_agent = ConversableAgent(
    "code_writer_agent",
    system_message=code_writer_system_message,
    llm_config={"config_list": [{"model": "gpt-4", "api_key": os.environ["OPENAI_API_KEY"]}]},
    code_execution_config=False,  # Turn off code execution for this agent.
)
这是一个通过代码编写代理和代码执行代理(如上所述)之间的对话解决数学问题的示例。
chat_result = code_executor_agent.initiate_chat(
    code_writer_agent,
    message="Write Python code to calculate the 14th Fibonacci number.",
)
Write Python code to calculate the 14th Fibonacci number.
--------------------------------------------------------------------------------
>>>>>>>> USING AUTO REPLY...
Sure, here is a Python code snippet to calculate the 14th Fibonacci number. The Fibonacci series is a sequence of numbers in which each number is the sum of the two preceding ones, usually starting with 0 and 1.
```python
def fibonacci(n):
if(n <= 0):
return "Input should be a positive integer."
elif(n == 1):
return 0
elif(n == 2):
return 1
else:
fib = [0, 1]
for i in range(2, n):
fib.append(fib[i-1] + fib[i-2])
return fib[n-1]
print(fibonacci(14))
```
This Python code defines a function `fibonacci(n)` which computes the n-th Fibonacci number. The function uses a list `fib` to store the Fibonacci numbers as they are computed, and then returns the (n-1)-th element as the n-th Fibonacci number due to zero-indexing in Python lists.
--------------------------------------------------------------------------------
>>>>>>>> NO HUMAN INPUT RECEIVED.
>>>>>>>> USING AUTO REPLY...
>>>>>>>> EXECUTING CODE BLOCK (inferred language is python)...
exitcode: 0 (execution succeeded)
Code output:
233
--------------------------------------------------------------------------------
>>>>>>>> USING AUTO REPLY...
Great, the execution was successful and the 14th Fibonacci number is 233. The sequence goes as follows: 0, 1, 1, 2, 3, 5, 8, 13, 21, 34, 55, 89, 144, 233... and so on, where each number is the sum of the previous two. Therefore, the 14th number in the Fibonacci series is 233.
I hope this meets your expectations. If you have any other concerns or need further computations, feel free to ask.
TERMINATE
--------------------------------------------------------------------------------
在之前的聊天会话中,代码执行代理每次响应时都会请求人工输入,以确保执行的代码是安全的。
现在我们可以尝试一个更复杂的例子,涉及查询网络。 假设我们想获取特斯拉和Meta(原名Facebook)今年以来的股价涨幅。我们还可以使用两个代理进行多次对话迭代。
import datetime

today = datetime.datetime.now().strftime("%Y-%m-%d")
chat_result = code_executor_agent.initiate_chat(
    code_writer_agent,
    message=f"Today is {today}. Write Python code to plot TSLA's and META's "
    "stock price gains YTD, and save the plot to a file named 'stock_gains.png'.",
)
Today is 2024-02-28. Write Python code to plot TSLA's and META's stock price gains YTD, and save the plot to a file named 'stock_gains.png'.
--------------------------------------------------------------------------------
>>>>>>>> USING AUTO REPLY...
This task requires retrieving the historical data of the stocks from a reliable data source and calculating the Year-To-Date (YTD) gain values, and then plotting them. pandas_datareader library will be used for data retrieval, pandas will be used for data manipulation, and matplotlib for plotting.
Below is the Python code to achieve this. To start, please install the required libraries by running to the following command:
```sh
pip install yfinance pandas matplotlib
```
Then run the python code:
```python
# filename: stock_gains.py
import yfinance as yf
import pandas as pd
import matplotlib.pyplot as plt
from datetime import datetime
# define the tickers
tickers = ['TSLA', 'META']
# define the start and end dates
start_date = datetime(2024, 1, 1)
end_date = datetime(2024, 2, 28)
# dictionary to hold dataframes
dfs = {}
for ticker in tickers:
# get the data for the stocks
df = yf.download(ticker, start_date, end_date)
# get the close price and calculate the cumulative percentage gain
df['Gain'] = df['Close'].pct_change().cumsum()
# add to dictionary
dfs[ticker] = df
# plot
plt.figure(figsize=(10, 5))
for ticker, df in dfs.items():
plt.plot(df.index, df['Gain'], label=ticker)
plt.title('YTD Stock Price Gain')
plt.xlabel('Date')
plt.ylabel('Percentage Gain')
plt.legend()
plt.grid(True)
plt.savefig('stock_gains.png')
plt.close()
print("The 'stock_gains.png' file has been successfully saved")
```
This script will download the historical data for TSLA and META from the start of the year to the specified date and calculates the YTD gains. It then generates the plot showing these gains and saves it to 'stock_gains.png'.
Please save the script to a file named 'stock_gains.py' and run it using Python. Remember to have the correct start and end dates for the YTD value when running the script. If your Python version is below 3.8, you should update it to execute this code perfectly.
--------------------------------------------------------------------------------
>>>>>>>> NO HUMAN INPUT RECEIVED.
>>>>>>>> USING AUTO REPLY...
>>>>>>>> EXECUTING CODE BLOCK 0 (inferred language is sh)...
>>>>>>>> EXECUTING CODE BLOCK 1 (inferred language is python)...
exitcode: 0 (execution succeeded)
Code output:
Requirement already satisfied: yfinance in /Users/ekzhu/miniconda3/envs/autogen/lib/python3.11/site-packages (0.2.36)
Requirement already satisfied: pandas in /Users/ekzhu/miniconda3/envs/autogen/lib/python3.11/site-packages (2.1.4)
Requirement already satisfied: matplotlib in /Users/ekzhu/miniconda3/envs/autogen/lib/python3.11/site-packages (3.8.2)
Requirement already satisfied: numpy>=1.16.5 in /Users/ekzhu/miniconda3/envs/autogen/lib/python3.11/site-packages (from yfinance) (1.26.2)
Requirement already satisfied: requests>=2.31 in /Users/ekzhu/miniconda3/envs/autogen/lib/python3.11/site-packages (from yfinance) (2.31.0)
Requirement already satisfied: multitasking>=0.0.7 in /Users/ekzhu/miniconda3/envs/autogen/lib/python3.11/site-packages (from yfinance) (0.0.11)
Requirement already satisfied: lxml>=4.9.1 in /Users/ekzhu/miniconda3/envs/autogen/lib/python3.11/site-packages (from yfinance) (5.0.1)
Requirement already satisfied: appdirs>=1.4.4 in /Users/ekzhu/miniconda3/envs/autogen/lib/python3.11/site-packages (from yfinance) (1.4.4)
Requirement already satisfied: pytz>=2022.5 in /Users/ekzhu/miniconda3/envs/autogen/lib/python3.11/site-packages (from yfinance) (2023.3.post1)
Requirement already satisfied: frozendict>=2.3.4 in /Users/ekzhu/miniconda3/envs/autogen/lib/python3.11/site-packages (from yfinance) (2.4.0)
Requirement already satisfied: peewee>=3.16.2 in /Users/ekzhu/miniconda3/envs/autogen/lib/python3.11/site-packages (from yfinance) (3.17.0)
Requirement already satisfied: beautifulsoup4>=4.11.1 in /Users/ekzhu/miniconda3/envs/autogen/lib/python3.11/site-packages (from yfinance) (4.12.2)
Requirement already satisfied: html5lib>=1.1 in /Users/ekzhu/miniconda3/envs/autogen/lib/python3.11/site-packages (from yfinance) (1.1)
Requirement already satisfied: python-dateutil>=2.8.2 in /Users/ekzhu/miniconda3/envs/autogen/lib/python3.11/site-packages (from pandas) (2.8.2)
Requirement already satisfied: tzdata>=2022.1 in /Users/ekzhu/miniconda3/envs/autogen/lib/python3.11/site-packages (from pandas) (2023.4)
Requirement already satisfied: contourpy>=1.0.1 in /Users/ekzhu/miniconda3/envs/autogen/lib/python3.11/site-packages (from matplotlib) (1.2.0)
Requirement already satisfied: cycler>=0.10 in /Users/ekzhu/miniconda3/envs/autogen/lib/python3.11/site-packages (from matplotlib) (0.12.1)
Requirement already satisfied: fonttools>=4.22.0 in /Users/ekzhu/miniconda3/envs/autogen/lib/python3.11/site-packages (from matplotlib) (4.47.2)
Requirement already satisfied: kiwisolver>=1.3.1 in /Users/ekzhu/miniconda3/envs/autogen/lib/python3.11/site-packages (from matplotlib) (1.4.5)
Requirement already satisfied: packaging>=20.0 in /Users/ekzhu/miniconda3/envs/autogen/lib/python3.11/site-packages (from matplotlib) (23.2)
Requirement already satisfied: pillow>=8 in /Users/ekzhu/miniconda3/envs/autogen/lib/python3.11/site-packages (from matplotlib) (10.2.0)
Requirement already satisfied: pyparsing>=2.3.1 in /Users/ekzhu/miniconda3/envs/autogen/lib/python3.11/site-packages (from matplotlib) (3.1.1)
Requirement already satisfied: soupsieve>1.2 in /Users/ekzhu/miniconda3/envs/autogen/lib/python3.11/site-packages (from beautifulsoup4>=4.11.1->yfinance) (2.5)
Requirement already satisfied: six>=1.9 in /Users/ekzhu/miniconda3/envs/autogen/lib/python3.11/site-packages (from html5lib>=1.1->yfinance) (1.16.0)
Requirement already satisfied: webencodings in /Users/ekzhu/miniconda3/envs/autogen/lib/python3.11/site-packages (from html5lib>=1.1->yfinance) (0.5.1)
Requirement already satisfied: charset-normalizer<4,>=2 in /Users/ekzhu/miniconda3/envs/autogen/lib/python3.11/site-packages (from requests>=2.31->yfinance) (3.3.2)
Requirement already satisfied: idna<4,>=2.5 in /Users/ekzhu/miniconda3/envs/autogen/lib/python3.11/site-packages (from requests>=2.31->yfinance) (3.6)
Requirement already satisfied: urllib3<3,>=1.21.1 in /Users/ekzhu/miniconda3/envs/autogen/lib/python3.11/site-packages (from requests>=2.31->yfinance) (2.1.0)
Requirement already satisfied: certifi>=2017.4.17 in /Users/ekzhu/miniconda3/envs/autogen/lib/python3.11/site-packages (from requests>=2.31->yfinance) (2024.2.2)
The 'stock_gains.png' file has been successfully saved
--------------------------------------------------------------------------------
>>>>>>>> USING AUTO REPLY...
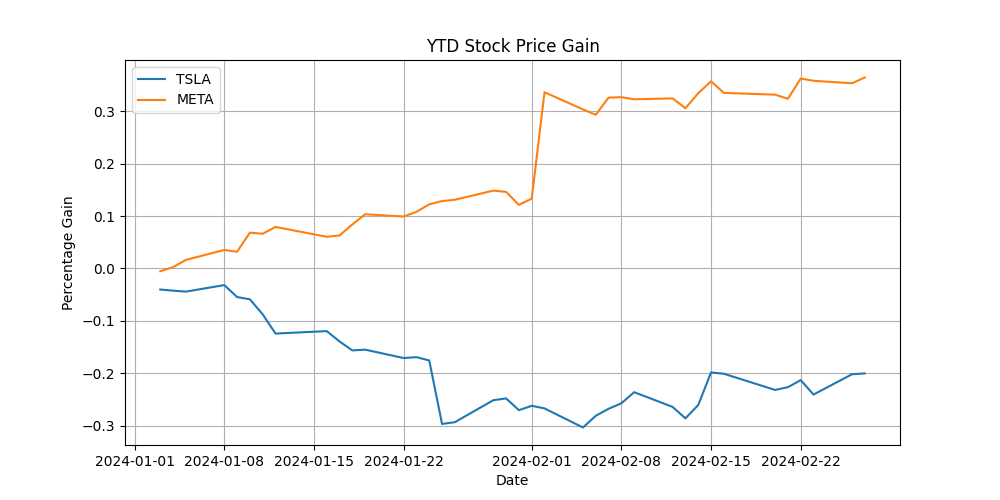
Great! The code executed successfully and the 'stock_gains.png' file has been saved successfully. This file contains the plot of TSLA's and META's stock price gains from the start of the year until February 28, 2024. You should now be able to view this image file in the same directory that you ran the script from.
Please make sure to verify this image file. It should contain two plotted lines, each representing the percentage gain over the time for each stock (TSLA and META). The x-axis represents the date, and the y-axis represents the percentage gain. If everything looks correct, this would be the end of the task.
TERMINATE
--------------------------------------------------------------------------------
在之前的对话中,代码编写代理生成了一个代码块来安装必要的软件包,并生成了另一个代码块用于编写脚本以获取特斯拉和Meta的股价并计算年初至今的收益。代码执行代理安装了这些软件包,执行了脚本,并返回了结果。
让我们看一下生成的图表。
from IPython.display import Image

Image(os.path.join(temp_dir, "stock_gains.png"))
由于代码执行会在文件系统中留下代码文件和输出等痕迹,我们可能希望每次对话结束后清理工作目录。
temp_dir.cleanup()
停止docker命令行执行器以清理docker容器。
executor.stop() # Stop the docker command line code executor.
命令行还是Jupyter代码执行器?
命令行代码执行器在不同代码块执行之间不会在内存中保留任何状态,因为它将每个代码块写入一个单独的文件,并在新进程中执行该代码块。
与命令行代码执行器不同,Jupyter代码执行器在同一Jupyter内核中运行所有代码块,这在执行之间保持内存状态。请参阅Jupyter代码执行器的主题页面。
选择命令行代码执行器还是Jupyter代码执行器取决于对话中代码块的性质。如果每个代码块都是一个“脚本”,并且不使用之前代码块中的变量,命令行代码执行器是一个不错的选择。如果某些代码块包含昂贵的计算(例如,训练机器学习模型和加载大量数据),并且您希望在内存中保留状态以避免重复计算,那么Jupyter代码执行器是更好的选择。
关于用户代理和助手代理的说明
用户代理代理
在之前的示例中,我们直接使用
ConversableAgent
类创建了代码执行代理。现有的AutoGen示例通常使用
UserProxyAgent
类来创建代码执行代理,该类是
ConversableAgent
的子类,并且带有human_input_mode=ALWAYS和llm_config=False参数——它总是为每条消息请求人工输入,并且不使用LLM。它还为每个human_input_mode设置提供了默认的description字段。这个类是为了方便创建用作代码执行代理的代理类的快捷方式。
助手代理
在之前的示例中,我们直接使用
ConversableAgent
类创建了代码编写代理。现有的AutoGen示例通常使用
AssistantAgent
类来创建代码编写代理,它是
ConversableAgent
的一个子类,具有human_input_mode=NEVER和code_execution_config=False——它从不请求人工输入且不使用代码执行器。它还带有默认的system_message和description字段。此类是创建旨在用作代码编写器且不执行代码的代理的便捷方式。
事实上,在前面的示例中,我们使用了AssistantAgent类的默认system_message字段来指导代码编写代理如何使用代码执行器。
import pprint

from autogen import AssistantAgent

pprint.pprint(AssistantAgent.DEFAULT_SYSTEM_MESSAGE)
('You are a helpful AI assistant.\n'
 'Solve tasks using your coding and language skills.\n'
 'In the following cases, suggest python code (in a python coding block) or '
 'shell script (in a sh coding block) for the user to execute.\n'
 '    1. When you need to collect info, use the code to output the info you '
 'need, for example, browse or search the web, download/read a file, print the '
 'content of a webpage or a file, get the current date/time, check the '
 'operating system. After sufficient info is printed and the task is ready to '
 'be solved based on your language skill, you can solve the task by yourself.\n'
 '    2. When you need to perform some task with code, use the code to perform '
 'the task and output the result. Finish the task smartly.\n'
 'Solve the task step by step if you need to. If a plan is not provided, '
 'explain your plan first. Be clear which step uses code, and which step uses '
 'your language skill.\n'
 'When using code, you must indicate the script type in the code block. The '
 'user cannot provide any other feedback or perform any other action beyond '
 "executing the code you suggest. The user can't modify your code. So do not "
 "suggest incomplete code which requires users to modify. Don't use a code "
 "block if it's not intended to be executed by the user.\n"
 'If you want the user to save the code in a file before executing it, put # '
 "filename: <filename> inside the code block as the first line. Don't include "
 'multiple code blocks in one response. Do not ask users to copy and paste the '
 "result. Instead, use 'print' function for the output when relevant. Check "
 'the execution result returned by the user.\n'
 'If the result indicates there is an error, fix the error and output the code '
 'again. Suggest the full code instead of partial code or code changes. If the '
 "error can't be fixed or if the task is not solved even after the code is "
 'executed successfully, analyze the problem, revisit your assumption, collect '
 'additional info you need, and think of a different approach to try.\n'
 'When you find an answer, verify the answer carefully. Include verifiable '
 'evidence in your response if possible.\n'
 'Reply "TERMINATE" in the end when everything is done.\n'
 '    ')
最佳实践
需要注意的是,UserProxyAgent和AssistantAgent旨在避免为ConversableAgent类编写system_message指令的快捷方式。它们并不适用于所有用例。正如我们将在下一章中展示的,调整system_message字段对于agent在更复杂的对话模式中正常工作至关重要,而不仅仅是两人聊天。
作为一个最佳实践,始终根据你的具体使用场景调整你的代理的system_message指令,并避免子类化UserProxyAgent和AssistantAgent。
总结
在本章中,我们介绍了代码执行器,如何设置 Docker 和本地执行,以及如何在对话中使用代码执行来完成任务。在下一章中,我们将介绍工具使用,它与代码执行器类似,但限制了代理可以执行的代码。