

Portkey
Portkey 是一个全栈 LLMOps 平台,能够可靠且安全地将您的生成式 AI 应用投入生产环境。
Portkey与Llamaindex集成的关键特性:
Section titled “Key Features of Portkey’s Integration with Llamaindex:”
- 🚪 AI 网关:
- 🔬 可观测性:
- 日志记录: 跟踪所有请求以进行监控和调试。
- 请求追踪: 了解每个请求的流转路径以进行优化。
- 自定义标签: 对请求进行分段和分类,以获得更好的洞察。
- 📝 基于用户反馈的持续改进:
- 反馈收集: 无缝收集任何已处理请求的反馈,无论是生成层面还是会话层面。
- 加权反馈: 通过为用户的反馈值附加权重来获取更细致入微的信息。
- 反馈元数据: 集成自定义元数据与反馈以提供上下文,实现更丰富的洞察与分析。
- 🔑 安全密钥管理:
- 虚拟密钥: Portkey 将原始供应商密钥转换为虚拟密钥,确保您的主凭据保持原样。
- 多重标识符: 能够为同一提供商添加多个密钥,或将同一密钥以不同名称存储,便于识别且不影响安全性。
要利用这些功能,让我们从设置开始:

如果您在 Colab 上打开这个笔记本,您可能需要安装 LlamaIndex 🦙。
%pip install llama-index-llms-portkey!pip install llama-index# Installing Llamaindex & Portkey SDK!pip install -U llama_index!pip install -U portkey-ai
# Importing necessary libraries and modulesfrom llama_index.llms.portkey import Portkeyfrom llama_index.core.llms import ChatMessageimport portkey as pk您无需在您的Llamaindex应用中安装任何其他SDK或导入它们。
步骤 1️⃣: 获取您的 Portkey API 密钥以及 OpenAI、Anthropic 等服务的虚拟密钥
Section titled “Step 1️⃣: Get your Portkey API Key and your Virtual Keys for OpenAI, Anthropic, and more”Portkey API密钥: 登录Portkey平台,然后点击左上角的个人资料图标并“复制API密钥”。
import os
os.environ["PORTKEY_API_KEY"] = "PORTKEY_API_KEY"- 在Portkey仪表板上导航至“虚拟密钥”页面,并点击右上角的“添加密钥”按钮。
- 选择您的人工智能提供商(OpenAI、Anthropic、Cohere、HuggingFace等),为您的密钥分配一个唯一名称,如有需要,可记录相关使用说明。您的虚拟密钥已准备就绪!
 3. Now copy and paste the keys below - you can use them anywhere within the Portkey ecosystem and keep your original key secure and untouched.
openai_virtual_key_a = ""openai_virtual_key_b = ""
anthropic_virtual_key_a = ""anthropic_virtual_key_b = ""
cohere_virtual_key_a = ""cohere_virtual_key_b = ""
如果您不想使用Portkey的虚拟密钥,也可以直接使用您的人工智能提供商密钥。
os.environ["OPENAI_API_KEY"] = ""os.environ["ANTHROPIC_API_KEY"] = ""步骤2️⃣:配置Portkey功能
Section titled “Step 2️⃣: Configure Portkey Features”为了充分发挥 Portkey 与 Llamaindex 集成的全部潜力,您可以如上图所示配置各种功能。以下是所有 Portkey 功能及预期值的指南:
| 功能 | 配置键 | Value(Type) | 必填 |
|---|---|---|---|
| API密钥 | api_key | string | ✅ 必需(可从外部设置) |
| 模式 | mode | fallback, loadbalance, single | ✅ 必填 |
| 缓存类型 | cache_status | simple, semantic | ❔ 可选 |
| 强制缓存刷新 | cache_force_refresh | True, False | ❔ 可选 |
| 缓存时间 | cache_age | integer (in seconds) | ❔ 可选 |
| 追踪ID | trace_id | string | ❔ 可选 |
| 重试次数 | retry | integer [0,5] | ❔ 可选 |
| 元数据 | metadata | json object 更多信息 | ❔ 可选 |
| 基础URL | base_url | url | ❔ 可选 |
api_key和mode是必需值。- 您可以通过 Portkey 构造函数设置您的 Portkey API 密钥,也可以将其设置为环境变量。
- There are 3 modes - Single, Fallback, Loadbalance.
以下是如何设置其中一些功能的示例:
portkey_client = Portkey(    mode="single",)
# Since we have defined the Portkey API Key with os.environ, we do not need to set api_key again here通过Portkey集成,构建LLM的过程得以简化。对所有提供商使用LLMOptions函数,使用与您在OpenAI或Anthropic构造函数中习惯使用的完全相同的密钥。唯一新增的密钥是weight,这对负载均衡功能至关重要。
openai_llm = pk.LLMOptions( provider="openai", model="gpt-4", virtual_key=openai_virtual_key_a,)以上代码展示了如何利用 LLMOptions 函数来配置使用 OpenAI 提供商和 GPT-4 模型的大语言模型。该函数同样适用于其他服务提供商,使得集成流程在不同提供商之间保持统一和高效。
步骤4️⃣:激活Portkey客户端
Section titled “Step 4️⃣: Activate the Portkey Client”一旦你使用 LLMOptions 函数构建了LLM,下一步就是通过Portkey激活它。这一步对于确保所有Portkey功能对你的LLM可用至关重要。
portkey_client.add_llms(openai_llm)就这样!只需4个步骤,您就为Llamaindex应用注入了成熟的生产环境能力。
让我们确保所有设置都正确无误。下面,我们将创建一个简单的聊天场景,并通过我们的Portkey客户端传递它以查看响应。
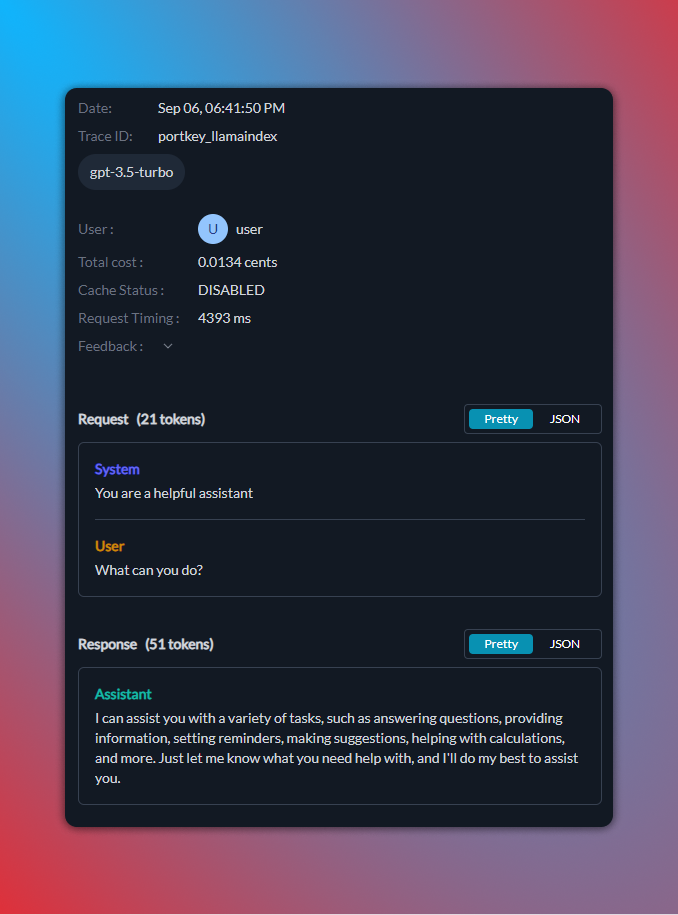
messages = [ ChatMessage(role="system", content="You are a helpful assistant"), ChatMessage(role="user", content="What can you do?"),]print("Testing Portkey Llamaindex integration:")response = portkey_client.chat(messages)print(response)以下是在您的Portkey仪表板上日志的显示方式:
通过 Portkey,流式响应从未如此简单直接。Portkey 提供 4 种响应函数:
.complete(prompt).stream_complete(prompt).chat(messages).stream_chat(messages)
虽然 complete 函数需要字符串输入(str),但 chat 函数处理的是 ChatMessage 对象数组。
示例用法:
# Let's set up a prompt and then use the stream_complete function to obtain a streamed response.
prompt = "Why is the sky blue?"
print("\nTesting Stream Complete:\n")response = portkey_client.stream_complete(prompt)for i in response:    print(i.delta, end="", flush=True)
# Let's prepare a set of chat messages and then utilize the stream_chat function to achieve a streamed chat response.
messages = [    ChatMessage(role="system", content="You are a helpful assistant"),    ChatMessage(role="user", content="What can you do?"),]
print("\nTesting Stream Chat:\n")response = portkey_client.stream_chat(messages)for i in response: print(i.delta, end="", flush=True)恭喜!🎉 您已成功设置并测试了Portkey与Llamaindex的集成。回顾一下步骤:
- pip 安装 portkey-ai
- from llama_index.llms import Portkey
- 从此处获取您的Portkey API密钥并创建虚拟提供商密钥。
- 构建您的Portkey客户端并设置模式:
portkey_client=Portkey(mode="fallback") - 使用LLMOptions构建您的提供者LLM:
openai_llm = pk.LLMOptions(provider="openai", model="gpt-4", virtual_key=openai_key_a) - 将LLM添加到Portkey,使用
portkey_client.add_llms(openai_llm) - 像调用其他大语言模型一样定期调用 Portkey 方法,使用
portkey_client.chat(messages)
以下是所有函数及其参数的指南:
🔁 使用Portkey实现回退和重试机制
Section titled “🔁 Implementing Fallbacks and Retries with Portkey”回退和重试机制对于构建稳健的AI应用至关重要。通过Portkey,实现这些功能非常简单:
- 故障切换: 如果主服务或模型发生故障,Portkey 将自动切换到备用模型。
- 重试机制: 如果请求失败,可配置 Portkey 进行多次重试。
下面,我们演示如何使用 Portkey 设置回退和重试机制:
portkey_client = Portkey(mode="fallback")messages = [    ChatMessage(role="system", content="You are a helpful assistant"),    ChatMessage(role="user", content="What can you do?"),]
llm1 = pk.LLMOptions(    provider="openai",    model="gpt-4",    retry_settings={"on_status_codes": [429, 500], "attempts": 2},    virtual_key=openai_virtual_key_a,)
llm2 = pk.LLMOptions(    provider="openai",    model="gpt-3.5-turbo",    virtual_key=openai_virtual_key_b,)
portkey_client.add_llms(llm_params=[llm1, llm2])
print("Testing Fallback & Retry functionality:")response = portkey_client.chat(messages)print(response)
⚖️ 使用 Portkey 实现负载均衡
Section titled “⚖️ Implementing Load Balancing with Portkey”负载均衡确保传入请求在多个模型之间高效分配。这不仅提升了性能,还在某个模型发生故障时提供冗余保障。
通过 Portkey,实现负载均衡非常简单。您需要:
- 为每个LLM定义
weight参数。该权重决定了请求在LLM之间的分配方式。 - 确保所有LLM的权重总和等于1。
以下是一个使用 Portkey 设置负载均衡的示例:
portkey_client = Portkey(mode="ab_test")
messages = [    ChatMessage(role="system", content="You are a helpful assistant"),    ChatMessage(role="user", content="What can you do?"),]
llm1 = pk.LLMOptions(    provider="openai",    model="gpt-4",    virtual_key=openai_virtual_key_a,    weight=0.2,)
llm2 = pk.LLMOptions(    provider="openai",    model="gpt-3.5-turbo",    virtual_key=openai_virtual_key_a,    weight=0.8,)
portkey_client.add_llms(llm_params=[llm1, llm2])
print("Testing Loadbalance functionality:")response = portkey_client.chat(messages)print(response)
🧠 使用Portkey实现语义缓存
Section titled “🧠 Implementing Semantic Caching with Portkey”语义缓存是一种智能缓存机制,能够理解请求的上下文。它不仅仅基于完全相同的输入匹配进行缓存,而是识别相似的请求并提供缓存结果,从而减少冗余请求、提升响应速度并节省成本。
让我们看看如何使用 Portkey 实现语义缓存:
import time
portkey_client = Portkey(mode="single")
openai_llm = pk.LLMOptions(    provider="openai",    model="gpt-3.5-turbo",    virtual_key=openai_virtual_key_a,    cache_status="semantic",)
portkey_client.add_llms(openai_llm)
current_messages = [    ChatMessage(role="system", content="You are a helpful assistant"),    ChatMessage(role="user", content="What are the ingredients of a pizza?"),]
print("Testing Portkey Semantic Cache:")
start = time.time()response = portkey_client.chat(current_messages)end = time.time() - start
print(response)print(f"{'-'*50}\nServed in {end} seconds.\n{'-'*50}")
new_messages = [    ChatMessage(role="system", content="You are a helpful assistant"),    ChatMessage(role="user", content="Ingredients of pizza"),]
print("Testing Portkey Semantic Cache:")
start = time.time()response = portkey_client.chat(new_messages)end = time.time() - start
print(response)print(f"{'-'*50}\nServed in {end} seconds.\n{'-'*50}")
Portkey的缓存支持另外两个关键缓存功能——强制刷新和时效。
cache_force_refresh: 强制向您的提供商发送请求,而不是从缓存中提供服务。
cache_age: 决定此特定字符串的缓存存储应自动刷新的时间间隔。缓存时长以秒为单位设置。
以下是使用方法:
# Setting the cache status as `semantic` and cache_age as 60s.openai_llm = pk.LLMOptions( provider="openai", model="gpt-3.5-turbo", virtual_key=openai_virtual_key_a, cache_force_refresh=True, cache_age=60,)🔬 使用 Portkey 实现可观测性
Section titled “🔬 Observability with Portkey”深入了解应用程序的行为至关重要。Portkey的可观测性功能使您能够轻松监控、调试和优化AI应用程序。您可以追踪每个请求,了解其执行路径,并根据自定义标签进行分类。这种精细程度有助于识别瓶颈、优化成本并提升整体用户体验。
以下是如何使用 Portkey 设置可观测性:
metadata = {    "_environment": "production",    "_prompt": "test",    "_user": "user",    "_organisation": "acme",}
trace_id = "llamaindex_portkey"
portkey_client = Portkey(mode="single")
openai_llm = pk.LLMOptions(    provider="openai",    model="gpt-3.5-turbo",    virtual_key=openai_virtual_key_a,    metadata=metadata,    trace_id=trace_id,)
portkey_client.add_llms(openai_llm)
print("Testing Observability functionality:")response = portkey_client.chat(messages)print(response)Portkey的AI网关内部使用了开源项目Rubeus。Rubeus支持诸如LLM互操作性、负载均衡、故障转移等功能,并充当中介,确保您的请求得到最优处理。
使用 Portkey 的优势之一在于其灵活性。您可以轻松自定义其行为,将请求重定向至不同供应商,甚至完全绕过 Portkey 的日志记录。
以下是一个使用 Portkey 自定义行为的示例:
portkey_client.base_url=None📝 使用Portkey提供反馈
Section titled “📝 Feedback with Portkey”持续改进是人工智能的基石。为确保您的模型和应用不断演进并更好地服务用户,反馈至关重要。Portkey的反馈API提供了一种直接的方式来收集用户的加权反馈,使您能够随时间推移不断优化和改进。
以下是如何使用 Portkey 的反馈 API:
了解更多关于反馈的信息。
import requestsimport json
# Endpoint URLurl = "https://api.portkey.ai/v1/feedback"
# Headersheaders = {    "x-portkey-api-key": os.environ.get("PORTKEY_API_KEY"),    "Content-Type": "application/json",}
# Datadata = {"trace_id": "llamaindex_portkey", "value": 1}
# Making the requestresponse = requests.post(url, headers=headers, data=json.dumps(data))
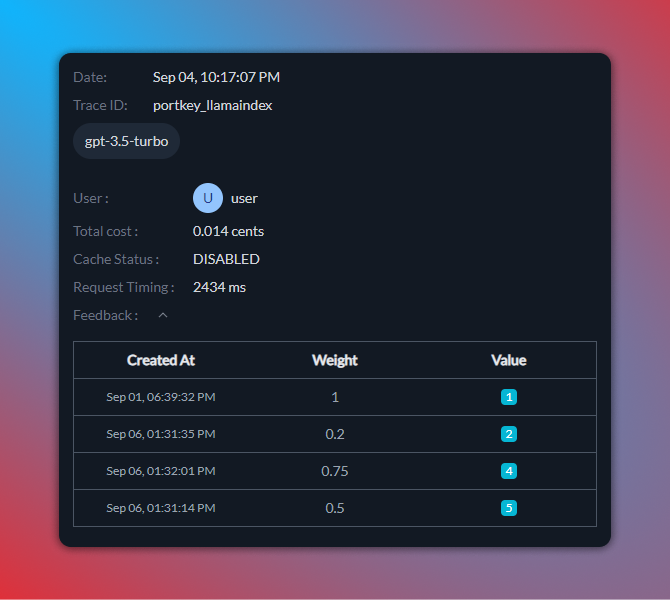
# Print the responseprint(response.text)所有带有weight和value的反馈数据(按追踪ID分类)均可在Portkey仪表盘中查看:
将Portkey与Llamaindex集成简化了构建稳健且具备弹性的AI应用的过程。借助语义缓存、可观测性、负载均衡、反馈和故障恢复等功能,您可以确保最佳性能并实现持续改进。
通过遵循本指南,您已成功设置并测试了Portkey与Llamaindex的集成。在继续构建和部署AI应用程序时,请记得充分利用此集成的全部潜力!
如需进一步帮助或有疑问,请联系开发人员 ➡️

加入我们的从业者社区,将大语言模型投入生产 ➡️
