AutoMM 语义分割 - 快速入门
![]()

语义分割是一项计算机视觉任务,其目标是创建图像的详细像素级分割图,将每个像素分配给特定的类别或对象。这项技术在各种应用中至关重要,例如在自动驾驶车辆中识别车辆、行人、交通标志、人行道和其他道路特征。
Segment Anything Model (SAM) 是一个在包含10亿个掩码和1100万张图像的庞大数据集上预训练的基础模型。虽然SAM在通用场景中表现非常出色,但在应用于遥感、医学影像、农业和制造等专业领域时,它遇到了挑战。幸运的是,AutoMM通过促进SAM在特定领域数据上的微调,提供了解决方案。
在这个易于遵循的教程中,我们将指导您使用AutoMM来微调SAM。只需调用一次fit() API,您就可以轻松地训练模型。
准备数据
为了演示目的,我们使用了来自Kaggle的Leaf Disease Segmentation。这个数据集是自动化植物疾病检测的一个很好的例子,特别是对于加速植物病理学过程。在叶子或植物上分割特定区域可能相当具有挑战性,尤其是在处理较小的病斑或各种类型的疾病时。
首先,下载并准备数据集。
download_dir = './ag_automm_tutorial'
zip_file = 'https://automl-mm-bench.s3.amazonaws.com/semantic_segmentation/leaf_disease_segmentation.zip'
from autogluon.core.utils.loaders import load_zip
load_zip.unzip(zip_file, unzip_dir=download_dir)
Downloading ./ag_automm_tutorial/file.zip from https://automl-mm-bench.s3.amazonaws.com/semantic_segmentation/leaf_disease_segmentation.zip...
0%|          | 0.00/53.3M [00:00<?, ?iB/s]
12%|█▏        | 6.61M/53.3M [00:00<00:01, 45.9MiB/s]
21%|██        | 11.2M/53.3M [00:00<00:01, 34.6MiB/s]
30%|██▉       | 15.8M/53.3M [00:00<00:00, 38.7MiB/s]
37%|███▋      | 19.8M/53.3M [00:00<00:01, 31.4MiB/s]
44%|████▍     | 23.4M/53.3M [00:00<00:01, 19.9MiB/s]
49%|████▊     | 25.9M/53.3M [00:01<00:01, 19.1MiB/s]
60%|██████    | 32.2M/53.3M [00:01<00:00, 23.9MiB/s]
65%|██████▌   | 34.8M/53.3M [00:01<00:00, 19.5MiB/s]
79%|███████▊  | 41.9M/53.3M [00:01<00:00, 24.2MiB/s]
94%|█████████▍| 50.3M/53.3M [00:01<00:00, 30.7MiB/s]
100%|██████████| 53.3M/53.3M [00:01<00:00, 26.7MiB/s]
接下来,加载CSV文件,确保相对路径被扩展,以便在训练和测试期间正确加载数据。
import pandas as pd
import os
dataset_path = os.path.join(download_dir, 'leaf_disease_segmentation')
train_data = pd.read_csv(f'{dataset_path}/train.csv', index_col=0)
val_data = pd.read_csv(f'{dataset_path}/val.csv', index_col=0)
test_data = pd.read_csv(f'{dataset_path}/test.csv', index_col=0)
image_col = 'image'
label_col = 'label'
def path_expander(path, base_folder):
    path_l = path.split(';')
    return ';'.join([os.path.abspath(os.path.join(base_folder, path)) for path in path_l])

for per_col in [image_col, label_col]:
    train_data[per_col] = train_data[per_col].apply(lambda ele: path_expander(ele, base_folder=dataset_path))
    val_data[per_col] = val_data[per_col].apply(lambda ele: path_expander(ele, base_folder=dataset_path))
    test_data[per_col] = test_data[per_col].apply(lambda ele: path_expander(ele, base_folder=dataset_path))


print(train_data[image_col].iloc[0])
print(train_data[label_col].iloc[0])
/home/ci/autogluon/docs/tutorials/multimodal/image_segmentation/ag_automm_tutorial/leaf_disease_segmentation/train_images/00002.jpg
/home/ci/autogluon/docs/tutorials/multimodal/image_segmentation/ag_automm_tutorial/leaf_disease_segmentation/train_masks/00002.png
每个Pandas DataFrame包含两列:一列用于图像路径,另一列用于相应的地面实况掩码。让我们更仔细地看一下训练数据的DataFrame。
train_data.head()
| image | label | |
|---|---|---|
| 0 | /home/ci/autogluon/docs/tutorials/multimodal/i... | /home/ci/autogluon/docs/tutorials/multimodal/i... |
| 1 | /home/ci/autogluon/docs/tutorials/multimodal/i... | /home/ci/autogluon/docs/tutorials/multimodal/i... |
| 2 | /home/ci/autogluon/docs/tutorials/multimodal/i... | /home/ci/autogluon/docs/tutorials/multimodal/i... |
| 3 | /home/ci/autogluon/docs/tutorials/multimodal/i... | /home/ci/autogluon/docs/tutorials/multimodal/i... |
| 4 | /home/ci/autogluon/docs/tutorials/multimodal/i... | /home/ci/autogluon/docs/tutorials/multimodal/i... |
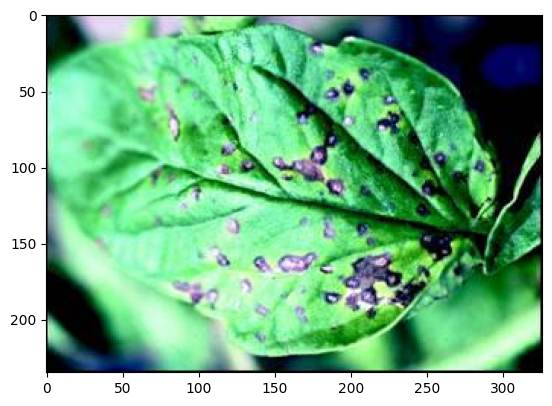
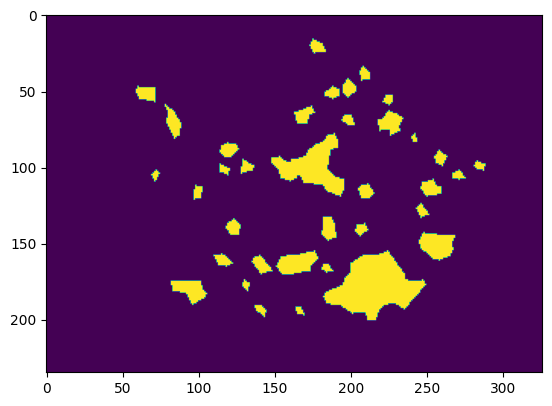
我们还可以可视化一张图像及其真实掩码。
from autogluon.multimodal.utils import SemanticSegmentationVisualizer
visualizer = SemanticSegmentationVisualizer()
visualizer.plot_image(test_data.iloc[0]['image'])
/home/ci/opt/venv/lib/python3.11/site-packages/mmengine/optim/optimizer/zero_optimizer.py:11: DeprecationWarning: `TorchScript` support for functional optimizers is deprecated and will be removed in a future PyTorch release. Consider using the `torch.compile` optimizer instead.
  from torch.distributed.optim import \
visualizer.plot_image(test_data.iloc[0]['label'])
零样本评估
现在,让我们看看预训练的SAM在图像分割方面的表现如何。在这个演示中,我们将使用基础的SAM模型。
from autogluon.multimodal import MultiModalPredictor
predictor_zero_shot = MultiModalPredictor(
    problem_type="semantic_segmentation",
    label=label_col,
     hyperparameters={
            "model.sam.checkpoint_name": "facebook/sam-vit-base",
        },
    num_classes=1, # forground-background segmentation
)
初始化预测器后,您可以直接执行推理。
pred_zero_shot = predictor_zero_shot.predict({'image': [test_data.iloc[0]['image']]})
visualizer.plot_mask(pred_zero_shot)

值得注意的是,由于缺乏对领域任务的上下文理解,没有提示的SAM输出的是粗糙的叶子掩码,而不是疾病掩码。虽然SAM在适当的点击提示下可以表现得更好,但对于一些需要独立模型进行部署的应用来说,它可能不是一个理想的端到端解决方案。
你也可以对测试数据进行零样本评估。
scores = predictor_zero_shot.evaluate(test_data, metrics=["iou"])
print(scores)
{'iou': 0.1398000568151474}
正如预期的那样,零样本SAM的测试分数相对较低。接下来,让我们探讨如何微调SAM以提高性能。
微调 SAM
初始化一个新的预测器,并使用训练和验证数据进行拟合。
from autogluon.multimodal import MultiModalPredictor
import uuid
save_path = f"./tmp/{uuid.uuid4().hex}-automm_semantic_seg"
predictor = MultiModalPredictor(
    problem_type="semantic_segmentation",
    label="label",
     hyperparameters={
            "model.sam.checkpoint_name": "facebook/sam-vit-base",
        },
    path=save_path,
)
predictor.fit(
    train_data=train_data,
    tuning_data=val_data,
    time_limit=180, # seconds
)
=================== System Info ===================
AutoGluon Version:  1.2b20241127
Python Version:     3.11.9
Operating System:   Linux
Platform Machine:   x86_64
Platform Version:   #1 SMP Tue Sep 24 10:00:37 UTC 2024
CPU Count:          8
Pytorch Version:    2.5.1+cu124
CUDA Version:       12.4
Memory Avail:       26.64 GB / 30.95 GB (86.1%)
Disk Space Avail:   187.68 GB / 255.99 GB (73.3%)
===================================================
AutoMM starts to create your model. ✨✨✨

To track the learning progress, you can open a terminal and launch Tensorboard:
    ```shell
    # Assume you have installed tensorboard
    tensorboard --logdir /home/ci/autogluon/docs/tutorials/multimodal/image_segmentation/tmp/66f7974352bb49bd92ddd8766bbbc60d-automm_semantic_seg
    ```
INFO: Seed set to 0
GPU Count: 1
GPU Count to be Used: 1
GPU 0 Name: Tesla T4
GPU 0 Memory: 0.56GB/15.0GB (Used/Total)
INFO: Using 16bit Automatic Mixed Precision (AMP)
INFO: GPU available: True (cuda), used: True
INFO: TPU available: False, using: 0 TPU cores
INFO: HPU available: False, using: 0 HPUs
INFO: `Trainer(val_check_interval=1.0)` was configured so validation will run at the end of the training epoch..
INFO: LOCAL_RANK: 0 - CUDA_VISIBLE_DEVICES: [0]
INFO:
  | Name              | Type                       | Params | Mode
-------------------------------------------------------------------------
0 | model             | SAMForSemanticSegmentation | 93.4 M | train
1 | validation_metric | Binary_IoU                 | 0      | train
2 | loss_func         | StructureLoss              | 0      | train
-------------------------------------------------------------------------
3.6 M     Trainable params
89.8 M    Non-trainable params
93.4 M    Total params
373.703   Total estimated model params size (MB)
17        Modules in train mode
208       Modules in eval mode
/home/ci/opt/venv/lib/python3.11/site-packages/torch/nn/_reduction.py:51: UserWarning: size_average and reduce args will be deprecated, please use reduction='mean' instead.
  warnings.warn(warning.format(ret))
INFO: Time limit reached. Elapsed time is 0:03:00. Signaling Trainer to stop.
INFO: Epoch 0, global step 96: 'val_iou' reached 0.59029 (best 0.59029), saving model to '/home/ci/autogluon/docs/tutorials/multimodal/image_segmentation/tmp/66f7974352bb49bd92ddd8766bbbc60d-automm_semantic_seg/epoch=0-step=96.ckpt' as top 3
/home/ci/autogluon/multimodal/src/autogluon/multimodal/utils/checkpoint.py:63: FutureWarning: You are using `torch.load` with `weights_only=False` (the current default value), which uses the default pickle module implicitly. It is possible to construct malicious pickle data which will execute arbitrary code during unpickling (See https://github.com/pytorch/pytorch/blob/main/SECURITY.md#untrusted-models for more details). In a future release, the default value for `weights_only` will be flipped to `True`. This limits the functions that could be executed during unpickling. Arbitrary objects will no longer be allowed to be loaded via this mode unless they are explicitly allowlisted by the user via `torch.serialization.add_safe_globals`. We recommend you start setting `weights_only=True` for any use case where you don't have full control of the loaded file. Please open an issue on GitHub for any issues related to this experimental feature.
  avg_state_dict = torch.load(checkpoint_paths[0], map_location=torch.device("cpu"))["state_dict"]  # nosec B614
AutoMM has created your model. 🎉🎉🎉

To load the model, use the code below:
    ```python
    from autogluon.multimodal import MultiModalPredictor
    predictor = MultiModalPredictor.load("/home/ci/autogluon/docs/tutorials/multimodal/image_segmentation/tmp/66f7974352bb49bd92ddd8766bbbc60d-automm_semantic_seg")
    ```

If you are not satisfied with the model, try to increase the training time,
adjust the hyperparameters (https://auto.gluon.ai/stable/tutorials/multimodal/advanced_topics/customization.html),
or post issues on GitHub (https://github.com/autogluon/autogluon/issues).
<autogluon.multimodal.predictor.MultiModalPredictor at 0x7f9c2463cd50>
在底层,我们使用LoRA进行高效的微调。请注意,在没有超参数定制的情况下,巨大的SAM作为默认模型,在许多情况下需要高效的微调。
微调后,在测试数据上评估SAM。
scores = predictor.evaluate(test_data, metrics=["iou"])
print(scores)
{'iou': 0.5662861466407776}
得益于微调过程,测试分数显著提高。
为了可视化影响,让我们检查微调后的预测掩码。
pred = predictor.predict({'image': [test_data.iloc[0]['image']]})
visualizer.plot_mask(pred)
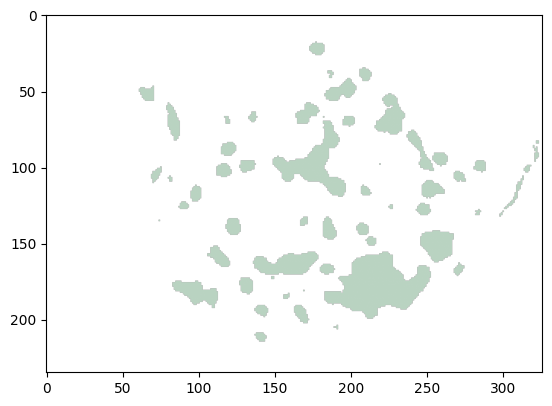
从结果中可以明显看出,预测的掩码现在更接近真实值。这证明了使用AutoMM对SAM进行领域特定应用的微调的有效性,提高了其在叶片病害分割等任务中的表现。
保存和加载
训练好的预测器在fit()结束时自动保存,您可以轻松地重新加载它。
警告
MultiModalPredictor.load() 隐式使用了 pickle 模块,这被认为是不安全的。有可能构造恶意的 pickle 数据,在反序列化期间执行任意代码。切勿加载可能来自不可信来源的数据,或可能被篡改的数据。只加载你信任的数据。
loaded_predictor = MultiModalPredictor.load(save_path)
scores = loaded_predictor.evaluate(test_data, metrics=["iou"])
print(scores)
Load pretrained checkpoint: /home/ci/autogluon/docs/tutorials/multimodal/image_segmentation/tmp/66f7974352bb49bd92ddd8766bbbc60d-automm_semantic_seg/model.ckpt
/home/ci/autogluon/multimodal/src/autogluon/multimodal/learners/base.py:2117: FutureWarning: You are using `torch.load` with `weights_only=False` (the current default value), which uses the default pickle module implicitly. It is possible to construct malicious pickle data which will execute arbitrary code during unpickling (See https://github.com/pytorch/pytorch/blob/main/SECURITY.md#untrusted-models for more details). In a future release, the default value for `weights_only` will be flipped to `True`. This limits the functions that could be executed during unpickling. Arbitrary objects will no longer be allowed to be loaded via this mode unless they are explicitly allowlisted by the user via `torch.serialization.add_safe_globals`. We recommend you start setting `weights_only=True` for any use case where you don't have full control of the loaded file. Please open an issue on GitHub for any issues related to this experimental feature.
  state_dict = torch.load(path, map_location=torch.device("cpu"))["state_dict"]  # nosec B614
{'iou': 0.5662861466407776}
我们可以看到评估分数仍然与上面相同,这意味着相同的模型!
其他示例
您可以前往AutoMM 示例探索更多关于 AutoMM 的示例。
自定义
要学习如何自定义AutoMM,请参考自定义AutoMM。