将预标注数据导入Label Studio
如果您的数据集已有模型生成的预测结果,无论是作为预标注任务还是预标记任务,您都可以将这些预测与数据集一起导入Label Studio进行审核和修正。Label Studio会自动在标注页面为每个任务显示您导入的预标注内容。
您可以将预标注任务导入Label Studio 通过用户界面或通过API。
备注
要在标注时使用机器学习模型生成交互式预标注,请参阅Set up machine learning with Label Studio。
企业
Label Studio Enterprise 客户可以使用一个名为 Prompts 的强大工具。通过 Prompts,您可以利用大语言模型(LLM)自动为 Label Studio 任务生成预测结果。更多信息请参阅 Prompts。
为Label Studio准备预标注数据
要将预测标签导入Label Studio,您必须使用Basic Label Studio JSON格式并通过predictions JSON键设置任务。Label Studio ML后端也以此格式输出任务。请查看这个常见视频教程,了解如何将提交的标注转换为预测:
预标注的JSON格式
Label Studio 预标注的 JSON 格式必须包含两个部分:
- 一个
data对象,用于引用预标注所应用的数据源。这可以是音频文件的URL、图像的预签名云存储链接、纯文本、对Label Studio中存储的CSV文件的引用,或其他内容。请参阅如何指定数据对象。 - 一个包含不同类型标注预标注结果的
predictions数组。了解如何将结果添加到predictions数组。
预标注的JSON格式必须与您数据标注项目所使用的标注配置相匹配。
指定数据对象
使用data对象来引用您在标注配置中通过Object tag指定的数据的value值。例如,以下是一个时间序列标注配置的片段:
...
  <TimeSeries name="ts" value="$csv" valueType="url">
      <Channel column="first_column"/>
  </TimeSeries>
...这段摘录在时间序列对象标签中指定了value="$csv"。因此,该标注配置的预标注JSON文件数据对象必须使用"csv"来指定时间序列预标注的CSV数据位置,如下例所示:
[
  {
    "data": {
      "csv": "https://app.heartex.ai/samples/time-series.csv?time=None&values=first_column"
    },
    "predictions": [ ]
  }
]
将结果添加到预测数组
predictions数组也取决于标注配置。某些预标注字段仅与特定类型的标注相关。下表描述了适用于所有预标注的JSON对象和数组:
| JSON键名 | 类型 | 描述 |
|---|---|---|
predictions |
array | Contains all pre-annotations for a specific task. |
predictions.model_version |
string | Specifies the model version that produced the prediction. |
predictions.result |
array | Contains all pre-annotated results for a specific task in a JSON object. |
result.value |
object | Contains details for a specific labeled region. |
result.id |
string | Arbitrary string used to identify a labeled region. Must match related regions, such as in OCR pre-annotations. |
result.from_name |
string | String used to reference the labeling configuration from_name for the type of labeling being performed. Must match the labeling configuration. |
result.to_name |
string | String used to reference the labeling configuration to_name for the type of labeling being performed. Must match the labeling configuration. |
result.type |
string | Specify the labeling tag for the type of labeling being performed. For example, a named entity recognition task has a type of labels. |
result.readonly |
bool | readonly mode for a specific region |
result.hidden |
bool | default visibility (eye icon) for a specific region |
其他类型的标注包含特定字段。您可以查阅本页示例,或在标注配置中查看对象和控制标签的标签文档,了解特定标注的result对象。例如,音频标签、超文本标签、段落标签、关键点标签等都包含result的JSON示例。
预测结果为只读
预测结果无法修改,始终为只读状态。
如果在项目设置(机器学习部分)中启用了“在标注流和快速视图中向标注者显示预测”选项,预测结果将自动复制到新创建的标注中。在快速视图模式下,可以通过编辑器工具面板上的特殊复制按钮从预测结果创建标注:

预标注的具体示例
请参考以下示例了解预标注格式的样例:
要为Label Studio格式化这些示例中未涵盖的预标注,请参考与您的标注配置相关的对象和控制标签的示例结果JSON,例如用于音频分类任务的Audio标签。每个标签都必须在JSON预标注格式中表示,才能在Label Studio用户界面中呈现预测结果。并非所有对象和控制标签都列出了示例结果JSON。
你也可以使用Label Studio Playground来预览特定标注配置的输出JSON。
导入图像边界框和选择预标注
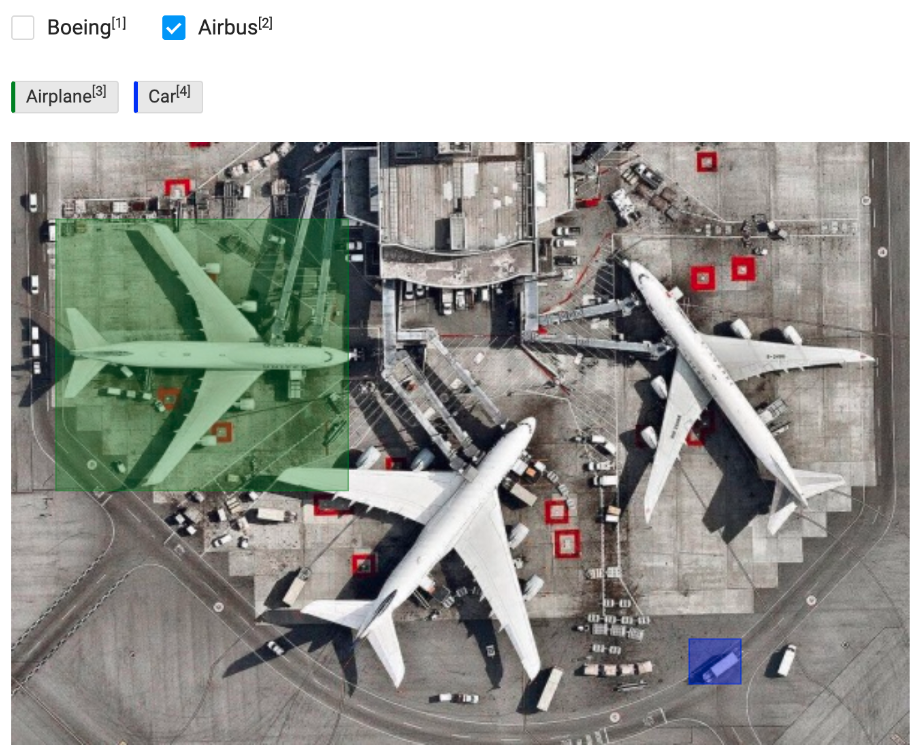
例如,导入预测的边界框区域(矩形)和选项用于判断图像中的物品是飞机还是汽车的任务。
对于图像预标注,Label Studio 期望图像标注的 x、y、宽度和高度以整体图像尺寸的百分比形式提供。有关如何转换格式的更多信息,请参阅本页的图像标注单位。
使用以下标注配置:
<View>
  <Choices name="choice" toName="image" showInLine="true">
    <Choice value="Boeing" background="blue"/>
    <Choice value="Airbus" background="green" />
  </Choices>

  <RectangleLabels name="label" toName="image">
    <Label value="Airplane" background="green"/>
    <Label value="Car" background="blue"/>
  </RectangleLabels>

  <Image name="image" value="$image"/>
</View>
在设置示例项目后,创建符合以下格式的示例任务:
Click to expand the JSON example with predictions
将此示例JSON保存为文件以导入到Label Studio中,例如example_prediction_task.json。
[{
  "data": {
    "image": "/static/samples/sample.jpg"
  },

  "predictions": [{
    "model_version": "one",
    "score": 0.5,
    "result": [
      {
        "id": "result1",
        "type": "rectanglelabels",
        "from_name": "label", "to_name": "image",
        "original_width": 600, "original_height": 403,
        "image_rotation": 0,
        "value": {
          "rotation": 0,
          "x": 4.98, "y": 12.82,
          "width": 32.52, "height": 44.91,
          "rectanglelabels": ["Airplane"]
        }
      },
      {
        "id": "result2",
        "type": "rectanglelabels",
        "from_name": "label", "to_name": "image",
        "original_width": 600, "original_height": 403,
        "image_rotation": 0,
        "value": {
          "rotation": 0,
          "x": 75.47, "y": 82.33,
          "width": 5.74, "height": 7.40,
          "rectanglelabels": ["Car"]
        }
      },
      {
        "id": "result3",
        "type": "choices",
        "from_name": "choice", "to_name": "image",
        "value": {
          "choices": ["Airbus"]
      }
    }]
  }]
}]
在这个示例中,1个预测或预标注内包含3个结果:
result1- 第一个边界框result2- 第二个边界框result3- 选项选择 预测分数适用于整个预测结果。
将预标注任务导入Label Studio 使用界面或使用API。
在Label Studio用户界面中,该任务的导入预测结果如下所示:
导入预标注的矩形、多边形、椭圆和关键点区域(不含图像标签)
如果您想导入带有预标注区域但未分配标签的图像,请参考此示例。
使用以下标注配置:
<View>
  <Image name="image" value="$image" zoom="true" zoomControl="true" rotateControl="false"/>

  <Rectangle name="rect" toName="image" showInline="false"/>
  <Polygon name="polygon" toName="image"/>
  <Ellipse name="ellipse" toName="image"/>
  <KeyPoint name="kp" toName="image"/>

  <Labels name="labels" toName="image" fillOpacity="0.5" strokeWidth="5">
    <Label value="Vehicle" background="green"/>
    <Label value="Building" background="blue"/>
    <Label value="Pavement" background="red"/>
  </Labels>
</View>
在设置示例项目后,请创建符合以下格式的示例任务:
Click to expand the JSON example
将此示例JSON保存为文件以导入Label Studio,例如example_prediction_task.json。
[{
  "data": {
    "image": "/static/samples/sample.jpg"
  },

  "predictions": [
    {
      "model_version": "one",
      "score": 0.5,
      "result": [
        {
          "original_width": 800,
          "original_height": 450,
          "image_rotation": 0,
          "value": {
            "x": 55.46,
            "y": 2.36,
            "width": 35.86,
            "height": 46.9,
            "rotation": 0
          },
          "id": "ABC",
          "from_name": "rect",
          "to_name": "image",
          "type": "rectangle"
        },
        {
          "original_width": 800,
          "original_height": 450,
          "image_rotation": 0,
          "value": {
            "points": [
              [
                20.93,
                28.90
              ],
              [
                25.86,
                64.69
              ],
              [
                38.40,
                62.79
              ],
              [
                34.13,
                27.48
              ]
            ]
          },
          "id": "GHI",
          "from_name": "polygon",
          "to_name": "image",
          "type": "polygon"
        },
        {
          "original_width": 800,
          "original_height": 450,
          "image_rotation": 0,
          "value": {
            "x": 8.4,
            "y": 20.14,
            "radiusX": 4,
            "radiusY": 7.10,
            "rotation": 0
          },
          "id": "JKL",
          "from_name": "ellipse",
          "to_name": "image",
          "type": "ellipse"
        },
        {
          "original_width": 800,
          "original_height": 450,
          "image_rotation": 0,
          "value": {
            "x": 38.40,
            "y": 34.21,
            "width": 1.0
          },
          "id": "DEF",
          "from_name": "rect",
          "to_name": "image",
          "type": "keypoint"
        }
      ]
    }
  ]
}]
在这个示例中,预测或预标注的1个结果字段内包含3个区域:
- 区域
ABC- 矩形边界框 - 区域
DEF- 第二个矩形边界框 - 区域
GHI- 多边形分割 - 区域
JKL- 一个椭圆 所有区域均未应用标签。标注配置必须使用Rectangle标签而非RectangleLabels标签来支持此类预测。尽管本示例的标注配置包含Labels标签,但预测结果无需为区域指定标签。
导入文本的跨度预标注
在这个示例中,使用命名实体识别模板(NER)导入文本的预标注:
<View>
  <Labels name="label" toName="text">
    <Label value="Person"></Label>
    <Label value="Organization"></Label>
    <Label value="Fact"></Label>
    <Label value="Money"></Label>
    <Label value="Date"></Label>
    <Label value="Time"></Label>
    <Label value="Ordinal"></Label>
    <Label value="Percent"></Label>
    <Label value="Product"></Label>
    <Label value="Language"></Label>
    <Label value="Location"></Label>
  </Labels>
  <Text name="text" value="$text"></Text>
</View>
这个示例JSON文件包含两个任务,每个任务有两组来自不同模型的预标注。第一个任务还包含每个NER跨度的预测分数:
Click to expand the NER JSON example
将此示例JSON保存为文件,例如:example_preannotated_ner_tasks.json。
[
  {
    "data": {
      "text": "All that changed when he was 27 and he came to Jerusalem. It was the weekend of both Easter and Passover, and the city was flooded with tourists."
    },
    "predictions": [
      {
        "model_version": "one",
        "score": 0.5,
        "result": [
          {
            "id": "abc",
            "from_name": "label",
            "to_name": "text",
            "type": "labels",
            "value": {
              "start": 29,
              "end": 31,
              "score": 0.70,
              "text": "27",
              "labels": [
                "Date"
              ]
            }
          },
          {
            "id": "def",
            "from_name": "label",
            "to_name": "text",
            "type": "labels",
            "value": {
              "start": 47,
              "end": 56,
              "score": 0.65,
              "text": "Jerusalem",
              "labels": [
                "Location"
              ]
            }
          },
          {
            "id": "ghi",
            "from_name": "label",
            "to_name": "text",
            "type": "labels",
            "value": {
              "start": 65,
              "end": 76,
              "score": 0.95,
              "text": "the weekend",
              "labels": [
                "Date"
              ]
            }
          },
          {
            "id": "jkl",
            "from_name": "label",
            "to_name": "text",
            "type": "labels",
            "value": {
              "start": 85,
              "end": 91,
              "score": 0.50,
              "text": "Easter",
              "labels": [
                "Date"
              ]
            }
          }
        ]
      },
      {
        "model_version": "two",
        "score": 0.42,
        "result": [
          {
            "id": "mno",
            "from_name": "label",
            "to_name": "text",
            "type": "labels",
            "value": {
              "start": 29,
              "end": 31,
              "score": 0.55,
              "text": "27",
              "labels": [
                "Date"
              ]
            }
          },
          {
            "id": "pqr",
            "from_name": "label",
            "to_name": "text",
            "type": "labels",
            "value": {
              "start": 47,
              "end": 56,
              "score": 0.40,
              "text": "Jerusalem",
              "labels": [
                "Location"
              ]
            }
          },
          {
            "id": "stu",
            "from_name": "label",
            "to_name": "text",
            "type": "labels",
            "value": {
              "start": 65,
              "end": 76,
              "score": 0.32,
              "text": "the weekend",
              "labels": [
                "Time"
              ]
            }
          },
          {
            "id": "vwx",
            "from_name": "label",
            "to_name": "text",
            "type": "labels",
            "value": {
              "start": 85,
              "end": 91,
              "score": 0.22,
              "text": "Easter",
              "labels": [
                "Location"
              ]
            }
          },
          {
            "id": "yz1",
            "from_name": "label",
            "to_name": "text",
            "type": "labels",
            "value": {
              "start": 96,
              "end": 104,
              "score": 0.96,
              "text": "Passover",
              "labels": [
                "Date"
              ]
            }
          }
        ]
      }
    ]
  },
  {
    "data": {
      "text": " Each journal was several inches thick and bound in leather. On one page are drawn portraits of Sunny in a flowery, Easter dress and sun hat. On another page are hundreds of sketches of leaves that Niyati saw in her yard."
    },
    "predictions": [
      {
        "model_version": "one",
        "result": [
          {
            "id": "ab2",
            "from_name": "label",
            "to_name": "text",
            "type": "labels",
            "value": {
              "start": 18,
              "end": 32,
              "text": "several inches",
              "labels": [
                "Product"
              ]
            }
          },
          {
            "id": "cd3",
            "from_name": "label",
            "to_name": "text",
            "type": "labels",
            "value": {
              "start": 64,
              "end": 67,
              "text": "one",
              "labels": [
                "Percent"
              ]
            }
          },
          {
            "id": "ef4",
            "from_name": "label",
            "to_name": "text",
            "type": "labels",
            "value": {
              "start": 96,
              "end": 101,
              "text": "Sunny",
              "labels": [
                "Person"
              ]
            }
          },
          {
            "id": "gh5",
            "from_name": "label",
            "to_name": "text",
            "type": "labels",
            "value": {
              "start": 162,
              "end": 170,
              "text": "hundreds",
              "labels": [
                "Percent"
              ]
            }
          },
          {
            "id": "ij6",
            "from_name": "label",
            "to_name": "text",
            "type": "labels",
            "value": {
              "start": 198,
              "end": 204,
              "text": "Niyati",
              "labels": [
                "Person"
              ]
            }
          }
        ]
      },
      {
        "model_version": "two",
        "result": [
          {
            "id": "kl7",
            "from_name": "label",
            "to_name": "text",
            "type": "labels",
            "value": {
              "start": 18,
              "end": 32,
              "text": "several inches",
              "labels": [
                "Fact"
              ]
            }
          },
          {
            "id": "mn8",
            "from_name": "label",
            "to_name": "text",
            "type": "labels",
            "value": {
              "start": 64,
              "end": 67,
              "text": "one",
              "labels": [
                "Percent"
              ]
            }
          },
          {
            "id": "op9",
            "from_name": "label",
            "to_name": "text",
            "type": "labels",
            "value": {
              "start": 96,
              "end": 101,
              "text": "Sunny",
              "labels": [
                "Time"
              ]
            }
          },
          {
            "id": "qr10",
            "from_name": "label",
            "to_name": "text",
            "type": "labels",
            "value": {
              "start": 116,
              "end": 122,
              "text": "Easter",
              "labels": [
                "Location"
              ]
            }
          },
          {
            "id": "st11",
            "from_name": "label",
            "to_name": "text",
            "type": "labels",
            "value": {
              "start": 162,
              "end": 170,
              "text": "hundreds",
              "labels": [
                "Money"
              ]
            }
          },
          {
            "id": "uv12",
            "from_name": "label",
            "to_name": "text",
            "type": "labels",
            "value": {
              "start": 198,
              "end": 204,
              "text": "Niyati",
              "labels": [
                "Person"
              ]
            }
          }
        ]
      }
    ]
  }
]
将预标注任务导入Label Studio 使用界面或使用API。在Label Studio界面中,导入的第一个任务的预测结果如下所示:

您可以使用区域面板选项对每个标注区域的预测分数进行排序。
导入RLE格式的笔刷分割预标注
如果想为使用BrushLabels标签的笔刷遮罩图像分割导入预标注数据,必须先将遮罩转换为RLE格式。Label Studio Converter包提供了一些辅助函数来实现这一转换。以下是常见转换场景及操作指南。
安装Label Studio转换器:
pip install -U label-studio-converter导入笔刷工具:
from label_studio_converter import brush将掩码转换为RLE格式。这需要一个
np.array数组,其shape=[image_width, image_height]且dtype=np.uint8。在您的Python代码中添加以下内容以执行转换:mask = (np.random.random([10, 20]) * 255).astype(np.uint8) # 只是一个随机的2D掩码 mask = (mask > 128).astype(np.uint8) * 255 # 最好进行阈值处理,可减小输出标注的大小 rle = brush.mask2rle(mask) # RLE格式的掩码图像要将OpenCV轮廓转换为RLE格式,请使用
brush.contour2rle(contours, contour_id, img_width, img_height)。要将路径中的图像(jpg、png、bmp格式)进行转换,请使用
brush.image2rle(path)。
如需更多帮助,请参考这个创建带有预标注的Label Studio任务的示例代码,适用于笔刷标签。
导入OCR预标注
导入光学字符识别(OCR)的预标注数据,例如这篇示例博客文章中展示的tesseract输出结果。
在本示例中,使用OCR模板为OCR任务导入预标注:
<View>
  <Image name="image" value="$ocr"/>
  <Labels name="label" toName="image">
    <Label value="Text" background="green"/>
    <Label value="Handwriting" background="blue"/>
  </Labels>
  <Rectangle name="bbox" toName="image" strokeWidth="3"/>
  <Polygon name="poly" toName="image" strokeWidth="3"/>
  <TextArea name="transcription" toName="image" editable="true" perRegion="true" required="true" maxSubmissions="1" rows="5" placeholder="Recognized Text" displayMode="region-list"/>
</View>
此示例JSON包含一个任务和三个结果字典,分别对应标注配置中的三种标签类型:矩形、分类标签和文本区域:
Click to expand the JSON example
将此示例JSON保存为文件以导入到Label Studio中,例如example_prediction_task.json。
{
   "data": {
      "ocr": "/data/upload/receipt_00523.png"
   },
   "predictions": [
      {
         "model_version": "best_ocr_model_1_final",
         "result": [
            {
               "original_width": 864,
               "original_height": 1296,
               "image_rotation": 0,
               "value": {
                  "x": 48.9333,
                  "y": 61.3336,
                  "width": 9.73333,
                  "height": 2.8446,
                  "rotation": 0
               },
               "id": "bb1",
               "from_name": "bbox",
               "to_name": "image",
               "type": "rectangle"
            },
            {
               "original_width": 864,
               "original_height": 1296,
               "image_rotation": 0,
               "value": {
                  "x": 48.9333,
                  "y": 61.3336,
                  "width": 9.7333,
                  "height": 2.8446,
                  "rotation": 0,
                  "labels": [
                     "Text"
                  ]
               },
               "id": "bb1",
               "from_name": "label",
               "to_name": "image",
               "type": "labels"
            },
            {
               "original_width": 864,
               "original_height": 1296,
               "image_rotation": 0,
               "value": {
                  "x": 48.9333,
                  "y": 61.3336,
                  "width": 9.7333,
                  "height": 2.8446,
                  "rotation": 0,
                  "text": [
                     "TOTAL"
                  ]
               },
               "id": "bb1",
               "from_name": "transcription",
               "to_name": "image",
               "type": "textarea"
            }
         ],
         "score": 0.89
      }
   ]
}
此示例JSON还包含任务的预测分数。每个矩形结果的ID与分配给区域的标签以及该区域的文本区域转录相匹配。
将预标注任务导入Label Studio 使用界面或使用API。
备注
本示例任务中的图像数据引用了一个上传的文件,该文件由Label Studio在上传图像后分配的source_filename标识。引用图像数据的最佳方式是使用云存储中图像的预签名URL,或者通过同步存储添加到Label Studio的本地存储中图像数据的绝对路径。
预标注问题排查
参见预标注问题排查。