


使用 ModelBuilder 类部署 PyMC 模型#
动机#
许多用户在将他们的PyMC模型部署到生产环境中时面临困难,因为部署/保存/加载用户创建的模型没有得到很好的标准化。其中一个原因是,与scikit-learn或TensorFlow不同,PyMC中没有直接的方法来保存或加载模型。新的ModelBuilder类旨在通过提供一个受scikit-learn启发的API来包装您的PyMC模型,从而改进这一工作流程。
新的 ModelBuilder 类允许用户使用方法来 fit()、predict()、save()、load()。用户可以创建任何他们想要的模型,继承 ModelBuilder 类,并使用预定义的方法。
让我们从头到尾梳理整个工作流程,从通常编写的简单线性回归 PyMC 模型开始。当然,这个模型只是您自己模型的占位符。
from typing import Dict, List, Optional, Tuple, Union

import arviz as az
import matplotlib.pyplot as plt
import numpy as np
import pandas as pd
import pymc as pm
import xarray as xr

from numpy.random import RandomState

%config InlineBackend.figure_format = 'retina'
RANDOM_SEED = 8927

rng = np.random.default_rng(RANDOM_SEED)
az.style.use("arviz-darkgrid")
WARNING (pytensor.tensor.blas): Using NumPy C-API based implementation for BLAS functions.
# Generate data
x = np.linspace(start=0, stop=1, num=100)
y = 0.3 * x + 0.5 + rng.normal(0, 1, len(x))
标准语法#
通常,一个 PyMC 模型会具有以下形式:
with pm.Model() as model:
    # priors
    a = pm.Normal("a", mu=0, sigma=1)
    b = pm.Normal("b", mu=0, sigma=1)
    eps = pm.HalfNormal("eps", 1.0)

    # observed data
    y_model = pm.Normal("y_model", mu=a + b * x, sigma=eps, observed=y)

    # Fitting
    idata = pm.sample()
    idata.extend(pm.sample_prior_predictive())

    # posterior predict
    idata.extend(pm.sample_posterior_predictive(idata))
Auto-assigning NUTS sampler...
Initializing NUTS using jitter+adapt_diag...
Multiprocess sampling (2 chains in 2 jobs)
NUTS: [a, b, eps]
Sampling 2 chains for 1_000 tune and 1_000 draw iterations (2_000 + 2_000 draws total) took 4 seconds.
We recommend running at least 4 chains for robust computation of convergence diagnostics
Sampling: [a, b, eps, y_model]
Sampling: [y_model]
我们如何部署这个模型?保存拟合的模型,在实例上加载它,并进行预测?没那么简单。
ModelBuilder 是为这个目的而构建的。它目前是 pymc-experimental 包的一部分,我们可以通过 pip install pymc-experimental 来安装。顾名思义,这个功能仍然是实验性的,可能会发生变化。
模型构建器类#
让我们导入ModelBuilder类。
from pymc_experimental.model_builder import ModelBuilder
为了定义我们所需的模型,我们继承自 ModelBuilder 类。我们需要定义几个方法。
class LinearModel(ModelBuilder):
    # Give the model a name
    _model_type = "LinearModel"

    # And a version
    version = "0.1"

    def build_model(self, X: pd.DataFrame, y: pd.Series, **kwargs):
        """
        build_model creates the PyMC model

        Parameters:
        model_config: dictionary
            it is a dictionary with all the parameters that we need in our model example:  a_loc, a_scale, b_loc
        X : pd.DataFrame
            The input data that is going to be used in the model. This should be a DataFrame
            containing the features (predictors) for the model. For efficiency reasons, it should
            only contain the necessary data columns, not the entire available dataset, as this
            will be encoded into the data used to recreate the model.

        y : pd.Series
            The target data for the model. This should be a Series representing the output
            or dependent variable for the model.

        kwargs : dict
            Additional keyword arguments that may be used for model configuration.
        """
        # Check the type of X and y and adjust access accordingly
        X_values = X["input"].values
        y_values = y.values if isinstance(y, pd.Series) else y
        self._generate_and_preprocess_model_data(X_values, y_values)

        with pm.Model(coords=self.model_coords) as self.model:
            # Create mutable data containers
            x_data = pm.MutableData("x_data", X_values)
            y_data = pm.MutableData("y_data", y_values)

            # prior parameters
            a_mu_prior = self.model_config.get("a_mu_prior", 0.0)
            a_sigma_prior = self.model_config.get("a_sigma_prior", 1.0)
            b_mu_prior = self.model_config.get("b_mu_prior", 0.0)
            b_sigma_prior = self.model_config.get("b_sigma_prior", 1.0)
            eps_prior = self.model_config.get("eps_prior", 1.0)

            # priors
            a = pm.Normal("a", mu=a_mu_prior, sigma=a_sigma_prior)
            b = pm.Normal("b", mu=b_mu_prior, sigma=b_sigma_prior)
            eps = pm.HalfNormal("eps", eps_prior)

            obs = pm.Normal("y", mu=a + b * x_data, sigma=eps, shape=x_data.shape, observed=y_data)

    def _data_setter(
        self, X: Union[pd.DataFrame, np.ndarray], y: Union[pd.Series, np.ndarray] = None
    ):
        if isinstance(X, pd.DataFrame):
            x_values = X["input"].values
        else:
            # Assuming "input" is the first column
            x_values = X[:, 0]

        with self.model:
            pm.set_data({"x_data": x_values})
            if y is not None:
                pm.set_data({"y_data": y.values if isinstance(y, pd.Series) else y})

    @staticmethod
    def get_default_model_config() -> Dict:
        """
        Returns a class default config dict for model builder if no model_config is provided on class initialization.
        The model config dict is generally used to specify the prior values we want to build the model with.
        It supports more complex data structures like lists, dictionaries, etc.
        It will be passed to the class instance on initialization, in case the user doesn't provide any model_config of their own.
        """
        model_config: Dict = {
            "a_mu_prior": 0.0,
            "a_sigma_prior": 1.0,
            "b_mu_prior": 0.0,
            "b_sigma_prior": 1.0,
            "eps_prior": 1.0,
        }
        return model_config

    @staticmethod
    def get_default_sampler_config() -> Dict:
        """
        Returns a class default sampler dict for model builder if no sampler_config is provided on class initialization.
        The sampler config dict is used to send parameters to the sampler .
        It will be used during fitting in case the user doesn't provide any sampler_config of their own.
        """
        sampler_config: Dict = {
            "draws": 1_000,
            "tune": 1_000,
            "chains": 3,
            "target_accept": 0.95,
        }
        return sampler_config

    @property
    def output_var(self):
        return "y"

    @property
    def _serializable_model_config(self) -> Dict[str, Union[int, float, Dict]]:
        """
        _serializable_model_config is a property that returns a dictionary with all the model parameters that we want to save.
        as some of the data structures are not json serializable, we need to convert them to json serializable objects.
        Some models will need them, others can just define them to return the model_config.
        """
        return self.model_config

    def _save_input_params(self, idata) -> None:
        """
        Saves any additional model parameters (other than the dataset) to the idata object.

        These parameters are stored within `idata.attrs` using keys that correspond to the parameter names.
        If you don't need to store any extra parameters, you can leave this method unimplemented.

        Example:
            For saving customer IDs provided as an 'customer_ids' input to the model:
            self.customer_ids = customer_ids.values #this line is done outside of the function, preferably at the initialization of the model object.
            idata.attrs["customer_ids"] = json.dumps(self.customer_ids.tolist())  # Convert numpy array to a JSON-serializable list.
        """
        pass

        pass

    def _generate_and_preprocess_model_data(
        self, X: Union[pd.DataFrame, pd.Series], y: Union[pd.Series, np.ndarray]
    ) -> None:
        """
        Depending on the model, we might need to preprocess the data before fitting the model.
        all required preprocessing and conditional assignments should be defined here.
        """
        self.model_coords = None  # in our case we're not using coords, but if we were, we would define them here, or later on in the function, if extracting them from the data.
        # as we don't do any data preprocessing, we just assign the data given by the user. Note that it's a very basic model,
        # and usually we would need to do some preprocessing, or generate the coords from the data.
        self.X = X
        self.y = y
现在我们可以创建 LinearModel 对象。首先我们需要处理的是数据生成:
X = pd.DataFrame(data=np.linspace(start=0, stop=1, num=100), columns=["input"])
y = 0.3 * x + 0.5
y = y + np.random.normal(0, 1, len(x))

model = LinearModel()
在创建了类 LinearModel 的对象后,我们可以使用 .fit() 方法来拟合模型。
拟合数据#
The fit() 方法接受一个参数 data,我们需要在该数据上拟合模型。元数据保存在 InferenceData 对象中,其中也存储了轨迹。这些是存储的字段:
id: 这是一个基于model_config、sample_conifg、version和model_type给出的唯一ID。用户可以使用它来检查模型是否与他们定义的另一个模型匹配。model_type: 模型类型告诉我们这是哪种类型的模型。在这种情况下,它输出 线性模型version: 如果你想改进模型,可以通过版本号来跟踪模型。随着版本的改变,id中的唯一哈希值也会改变。sample_conifg: 它存储了用户为此特定模型设置的采样器配置的值。model_config: 它存储了用户为此特定模型设置的模型配置值。
idata = model.fit(X, y)
Auto-assigning NUTS sampler...
Initializing NUTS using jitter+adapt_diag...
Multiprocess sampling (3 chains in 2 jobs)
NUTS: [a, b, eps]
Sampling 3 chains for 1_000 tune and 1_000 draw iterations (3_000 + 3_000 draws total) took 9 seconds.
We recommend running at least 4 chains for robust computation of convergence diagnostics
Sampling: [a, b, eps, y]
Sampling: [y]
将模型保存到文件#
在拟合模型后,我们可能需要将其保存为文件以便共享,这样其他人可以再次使用它。
要保存()或加载(),我们可以使用以下语法快速调用相应任务的方法。
fname = "linear_model_v1.nc"
model.save(fname)
这会在给定路径下保存一个文件,文件名为
一个存储模型推理数据的NetCDF .nc 文件。
加载模型#
现在,如果我们想要部署这个模型,或者只是让其他人使用它来预测数据,他们需要两样东西:
the
LinearModel类(可能在 .py 文件中)linear_model_v1.nc 文件
通过这些,您可以轻松地在不同的环境中(例如生产环境)加载已拟合的模型:
model_2 = LinearModel.load(fname)
/media/Data/mambaforge/envs/pymc-docs/lib/python3.11/site-packages/arviz/data/inference_data.py:153: UserWarning: fit_data group is not defined in the InferenceData scheme
  warnings.warn(
请注意,load() 是一个类方法,我们不需要实例化 LinearModel 对象。
type(model_2)
__main__.LinearModel
预测#
接下来,我们可能希望在新数据上进行预测。predict() 方法允许用户使用拟合的模型在新数据上进行后验预测。
我们的第一个任务是创建需要预测的数据。
x_pred = np.random.uniform(low=1, high=2, size=10)
prediction_data = pd.DataFrame({"input": x_pred})
type(prediction_data["input"].values)
numpy.ndarray
ModelBuilder 提供了两种预测方法:
点估计(均值)使用
predict()全后验预测(样本)使用
predict_posterior()
pred_mean = model_2.predict(prediction_data)
# samples
pred_samples = model_2.predict_posterior(prediction_data)
Sampling: [y]
Sampling: [y]
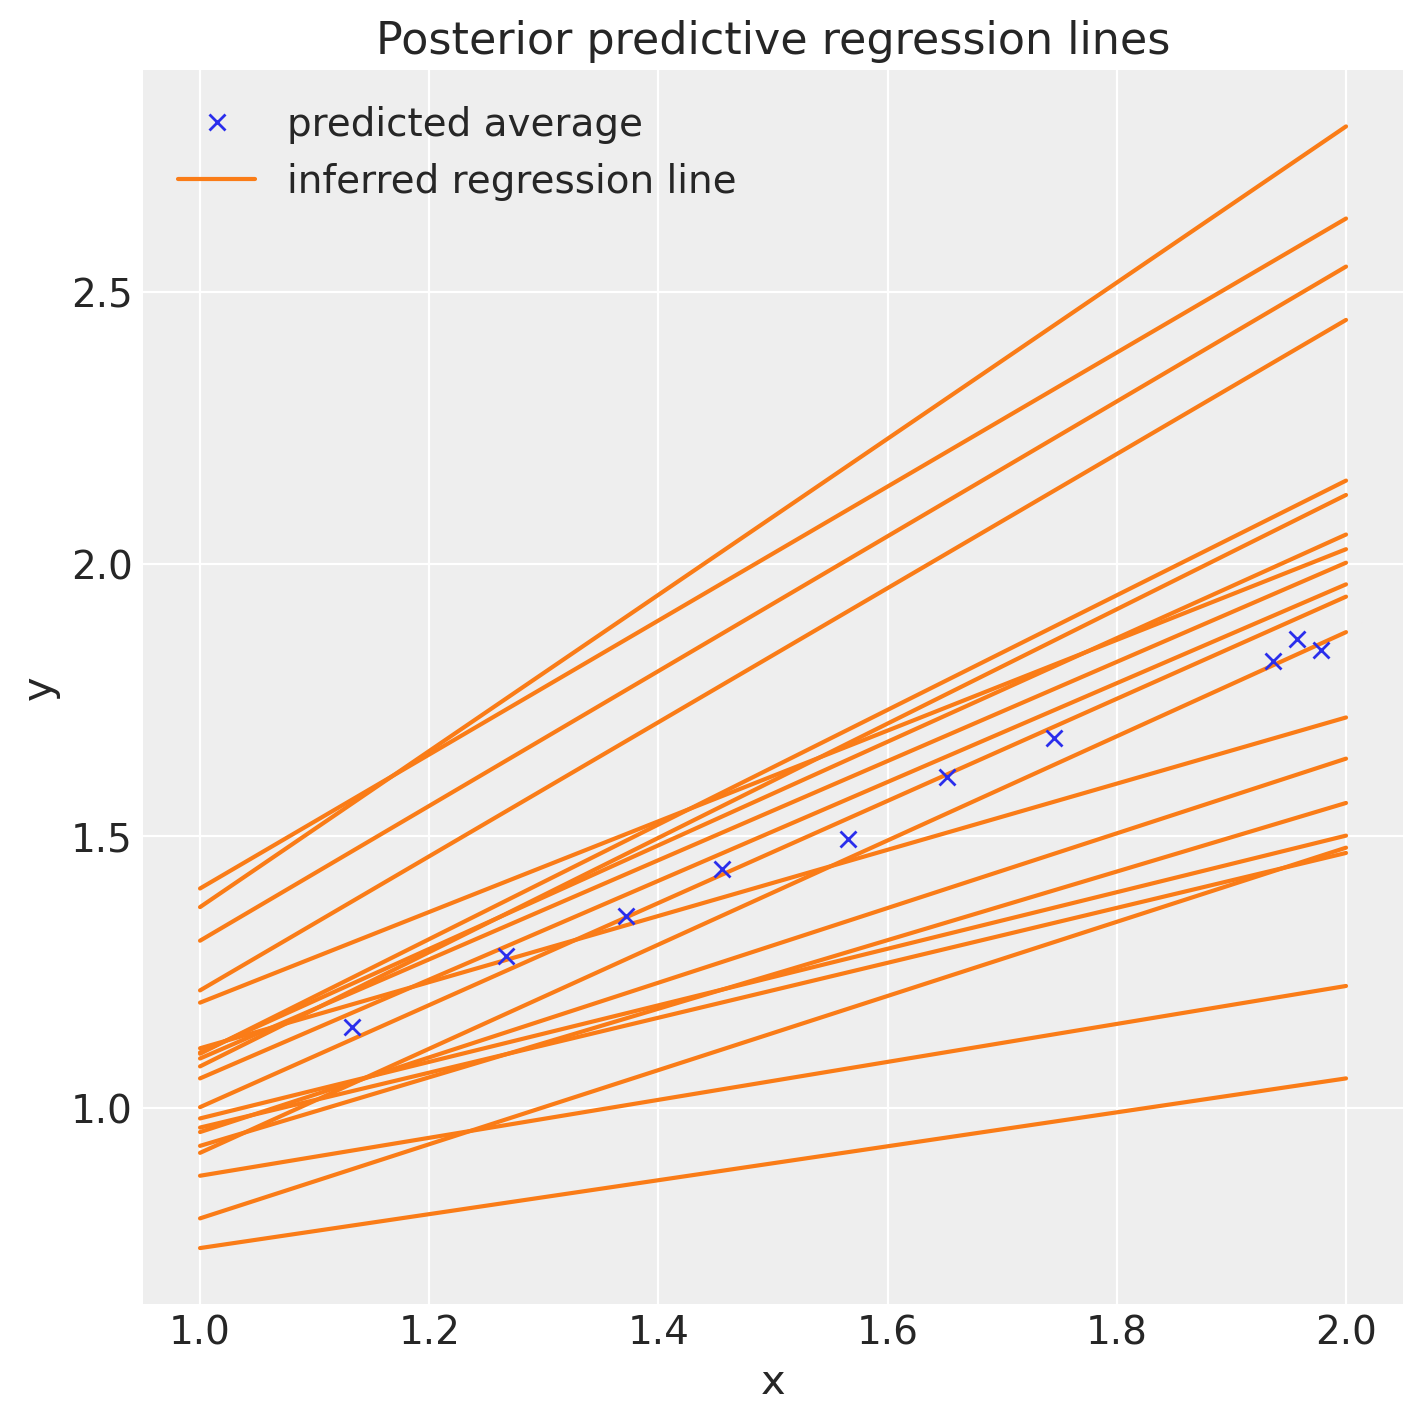
在使用 predict() 之后,我们可以绘制我们的数据并图形化地查看我们的 LinearModel 的满意程度。
fig, ax = plt.subplots(figsize=(7, 7))
posterior = az.extract(idata, num_samples=20)
x_plot = xr.DataArray(np.linspace(1, 2, 100))
y_plot = posterior["b"] * x_plot + posterior["a"]
Line2 = ax.plot(x_plot, y_plot.transpose(), color="C1")
Line1 = ax.plot(x_pred, pred_mean, "x")
ax.set(title="Posterior predictive regression lines", xlabel="x", ylabel="y")
ax.legend(
    handles=[Line1[0], Line2[0]], labels=["predicted average", "inferred regression line"], loc=0
);
%load_ext watermark
%watermark -n -u -v -iv -w -p pymc_experimental
Last updated: Thu Oct 05 2023

Python implementation: CPython
Python version       : 3.11.6
IPython version      : 8.16.1

pymc_experimental: 0.0.12

numpy     : 1.25.2
matplotlib: 3.8.0
pandas    : 2.1.1
arviz     : 0.16.1
xarray    : 2023.9.0
pymc      : 5.9.0

Watermark: 2.4.3
许可证声明#
本示例库中的所有笔记本均在MIT许可证下提供,该许可证允许修改和重新分发,前提是保留版权和许可证声明。
引用 PyMC 示例#
要引用此笔记本,请使用Zenodo为pymc-examples仓库提供的DOI。
重要
许多笔记本是从其他来源改编的:博客、书籍……在这种情况下,您应该引用原始来源。
同时记得引用代码中使用的相关库。
这是一个BibTeX的引用模板:
@incollection{citekey,
  author    = "<notebook authors, see above>",
  title     = "<notebook title>",
  editor    = "PyMC Team",
  booktitle = "PyMC examples",
  doi       = "10.5281/zenodo.5654871"
}
渲染后可能看起来像: