Mobject
限定名称: manim.mobject.mobject.Mobject
- class Mobject(color=ManimColor('#FFFFFF'), name=None, dim=3, target=None, z_index=0)[来源]
基础:
object数学对象:可以在屏幕上显示的对象的基类。
有一个兼容层允许使用
get_*和set_*方法来获取和设置通用属性。更多详情请参见set()。- Parameters:
颜色 (ParsableManimColor | 列表[ParsableManimColor])
name (str | None)
dim (int)
z_index (float)
方法
将mobjects添加为子对象。
添加一个动画覆盖。
添加一个BackgroundRectangle作为子对象。
add_background_rectangle_to_family_members_with_pointsadd_background_rectangle_to_submobjectsadd_n_more_submobjects将所有传递的mobjects添加到submobjects的末尾。
向这个mobject添加一个更新函数。
将此mobject的数据与另一个mobject对齐。
方向只需要是一个指向2D平面中的边或角的向量。
align_pointsalign_points_with_largeralign_submobjects将mobject在某个方向上对齐到另一个
Mobject。返回定义此类的特定动画覆盖的函数。
将一个复杂函数应用于
Mobject。apply_functionapply_function_to_positionapply_function_to_submobject_positionsapply_matrixapply_over_attr_arraysapply_points_function_about_point将函数应用于
self和每个具有点的子对象,递归地。将
Mobject在屏幕上彼此相邻排序。将子对象排列在网格中。
使用小缓冲区排列
submobjects的位置。编辑点、颜色和子对象以与另一个
Mobject相同将mobject的中心移动到场景的中心。
移除每个更新器。
创建并返回一个与
Mobject完全相同的副本,包括所有submobjects。fadefade_tofamily_members_with_points将mobject围绕其中心翻转/镜像。
初始化
points并因此确定形状。generate_target返回此mobject及其所有子对象的所有点。
get_array_attrs获取包围
Mobject的盒子的底部Point3Dsget_boundary_point获取中心点 Point3Ds
get_center_of_mass返回
Mobject的颜色旨在概括
get_x,get_y和get_z获取特定方向的角点Point3Ds。
想象一个包围
Mobject的盒子。获取特定方向的边缘点3D。
返回围绕
Mobject的描边结束的点。get_extremum_along_dimget_familyget_family_updatersget_group_classget_image获取包围
Mobject的盒子的左侧Point3Ds返回此mobject及其所有子对象中给定属性的所有内容。
获取形成
Mobject路径中点的Point3Ds。返回此mobject类型的基类。
获取包围3D
Mobject的盒子的最低点(与天顶相对)的Point3Ds。get_num_pointsget_pieces最简单的
Mobject可以转换为自身或从自身转换而来。get_points_defining_boundary获取包围
Mobject的盒子的正确Point3Ds返回围绕
Mobject的描边开始的点。返回笔画的起点和终点作为一个
tuple。返回所有使用
dt参数的更新器。获取包围
Mobject的盒子的顶部Point3Ds返回所有更新器。
返回
Mobject中心的 x Point3D 作为float返回
Mobject中心的 y Point3D 作为float返回
Mobject中心的 z Point3D 作为floatget_z_index_reference_point获取包围3D
Mobject的盒子的顶点Point3Ds。检查
Mobject是否不包含点。检查
Mobject是否包含点。测试
self是否具有基于时间的更新器。初始化颜色。
在特定位置插入一个mobject到self.submobjects中
将此
Mobject转换为mobject1和mobject2之间的插值。interpolate_color反转
submobjects的列表。is_off_screen测量
Mobject在某个方向上的长度。将颜色与另一个
Mobject的颜色匹配。将Point3Ds与另一个
Mobject的Point3Ds进行匹配。将深度与另一个
Mobject的深度匹配。将指定的维度与另一个
Mobject的维度匹配。将高度与另一个
Mobject的高度匹配。编辑点、位置和子对象,使其与另一个
Mobject相同,同时保持样式不变。匹配给定mobject的更新器。
将宽度与另一个
Mobject的宽度匹配。匹配x坐标。
匹配 y 坐标。
匹配 z 坐标。
将
Mobject的中心移动到某个Point3D。nonempty_submobjects如果一个带有点的
Mobject被对齐到一个没有点的对象,将两者视为组,并将带有点的对象推入其自己的子对象列表中。point_from_proportionpose_at_angleproportion_from_pointpush_self_into_submobjectsput_start_and_end_on从该维度和子对象中的所有点中找到最小值或最大值。
移除
submobjects。移除一个更新器。
这可以使过渡动画更加美观
repeat_submobjectreplacerescale_to_fit将
points设置为空数组。恢复之前使用
save_state()保存的状态。启用从更新器和动画进行更新。
reverse_points围绕某个点旋转
Mobject。将
Mobject绕原点旋转,原点位于[0,0,0]。仅将此
Mobject的图像保存到png文件中。保存当前状态(位置、颜色和大小)。
按比例缩放大小。
缩放
Mobject以适应深度,同时保持宽度/高度比例。缩放
Mobject以适应高度,同时保持宽度/深度比例。缩放
Mobject以适应宽度,同时保持高度/深度比例。设置属性。
条件是一个函数,它接受一个参数,(x, y, z)。
- 参数 colors:
用于渐变的颜色。使用方式如 set_color_by_gradient(RED, BLUE, GREEN)。
set_colors_by_radial_gradientset_coord设置关键字参数的默认值。
set_submobject_colors_by_gradientset_submobject_colors_by_radial_gradient设置
Mobject中心的x值(int或float)设置
Mobject中心的y值(int或float)设置
Mobject中心的z值(int或float)将
Mobject的z_index设置为z_index_value中指定的值。将
Mobject的z Point3D设置为z_index的值。按给定的向量进行位移。
shift_onto_screenshow打乱
submobjects的列表。打乱
submobjects的顺序通过由
submob_func定义的函数对submobjects列表进行排序。对
submobjects进行排序space_out_submobjectssplitstretchstretch_about_point拉伸
Mobject以适应深度,不保持宽度/高度比例。拉伸
Mobject以适应高度,不保持宽度/深度的比例。拉伸
Mobject以适应宽度,不保持高度/深度的比例。surround禁用来自更新器和动画的更新。
throw_error_if_no_points将此
Mobject移动到屏幕的给定角落。将此
Mobject移动到屏幕的给定边缘,而不影响其在另一维度的位置。to_original_color应用所有更新器。
属性
用于动画化
self的任何方法的应用。animation_overridesmobject的深度。
mobject的高度。
mobject的宽度。
- classmethod _add_intrinsic_animation_overrides()[来源]
初始化标记有
override_animation()装饰器的动画覆盖。- Return type:
无
- add(*mobjects)[来源]
将mobjects添加为子对象。
mobjects 被添加到
submobjects中。mobject的子类可以实现
+和+=的dunder方法。- Parameters:
mobjects (Mobject) – 要添加的mobjects。
- Returns:
self- Return type:
- Raises:
ValueError – 当一个mobject尝试添加自己时。
类型错误 – 当尝试添加一个不是
Mobject实例的对象时。
注释
一个mobject不能包含它自己,也不能多次包含同一个子mobject。如果父mobject被显示,新添加的子mobject也会被显示(即它们会自动添加到父场景中)。
另请参阅
示例
>>> outer = Mobject()
>>> inner = Mobject()
>>> outer = outer.add(inner)
重复项不会再次添加:
>>> outer = outer.add(inner)
>>> len(outer.submobjects)
1
将对象添加到自身会引发错误:
>>> outer.add(outer)
Traceback (most recent call last):
...
ValueError: Mobject cannot contain self
给定的mobject不能作为子对象两次添加到某个父对象中:
>>> parent = Mobject(name="parent")
>>> child = Mobject(name="child")
>>> parent.add(child, child)
[...] WARNING  ...
parent
>>> parent.submobjects
[child]
- classmethod add_animation_override(animation_class, override_func)[来源]
添加一个动画覆盖。
这不适用于子类。
- Parameters:
animation_class (type[动画]) – 要覆盖的动画类型
override_func (FunctionOverride) – 该函数返回一个动画,用于替换默认动画。它会接收传递给动画构造函数的参数。
- Raises:
MultiAnimationOverrideException – 如果被覆盖的动画已经被覆盖。
- Return type:
无
- add_background_rectangle(color=None, opacity=0.75, **kwargs)[来源]
添加一个BackgroundRectangle作为子对象。
BackgroundRectangle 被添加在其他子对象的后面。
这可以用于在嘈杂的背景前增加物体的可见性。
- Parameters:
color (ParsableManimColor | None) – BackgroundRectangle的颜色
opacity (float) – BackgroundRectangle的不透明度
kwargs – 传递给BackgroundRectangle构造函数的额外关键字参数
- Returns:
self- Return type:
- add_to_back(*mobjects)[source]
将所有传递的mobjects添加到submobjects的末尾。
如果
submobjects已经包含给定的 mobjects,它们只会被移到后面。注意
从技术上讲,这是通过将mobjects添加(或移动)到
submobjects的头部来实现的。这个列表的头部首先被渲染,这将相应的mobjects放置在后续列表成员的后面。- Raises:
ValueError – 当一个mobject尝试添加自己时。
类型错误 – 当尝试添加一个不是
Mobject实例的对象时。
- Parameters:
mobjects (Mobject)
- Return type:
自我
注释
一个mobject不能包含它自己,也不能多次包含同一个子mobject。如果父mobject被显示,新添加的子mobject也会被显示(即它们会自动添加到父场景中)。
- add_updater(update_function, index=None, call_updater=False)[source]
向这个mobject添加一个更新函数。
更新函数,简称updaters,是应用于每一帧中Mobject的函数。
- Parameters:
- Returns:
self- Return type:
示例
示例:NextToUpdater 
from manim import *

class NextToUpdater(Scene):
    def construct(self):
        def dot_position(mobject):
            mobject.set_value(dot.get_center()[0])
            mobject.next_to(dot)

        dot = Dot(RIGHT*3)
        label = DecimalNumber()
        label.add_updater(dot_position)
        self.add(dot, label)

        self.play(Rotating(dot, about_point=ORIGIN, angle=TAU, run_time=TAU, rate_func=linear))
示例:DtUpdater 
from manim import *

class DtUpdater(Scene):
    def construct(self):
        square = Square()

        #Let the square rotate 90° per second
        square.add_updater(lambda mobject, dt: mobject.rotate(dt*90*DEGREES))
        self.add(square)
        self.wait(2)
class DtUpdater(Scene):
    def construct(self):
        square = Square()

        #Let the square rotate 90° per second
        square.add_updater(lambda mobject, dt: mobject.rotate(dt*90*DEGREES))
        self.add(square)
        self.wait(2)
- align_data(mobject, skip_point_alignment=False)[source]
将此mobject的数据与另一个mobject对齐。
之后,两个mobjects将具有相同数量的子对象(参见
align_submobjects()),相同的父结构(参见null_point_align())。如果skip_point_alignment为false,它们还将具有相同数量的点(参见align_points())。- Parameters:
mobject (Mobject) – 该mobject应对齐的其他mobject。
skip_point_alignment (bool) – 控制是否跳过计算成本较高的点对齐(默认值:False)。
- Return type:
无
- align_on_border(direction, buff=0.5)[source]
方向只需要是一个指向2D平面中的边或角的向量。
- Parameters:
方向 (Vector3D)
buff (float)
- Return type:
自我
- align_to(mobject_or_point, direction=array([0., 0., 0.]))[source]
将mobject在某个方向上对齐到另一个
Mobject。示例: mob1.align_to(mob2, UP) 将 mob1 垂直移动,使其 顶部边缘与 mob2 的顶部边缘对齐。
- property animate: _AnimationBuilder | Self
用于动画化
self的任何方法的应用。任何在
animate上调用的方法都会被转换为在mobject本身上应用该方法的动画。例如,
square.set_fill(WHITE)设置正方形的填充颜色, 而square.animate.set_fill(WHITE)则将此操作动画化。可以通过链式调用将多个方法放入单个动画中:
self.play(my_mobject.animate.shift(RIGHT).rotate(PI))
警告
不建议在同一个
Mobject的一次调用中传递多个动画给play(),这很可能无法正常工作。应该避免像下面这样编写动画:self.play(my_mobject.animate.shift(RIGHT), my_mobject.animate.rotate(PI))
使用方法链。
可以传递给
Scene.play()的关键字参数可以在访问.animate后直接传递,如下所示:self.play(my_mobject.animate(rate_func=linear).shift(RIGHT))
这在动画化同时进行的
.animate调用时特别有用,这些调用你希望它们表现不同:self.play( mobject1.animate(run_time=2).rotate(PI), mobject2.animate(rate_func=there_and_back).shift(RIGHT), )
另请参阅
示例
示例:AnimateExample 
from manim import *

class AnimateExample(Scene):
    def construct(self):
        s = Square()
        self.play(Create(s))
        self.play(s.animate.shift(RIGHT))
        self.play(s.animate.scale(2))
        self.play(s.animate.rotate(PI / 2))
        self.play(Uncreate(s))
class AnimateExample(Scene):
    def construct(self):
        s = Square()
        self.play(Create(s))
        self.play(s.animate.shift(RIGHT))
        self.play(s.animate.scale(2))
        self.play(s.animate.rotate(PI / 2))
        self.play(Uncreate(s))
示例:AnimateChainExample 
from manim import *

class AnimateChainExample(Scene):
    def construct(self):
        s = Square()
        self.play(Create(s))
        self.play(s.animate.shift(RIGHT).scale(2).rotate(PI / 2))
        self.play(Uncreate(s))
class AnimateChainExample(Scene):
    def construct(self):
        s = Square()
        self.play(Create(s))
        self.play(s.animate.shift(RIGHT).scale(2).rotate(PI / 2))
        self.play(Uncreate(s))
示例:AnimateWithArgsExample 
from manim import *

class AnimateWithArgsExample(Scene):
    def construct(self):
        s = Square()
        c = Circle()

        VGroup(s, c).arrange(RIGHT, buff=2)
        self.add(s, c)

        self.play(
            s.animate(run_time=2).rotate(PI / 2),
            c.animate(rate_func=there_and_back).shift(RIGHT),
        )
警告
.animate将在应用
.animate之前和之后对Mobject的点进行插值。这可能会导致在尝试沿路径或旋转进行插值时出现意外行为。如果你希望动画考虑中间的点,可以考虑使用ValueTracker与更新器。
- apply_complex_function(function, **kwargs)[source]
将一个复杂函数应用于
Mobject。 x和y的Point3D分别对应于实部和虚部。示例
示例:ApplyFuncExample 
from manim import *

class ApplyFuncExample(Scene):
    def construct(self):
        circ = Circle().scale(1.5)
        circ_ref = circ.copy()
        circ.apply_complex_function(
            lambda x: np.exp(x*1j)
        )
        t = ValueTracker(0)
        circ.add_updater(
            lambda x: x.become(circ_ref.copy().apply_complex_function(
                lambda x: np.exp(x+t.get_value()*1j)
            )).set_color(BLUE)
        )
        self.add(circ_ref)
        self.play(TransformFromCopy(circ_ref, circ))
        self.play(t.animate.set_value(TAU), run_time=3)
class ApplyFuncExample(Scene): def construct(self): circ = Circle().scale(1.5) circ_ref = circ.copy() circ.apply_complex_function( lambda x: np.exp(x*1j) ) t = ValueTracker(0) circ.add_updater( lambda x: x.become(circ_ref.copy().apply_complex_function( lambda x: np.exp(x+t.get_value()*1j) )).set_color(BLUE) ) self.add(circ_ref) self.play(TransformFromCopy(circ_ref, circ)) self.play(t.animate.set_value(TAU), run_time=3)- Parameters:
function (Callable[[complex], complex])
- Return type:
自我
- apply_to_family(func)[来源]
将函数应用于
self和每个具有点的子对象,递归地。- Parameters:
func (Callable[[Mobject], None]) – 应用于每个mobject的函数。
func将相应的(子)mobject作为参数传递。- Returns:
self- Return type:
另请参阅
family_members_with_points()
- arrange(direction=array([1., 0., 0.]), buff=0.25, center=True, **kwargs)[来源]
将
Mobject在屏幕上彼此相邻排序。示例
示例: 示例 
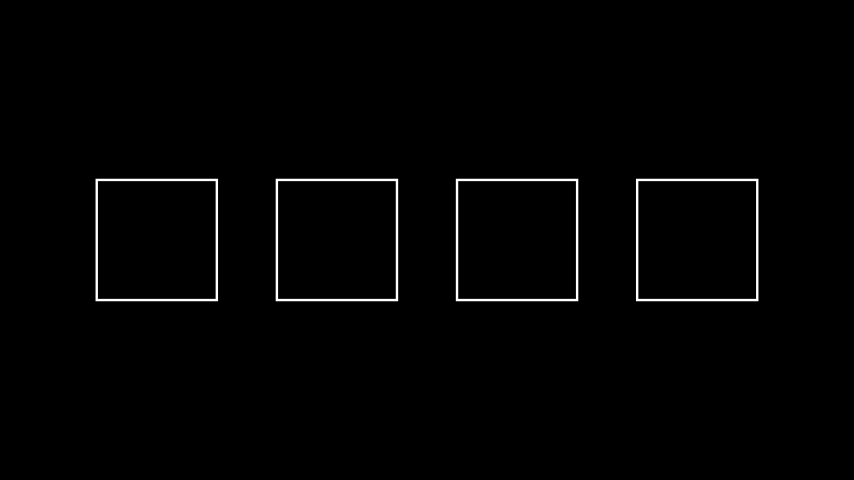
from manim import *

class Example(Scene):
    def construct(self):
        s1 = Square()
        s2 = Square()
        s3 = Square()
        s4 = Square()
        x = VGroup(s1, s2, s3, s4).set_x(0).arrange(buff=1.0)
        self.add(x)
class Example(Scene): def construct(self): s1 = Square() s2 = Square() s3 = Square() s4 = Square() x = VGroup(s1, s2, s3, s4).set_x(0).arrange(buff=1.0) self.add(x)- Parameters:
方向 (Vector3D)
buff (float)
center (布尔值)
- Return type:
自我
- arrange_in_grid(rows=None, cols=None, buff=0.25, cell_alignment=array([0., 0., 0.]), row_alignments=None, col_alignments=None, row_heights=None, col_widths=None, flow_order='rd', **kwargs)[source]
将子对象排列在网格中。
- Parameters:
rows (int | None) – 网格中的行数。
cols (int | None) – 网格中的列数。
buff (float | tuple[float, float]) – 网格单元格之间的间隙。为了在水平和垂直方向上指定不同的缓冲,可以给出一个包含两个值的元组 -
(row, col)。cell_alignment (Vector3D) – 每个子对象在其网格单元中的对齐方式。
row_alignments (str | None) – 每行的垂直对齐方式(从上到下)。接受以下字符:
"u"- 上对齐,"c"- 居中对齐,"d"- 下对齐。col_alignments (str | None) – 每列的水平对齐方式(从左到右)。接受以下字符
"l"- 左对齐,"c"- 居中对齐,"r"- 右对齐。row_heights (Iterable[float | None] | None) – 定义某些行的高度列表(从上到下)。如果列表中包含
None,则相应的行将根据该行中最高的元素自动调整其高度。col_widths (Iterable[float | None] | None) – 定义某些列的宽度列表(从左到右)。如果列表包含
None,则相应的列将根据该列中最宽的元素自动调整宽度。flow_order (str) – 子对象填充网格的顺序。可以是以下值之一: “rd”, “dr”, “ld”, “dl”, “ru”, “ur”, “lu”, “ul”。(“rd” -> 先向右填充,然后向下填充)
- Returns:
self- Return type:
- Raises:
ValueError – 如果
rows和cols太小,无法容纳所有子对象。ValueError – 如果
cols,col_alignments和col_widths或rows,row_alignments和row_heights的大小不匹配。
注释
如果只有
cols和rows中的一个被隐式设置,另一个将被选择得足够大以适应所有子对象。如果两者都没有设置,它们将被选择为大致相同,倾向于cols>rows(仅仅是因为视频的宽度大于高度)。如果同时定义了
cell_alignment和row_alignments/col_alignments,后者具有更高的优先级。示例
示例:ExampleBoxes 

from manim import *

class ExampleBoxes(Scene):
    def construct(self):
        boxes=VGroup(*[Square() for s in range(0,6)])
        boxes.arrange_in_grid(rows=2, buff=0.1)
        self.add(boxes)
class ExampleBoxes(Scene):
    def construct(self):
        boxes=VGroup(*[Square() for s in range(0,6)])
        boxes.arrange_in_grid(rows=2, buff=0.1)
        self.add(boxes)
示例:ArrangeInGrid 
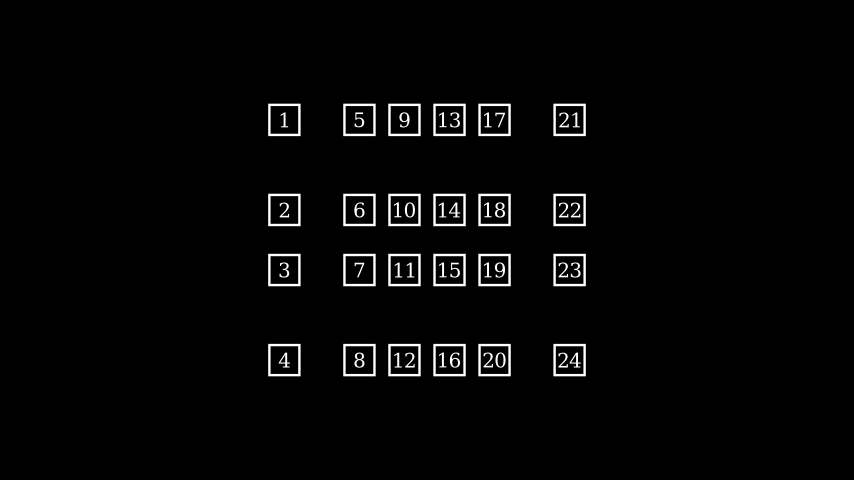
from manim import *

class ArrangeInGrid(Scene):
    def construct(self):
        boxes = VGroup(*[
            Rectangle(WHITE, 0.5, 0.5).add(Text(str(i+1)).scale(0.5))
            for i in range(24)
        ])
        self.add(boxes)

        boxes.arrange_in_grid(
            buff=(0.25,0.5),
            col_alignments="lccccr",
            row_alignments="uccd",
            col_widths=[1, *[None]*4, 1],
            row_heights=[1, None, None, 1],
            flow_order="dr"
        )
- arrange_submobjects(*args, **kwargs)[source]
使用小缓冲区排列
submobjects的位置。示例
示例:ArrangeSumobjectsExample 
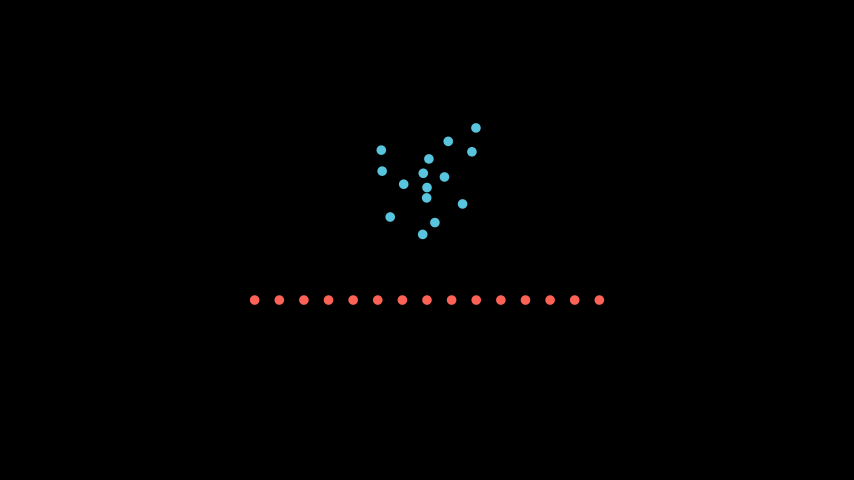
from manim import *

class ArrangeSumobjectsExample(Scene):
    def construct(self):
        s= VGroup(*[Dot().shift(i*0.1*RIGHT*np.random.uniform(-1,1)+UP*np.random.uniform(-1,1)) for i in range(0,15)])
        s.shift(UP).set_color(BLUE)
        s2= s.copy().set_color(RED)
        s2.arrange_submobjects()
        s2.shift(DOWN)
        self.add(s,s2)
class ArrangeSumobjectsExample(Scene): def construct(self): s= VGroup(*[Dot().shift(i*0.1*RIGHT*np.random.uniform(-1,1)+UP*np.random.uniform(-1,1)) for i in range(0,15)]) s.shift(UP).set_color(BLUE) s2= s.copy().set_color(RED) s2.arrange_submobjects() s2.shift(DOWN) self.add(s,s2)- Return type:
自我
- become(mobject, match_height=False, match_width=False, match_depth=False, match_center=False, stretch=False)[来源]
编辑点、颜色和子对象,使其与另一个
Mobject相同注意
如果 match_height 和 match_width 都为
True,那么转换后的Mobject将首先匹配高度,然后匹配宽度。- Parameters:
- Return type:
自我
示例
示例:BecomeScene 
from manim import *

class BecomeScene(Scene):
    def construct(self):
        circ = Circle(fill_color=RED, fill_opacity=0.8)
        square = Square(fill_color=BLUE, fill_opacity=0.2)
        self.add(circ)
        self.wait(0.5)
        circ.become(square)
        self.wait(0.5)
class BecomeScene(Scene):
    def construct(self):
        circ = Circle(fill_color=RED, fill_opacity=0.8)
        square = Square(fill_color=BLUE, fill_opacity=0.2)
        self.add(circ)
        self.wait(0.5)
        circ.become(square)
        self.wait(0.5)
以下示例说明了在使用
match_...和stretch参数时,mobject 测量值如何变化。 我们从一个高 2 单位、宽 4 单位的矩形开始,我们希望将其转换为半径为 3 的圆:>>> from manim import Rectangle, Circle >>> import numpy as np >>> rect = Rectangle(height=2, width=4) >>> circ = Circle(radius=3)
使用
stretch=True时,目标圆会被变形以匹配矩形的比例,这导致目标mobject成为一个高度为2、宽度为4的椭圆。我们可以检查生成的点是否满足椭圆方程\(x^2/a^2 + y^2/b^2 = 1\),其中\(a = 4/2\)和\(b = 2/2\)是半轴:>>> result = rect.copy().become(circ, stretch=True) >>> result.height, result.width (2.0, 4.0) >>> ellipse_points = np.array(result.get_anchors()) >>> ellipse_eq = np.sum(ellipse_points**2 * [1/4, 1, 0], axis=1) >>> np.allclose(ellipse_eq, 1) True
使用
match_height=True和match_width=True时,圆会被缩放,以分别保持矩形的高度或宽度。 生成的 mobject 的点满足对应半径 \(r\) 的圆方程 \(x^2 + y^2 = r^2\):>>> result = rect.copy().become(circ, match_height=True) >>> result.height, result.width (2.0, 2.0) >>> circle_points = np.array(result.get_anchors()) >>> circle_eq = np.sum(circle_points**2, axis=1) >>> np.allclose(circle_eq, 1) True >>> result = rect.copy().become(circ, match_width=True) >>> result.height, result.width (4.0, 4.0) >>> circle_points = np.array(result.get_anchors()) >>> circle_eq = np.sum(circle_points**2, axis=1) >>> np.allclose(circle_eq, 2**2) True
使用
match_center=True,生成的 mobject 会被移动,使其中心与原始 mobject 的中心相同:>>> rect = rect.shift(np.array([0, 1, 0])) >>> np.allclose(rect.get_center(), circ.get_center()) False >>> result = rect.copy().become(circ, match_center=True) >>> np.allclose(rect.get_center(), result.get_center()) True
- clear_updaters(recursive=True)[来源]
移除每个更新器。
- Parameters:
recursive (bool) – 是否在所有子对象上递归调用
clear_updaters。- Returns:
self- Return type:
- copy()[source]
创建并返回一个与
Mobject完全相同的副本,包括所有submobjects。- Returns:
副本。
- Return type:
注意
克隆体最初在场景中不可见,即使原始对象是可见的。
- property depth: float
mobject的深度。
- Return type:
float
另请参阅
- flip(axis=array([0., 1., 0.]), **kwargs)[source]
将mobject围绕其中心翻转/镜像。
示例
示例:FlipExample 
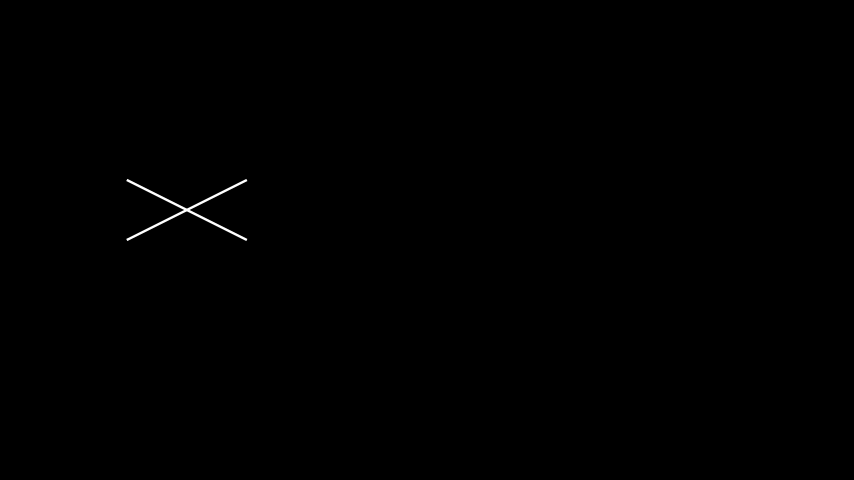
from manim import *

class FlipExample(Scene):
    def construct(self):
        s= Line(LEFT, RIGHT+UP).shift(4*LEFT)
        self.add(s)
        s2= s.copy().flip()
        self.add(s2)
class FlipExample(Scene): def construct(self): s= Line(LEFT, RIGHT+UP).shift(4*LEFT) self.add(s) s2= s.copy().flip() self.add(s2)- Parameters:
axis (Vector3D)
- Return type:
自我
- get_color()[source]
返回
Mobject的颜色示例
>>> from manim import Square, RED
>>> Square(color=RED).get_color() == RED
True
- Return type:
- get_coord(dim, direction=array([0., 0., 0.]))[source]
旨在概括
get_x,get_y和get_z- Parameters:
dim (int)
方向 (Vector3D)
- get_critical_point(direction)[来源]
想象一个包围
Mobject的盒子。这样的盒子有9个“关键点”:4个角、4个边的中心、以及中心点。此函数根据给定的方向返回其中一个关键点。sample = Arc(start_angle=PI/7, angle = PI/5) # These are all equivalent max_y_1 = sample.get_top()[1] max_y_2 = sample.get_critical_point(UP)[1] max_y_3 = sample.get_extremum_along_dim(dim=1, key=1)
- get_merged_array(array_attr)[source]
返回此mobject及其所有子对象中给定属性的所有内容。
可能包含重复项;顺序是子对象的深度优先(前序)遍历。
- Parameters:
array_attr (str)
- Return type:
ndarray
- get_midpoint()[来源]
获取形成
Mobject路径中点的Point3Ds。示例
示例:AngleMidPoint 
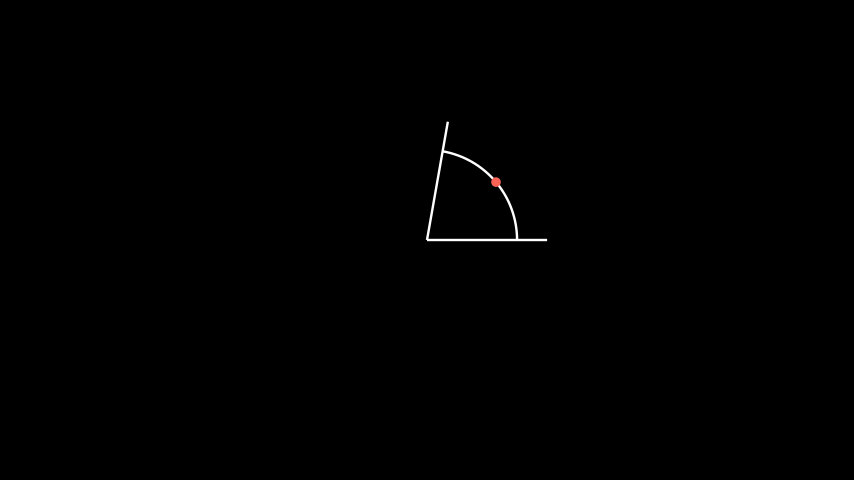
from manim import *

class AngleMidPoint(Scene):
    def construct(self):
        line1 = Line(ORIGIN, 2*RIGHT)
        line2 = Line(ORIGIN, 2*RIGHT).rotate_about_origin(80*DEGREES)

        a = Angle(line1, line2, radius=1.5, other_angle=False)
        d = Dot(a.get_midpoint()).set_color(RED)

        self.add(line1, line2, a, d)
        self.wait()
class AngleMidPoint(Scene): def construct(self): line1 = Line(ORIGIN, 2*RIGHT) line2 = Line(ORIGIN, 2*RIGHT).rotate_about_origin(80*DEGREES) a = Angle(line1, line2, radius=1.5, other_angle=False) d = Dot(a.get_midpoint()).set_color(RED) self.add(line1, line2, a, d) self.wait()- Return type:
- get_time_based_updaters()[来源]
返回所有使用
dt参数的更新器。更新程序使用此参数作为时间差异的输入。
- Returns:
基于时间的更新器列表。
- Return type:
列表[
Callable]
- get_x(direction=array([0., 0., 0.]))[来源]
返回
Mobject中心的 x Point3D 作为float- Parameters:
方向 (Vector3D)
- Return type:
- get_y(direction=array([0., 0., 0.]))[source]
返回
Mobject中心的 y Point3D 作为float- Parameters:
方向 (Vector3D)
- Return type:
- get_z(direction=array([0., 0., 0.]))[来源]
返回
Mobject中心的 z Point3D 作为float- Parameters:
方向 (Vector3D)
- Return type:
- has_time_based_updater()[来源]
测试
self是否具有基于时间的更新器。- Returns:
True如果至少有一个更新器使用了dt参数,False否则。- Return type:
bool
- property height: float
mobject的高度。
- Return type:
float
示例
示例:HeightExample 
from manim import *

class HeightExample(Scene):
    def construct(self):
        decimal = DecimalNumber().to_edge(UP)
        rect = Rectangle(color=BLUE)
        rect_copy = rect.copy().set_stroke(GRAY, opacity=0.5)

        decimal.add_updater(lambda d: d.set_value(rect.height))

        self.add(rect_copy, rect, decimal)
        self.play(rect.animate.set(height=5))
        self.wait()
另请参阅
- insert(index, mobject)[来源]
在特定位置插入一个mobject到self.submobjects中
实际上只是调用了
self.submobjects.insert(index, mobject), 其中self.submobjects是一个列表。高度改编自
Mobject.add。- Parameters:
index (int) – 索引位置
mobject (Mobject) – 要插入的mobject。
- Return type:
无
- interpolate(mobject1, mobject2, alpha, path_func=<function interpolate>)[source]
将此
Mobject转换为mobject1和mobject2之间的插值。示例
示例:DotInterpolation 

from manim import *

class DotInterpolation(Scene):
    def construct(self):
        dotR = Dot(color=DARK_GREY)
        dotR.shift(2 * RIGHT)
        dotL = Dot(color=WHITE)
        dotL.shift(2 * LEFT)

        dotMiddle = VMobject().interpolate(dotL, dotR, alpha=0.3)

        self.add(dotL, dotR, dotMiddle)
class DotInterpolation(Scene): def construct(self): dotR = Dot(color=DARK_GREY) dotR.shift(2 * RIGHT) dotL = Dot(color=WHITE) dotL.shift(2 * LEFT) dotMiddle = VMobject().interpolate(dotL, dotR, alpha=0.3) self.add(dotL, dotR, dotMiddle)- Parameters:
mobject1 (Mobject)
mobject2 (Mobject)
alpha (浮点数)
path_func (PathFuncType)
- Return type:
自我
- invert(recursive=False)[source]
反转
submobjects的列表。- Parameters:
recursive (bool) – 如果
True,则此 mobject 家族的所有子对象列表都将被反转。- Return type:
无
示例
示例:InvertSumobjectsExample 
from manim import *

class InvertSumobjectsExample(Scene):
    def construct(self):
        s = VGroup(*[Dot().shift(i*0.1*RIGHT) for i in range(-20,20)])
        s2 = s.copy()
        s2.invert()
        s2.shift(DOWN)
        self.play(Write(s), Write(s2))
class InvertSumobjectsExample(Scene):
    def construct(self):
        s = VGroup(*[Dot().shift(i*0.1*RIGHT) for i in range(-20,20)])
        s2 = s.copy()
        s2.invert()
        s2.shift(DOWN)
        self.play(Write(s), Write(s2))
- match_coord(mobject, dim, direction=array([0., 0., 0.]))[source]
将Point3Ds与另一个
Mobject的Point3Ds进行匹配。
- match_depth(mobject, **kwargs)[source]
将深度与另一个
Mobject的深度匹配。- Parameters:
mobject (Mobject)
- Return type:
自我
- match_dim_size(mobject, dim, **kwargs)[source]
将指定的维度与另一个
Mobject的维度匹配。- Parameters:
mobject (Mobject)
dim (int)
- Return type:
自我
- match_height(mobject, **kwargs)[source]
将高度与另一个
Mobject的高度匹配。- Parameters:
mobject (Mobject)
- Return type:
自我
- match_points(mobject, copy_submobjects=True)[source]
编辑点、位置和子对象,使其与另一个
Mobject相同,同时保持样式不变。示例
示例:MatchPointsScene 
from manim import *

class MatchPointsScene(Scene):
    def construct(self):
        circ = Circle(fill_color=RED, fill_opacity=0.8)
        square = Square(fill_color=BLUE, fill_opacity=0.2)
        self.add(circ)
        self.wait(0.5)
        self.play(circ.animate.match_points(square))
        self.wait(0.5)
class MatchPointsScene(Scene): def construct(self): circ = Circle(fill_color=RED, fill_opacity=0.8) square = Square(fill_color=BLUE, fill_opacity=0.2) self.add(circ) self.wait(0.5) self.play(circ.animate.match_points(square)) self.wait(0.5)- Parameters:
mobject (Mobject)
copy_submobjects (bool)
- Return type:
自我
- match_width(mobject, **kwargs)[来源]
将宽度与另一个
Mobject的宽度匹配。- Parameters:
mobject (Mobject)
- Return type:
自我
- match_x(mobject, direction=array([0., 0., 0.]))[来源]
将x坐标与另一个
Mobject的x坐标匹配。- Parameters:
mobject (Mobject)
- Return type:
自我
- match_y(mobject, direction=array([0., 0., 0.]))[source]
将y坐标与另一个
Mobject的x坐标匹配。- Parameters:
mobject (Mobject)
- Return type:
自我
- match_z(mobject, direction=array([0., 0., 0.]))[source]
将z坐标与另一个
Mobject的x坐标匹配。- Parameters:
mobject (Mobject)
- Return type:
自我
- move_to(point_or_mobject, aligned_edge=array([0., 0., 0.]), coor_mask=array([1, 1, 1]))[source]
将
Mobject的中心移动到某个Point3D。
- next_to(mobject_or_point, direction=array([1., 0., 0.]), buff=0.25, aligned_edge=array([0., 0., 0.]), submobject_to_align=None, index_of_submobject_to_align=None, coor_mask=array([1, 1, 1]))[source]
将此
Mobject移动到另一个Mobject或Point3D旁边。示例
示例:几何形状 
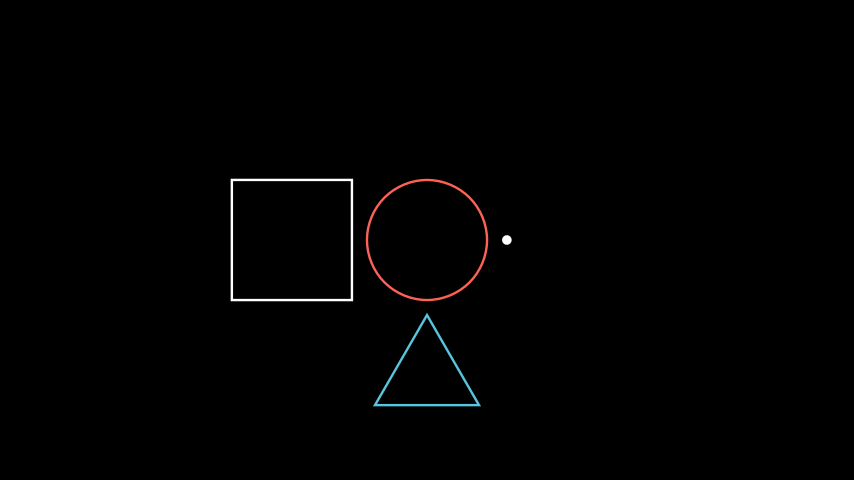
from manim import *

class GeometricShapes(Scene):
    def construct(self):
        d = Dot()
        c = Circle()
        s = Square()
        t = Triangle()
        d.next_to(c, RIGHT)
        s.next_to(c, LEFT)
        t.next_to(c, DOWN)
        self.add(d, c, s, t)
class GeometricShapes(Scene):
    def construct(self):
        d = Dot()
        c = Circle()
        s = Square()
        t = Triangle()
        d.next_to(c, RIGHT)
        s.next_to(c, LEFT)
        t.next_to(c, DOWN)
        self.add(d, c, s, t)
- reduce_across_dimension(reduce_func, dim)[来源]
从该维度和子对象中的所有点中找到最小值或最大值。
- Parameters:
reduce_func (可调用)
dim (int)
- remove(*mobjects)[来源]
移除
submobjects。如果存在,mobjects将从
submobjects中移除。mobject的子类可以实现
-和-=的dunder方法。另请参阅
- restore()[source]
恢复之前使用
save_state()保存的状态。- Return type:
自我
- resume_updating(recursive=True)[来源]
启用从更新器和动画进行更新。
- Parameters:
recursive (bool) – 是否递归地启用对所有子对象的更新。
- Returns:
self- Return type:
- rotate_about_origin(angle, axis=array([0., 0., 1.]), axes=[])[来源]
将
Mobject绕原点旋转,原点位于[0,0,0]。- Parameters:
角度 (浮点数)
axis (Vector3D)
- Return type:
自我
- scale(scale_factor, **kwargs)[source]
按比例缩放大小。
默认行为是围绕mobject的中心进行缩放。
- Parameters:
scale_factor (float) – 缩放因子 \(\alpha\)。如果 \(0 < |\alpha| < 1\),对象 会缩小,而对于 \(|\alpha| > 1\) 则会放大。此外, 如果 \(\alpha < 0\),对象也会被翻转。
kwargs – 传递给
apply_points_function_about_point()的额外关键字参数。
- Returns:
self- Return type:
示例
示例:MobjectScaleExample 
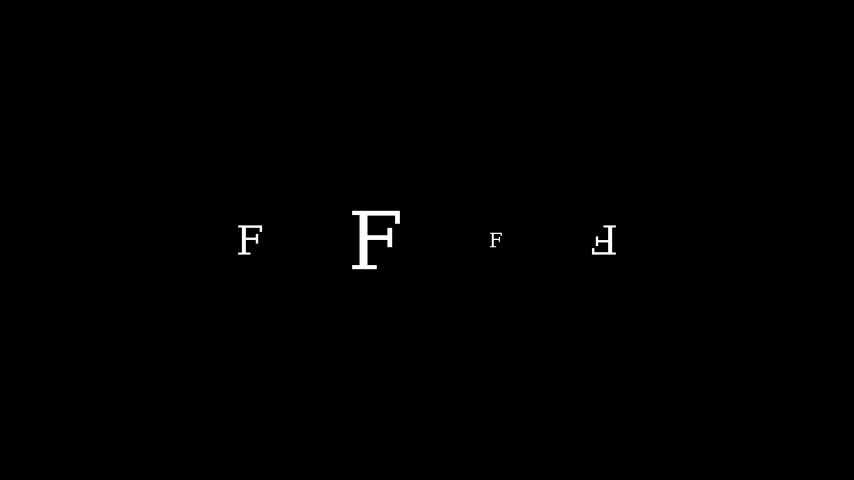
from manim import *

class MobjectScaleExample(Scene):
    def construct(self):
        f1 = Text("F")
        f2 = Text("F").scale(2)
        f3 = Text("F").scale(0.5)
        f4 = Text("F").scale(-1)

        vgroup = VGroup(f1, f2, f3, f4).arrange(6 * RIGHT)
        self.add(vgroup)
class MobjectScaleExample(Scene):
    def construct(self):
        f1 = Text("F")
        f2 = Text("F").scale(2)
        f3 = Text("F").scale(0.5)
        f4 = Text("F").scale(-1)

        vgroup = VGroup(f1, f2, f3, f4).arrange(6 * RIGHT)
        self.add(vgroup)
另请参阅
- scale_to_fit_depth(depth, **kwargs)[source]
缩放
Mobject以适应深度,同时保持宽度/高度比例。- Parameters:
深度 (浮点数)
- Return type:
自我
- scale_to_fit_height(height, **kwargs)[来源]
缩放
Mobject以适应高度,同时保持宽度/深度比例。- Returns:
self- Return type:
- Parameters:
高度 (浮点数)
示例
>>> from manim import *
>>> sq = Square()
>>> sq.width
2.0
>>> sq.scale_to_fit_height(5)
Square
>>> sq.height
5.0
>>> sq.width
5.0
- scale_to_fit_width(width, **kwargs)[source]
缩放
Mobject以适应宽度,同时保持高度/深度比例。- Returns:
self- Return type:
- Parameters:
width (float)
示例
>>> from manim import *
>>> sq = Square()
>>> sq.height
2.0
>>> sq.scale_to_fit_width(5)
Square
>>> sq.width
5.0
>>> sq.height
5.0
- set(**kwargs)[来源]
设置属性。
即
my_mobject.set(foo=1)应用my_mobject.foo = 1。这是一个便利功能,与
animate一起使用,用于动画设置属性。除了这个方法之外,还有一个兼容层允许
get_*和set_*方法来获取和设置通用属性。例如:>>> mob = Mobject() >>> mob.set_foo(0) Mobject >>> mob.get_foo() 0 >>> mob.foo 0
此兼容层不会干扰任何明确定义的
get_*或set_*方法。警告
此兼容层是为了向后兼容而存在,并不保证会一直保留。在适用的情况下,请优先使用常规方式获取/设置属性或使用
set()方法。- Parameters:
**kwargs – 要设置的属性及其对应的值。
- Returns:
self- Return type:
示例
>>> mob = Mobject()
>>> mob.set(foo=0)
Mobject
>>> mob.foo
0
- set_color(color=ManimColor('#FFFF00'), family=True)[source]
条件是一个接受一个参数的函数,(x, y, z)。 这里它只是递归到子对象,但在子类中,这应该根据颜色的内部工作原理进一步实现。
- Parameters:
颜色 (ParsableManimColor)
family (bool)
- Return type:
自我
- set_color_by_gradient(*colors)[source]
- Parameters:
颜色 (ParsableManimColor) – 用于渐变的颜色。使用方法如 set_color_by_gradient(RED, BLUE, GREEN)。
ManimColor.parse(color) (self.color =)
self (返回)
- Return type:
自我
- classmethod set_default(**kwargs)[source]
设置关键字参数的默认值。
如果调用此方法时没有任何额外的关键字参数,则会恢复此类的初始化方法的原始默认值。
- Parameters:
kwargs – 传递任何关键字参数将更新此类初始化函数的关键字参数的默认值。
- Return type:
无
示例
>>> from manim import Square, GREEN
>>> Square.set_default(color=GREEN, fill_opacity=0.25)
>>> s = Square(); s.color, s.fill_opacity
(ManimColor('#83C167'), 0.25)
>>> Square.set_default()
>>> s = Square(); s.color, s.fill_opacity
(ManimColor('#FFFFFF'), 0.0)
示例:ChangedDefaultTextcolor 
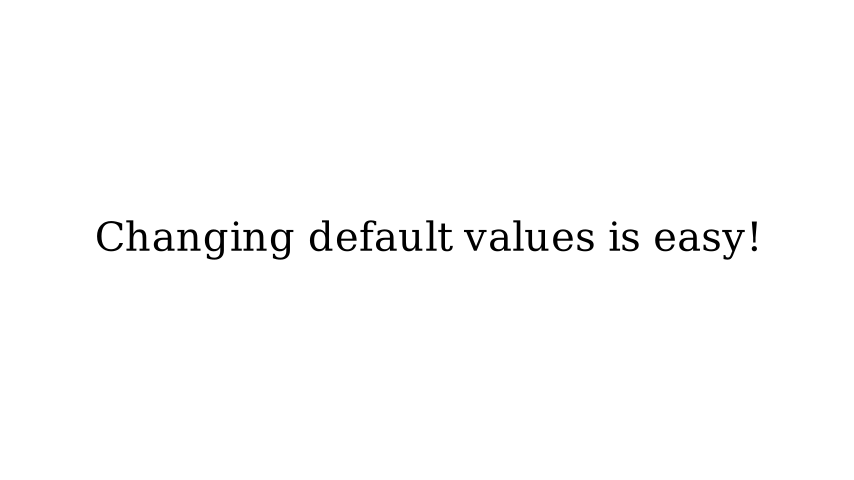
from manim import *

config.background_color = WHITE

class ChangedDefaultTextcolor(Scene):
    def construct(self):
        Text.set_default(color=BLACK)
        self.add(Text("Changing default values is easy!"))

        # we revert the colour back to the default to prevent a bug in the docs.
        Text.set_default(color=WHITE)
- set_x(x, direction=array([0., 0., 0.]))[source]
设置
Mobject中心的x值(int或float)- Parameters:
x (浮点数)
方向 (Vector3D)
- Return type:
自我
- set_y(y, direction=array([0., 0., 0.]))[来源]
设置
Mobject中心的y值(int或float)- Parameters:
y (浮点数)
方向 (Vector3D)
- Return type:
自我
- set_z(z, direction=array([0., 0., 0.]))[来源]
设置
Mobject中心的z值(int或float)- Parameters:
z (浮点数)
方向 (Vector3D)
- Return type:
自我
- set_z_index(z_index_value, family=True)[来源]
将
Mobject的z_index设置为z_index_value中指定的值。- Parameters:
z_index_value (float) –
z_index设置的新值。family (bool) – 如果为
True,则所有子对象的z_index值也会被设置。
- Returns:
Mobject本身,在设置
z_index之后。用于链式调用。(返回self。)- Return type:
示例
示例:SetZIndex 
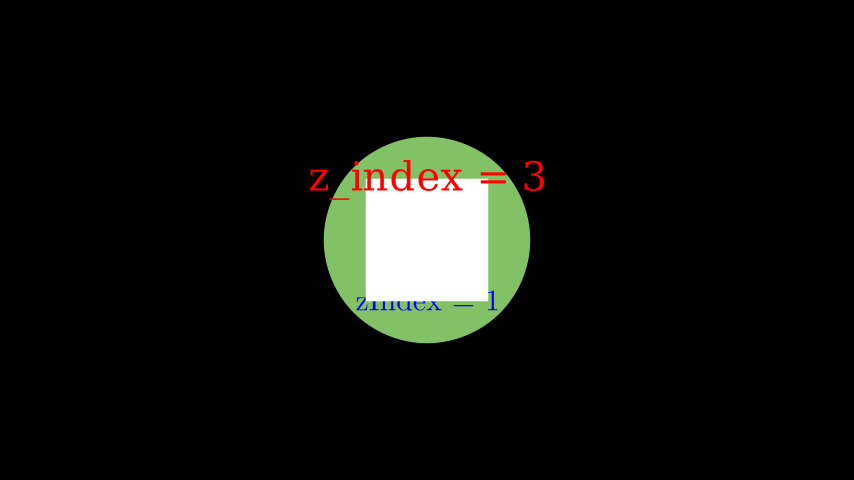
from manim import *

class SetZIndex(Scene):
    def construct(self):
        text = Text('z_index = 3', color = PURE_RED).shift(UP).set_z_index(3)
        square = Square(2, fill_opacity=1).set_z_index(2)
        tex = Tex(r'zIndex = 1', color = PURE_BLUE).shift(DOWN).set_z_index(1)
        circle = Circle(radius = 1.7, color = GREEN, fill_opacity = 1) # z_index = 0

        # Displaying order is now defined by z_index values
        self.add(text)
        self.add(square)
        self.add(tex)
        self.add(circle)
- set_z_index_by_z_Point3D()[source]
将
Mobject的z Point3D设置为z_index的值。- Returns:
Mobject 本身,在设置
z_index之后。(返回 self。)- Return type:
- shuffle(recursive=False)[source]
打乱
submobjects的列表。- Parameters:
递归 (布尔型)
- Return type:
无
- shuffle_submobjects(*args, **kwargs)[来源]
打乱
submobjects的顺序示例
示例:ShuffleSubmobjectsExample 
from manim import *

class ShuffleSubmobjectsExample(Scene):
    def construct(self):
        s= VGroup(*[Dot().shift(i*0.1*RIGHT) for i in range(-20,20)])
        s2= s.copy()
        s2.shuffle_submobjects()
        s2.shift(DOWN)
        self.play(Write(s), Write(s2))
class ShuffleSubmobjectsExample(Scene): def construct(self): s= VGroup(*[Dot().shift(i*0.1*RIGHT) for i in range(-20,20)]) s2= s.copy() s2.shuffle_submobjects() s2.shift(DOWN) self.play(Write(s), Write(s2))- Return type:
无
- sort(point_to_num_func=<function Mobject.<lambda>>, submob_func=None)[source]
通过由
submob_func定义的函数对submobjects列表进行排序。
- sort_submobjects(*args, **kwargs)[来源]
对
submobjects进行排序- Return type:
自我
- stretch_to_fit_depth(depth, **kwargs)[来源]
拉伸
Mobject以适应深度,不保持宽度/高度比例。- Parameters:
深度 (浮点数)
- Return type:
自我
- stretch_to_fit_height(height, **kwargs)[source]
拉伸
Mobject以适应高度,不保持宽度/深度的比例。- Returns:
self- Return type:
- Parameters:
高度 (浮点数)
示例
>>> from manim import *
>>> sq = Square()
>>> sq.width
2.0
>>> sq.stretch_to_fit_height(5)
Square
>>> sq.height
5.0
>>> sq.width
2.0
- stretch_to_fit_width(width, **kwargs)[source]
拉伸
Mobject以适应宽度,不保持高度/深度的比例。- Returns:
self- Return type:
- Parameters:
width (float)
示例
>>> from manim import *
>>> sq = Square()
>>> sq.height
2.0
>>> sq.stretch_to_fit_width(5)
Square
>>> sq.width
5.0
>>> sq.height
2.0
- suspend_updating(recursive=True)[source]
禁用来自更新器和动画的更新。
- Parameters:
recursive (bool) – 是否递归地暂停所有子对象的更新。
- Returns:
self- Return type:
- to_corner(corner=array([-1., -1., 0.]), buff=0.5)[source]
将此
Mobject移动到屏幕的给定角落。示例
示例:ToCornerExample 
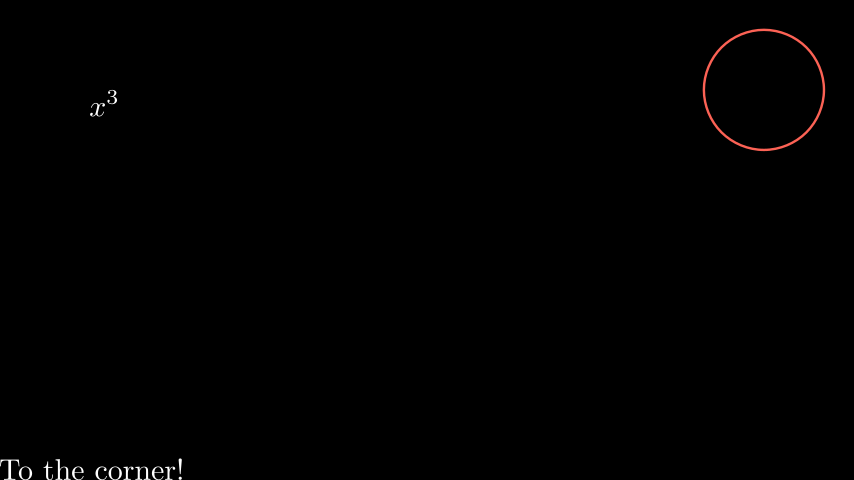
from manim import *

class ToCornerExample(Scene):
    def construct(self):
        c = Circle()
        c.to_corner(UR)
        t = Tex("To the corner!")
        t2 = MathTex("x^3").shift(DOWN)
        self.add(c,t,t2)
        t.to_corner(DL, buff=0)
        t2.to_corner(UL, buff=1.5)
class ToCornerExample(Scene):
    def construct(self):
        c = Circle()
        c.to_corner(UR)
        t = Tex("To the corner!")
        t2 = MathTex("x^3").shift(DOWN)
        self.add(c,t,t2)
        t.to_corner(DL, buff=0)
        t2.to_corner(UL, buff=1.5)
- to_edge(edge=array([-1., 0., 0.]), buff=0.5)[source]
将此
Mobject移动到屏幕的给定边缘,而不影响其在另一维度的位置。示例
示例:ToEdgeExample 
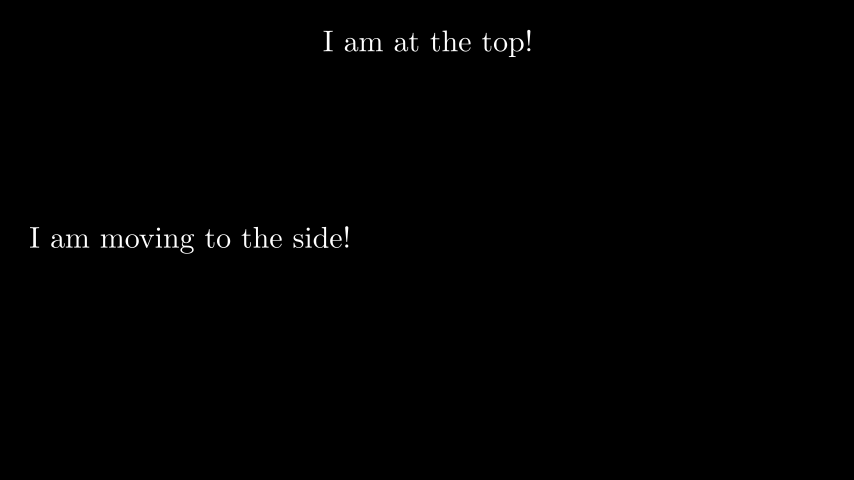
from manim import *

class ToEdgeExample(Scene):
    def construct(self):
        tex_top = Tex("I am at the top!")
        tex_top.to_edge(UP)
        tex_side = Tex("I am moving to the side!")
        c = Circle().shift(2*DOWN)
        self.add(tex_top, tex_side)
        tex_side.to_edge(LEFT)
        c.to_edge(RIGHT, buff=0)
- update(dt=0, recursive=True)[source]
应用所有更新器。
如果更新被暂停,则不执行任何操作。
- Parameters:
dt (float) – 传递给更新函数的参数
dt。通常这是自上次调用update以来的时间(以秒为单位)。recursive (bool) – 是否递归更新所有子对象。
- Returns:
self- Return type:
另请参阅
- property width: float
mobject的宽度。
- Return type:
float
示例
示例:WidthExample 
from manim import *

class WidthExample(Scene):
    def construct(self):
        decimal = DecimalNumber().to_edge(UP)
        rect = Rectangle(color=BLUE)
        rect_copy = rect.copy().set_stroke(GRAY, opacity=0.5)

        decimal.add_updater(lambda d: d.set_value(rect.width))

        self.add(rect_copy, rect, decimal)
        self.play(rect.animate.set(width=7))
        self.wait()
另请参阅