Manim的构建模块
本文档解释了manim的构建模块,并将为您提供开始制作自己视频所需的所有必要工具。
本质上,manim 提供了三种不同的概念,你可以将它们组合在一起以生成数学动画:数学对象(或简称为 mobject)、动画 和 场景。正如我们将在以下部分中看到的,这三种概念在 manim 中分别实现为一个单独的类:Mobject、Animation 和 场景 类。
注意
建议您在阅读本页之前先阅读教程快速入门和Manim的输出设置。
Mobjects
Mobjects are the basic building blocks for all manim animations. Each class
that derives from Mobject represents an object that can be displayed
on the screen. For example, simple shapes such as Circle,
Arrow, and Rectangle are all mobjects. More complicated
constructs such as Axes, FunctionGraph, or
BarChart are mobjects as well.
If you try to display an instance of Mobject on the screen, you will only
see an empty frame. The reason is that the Mobject class is an
abstract base class of all other mobjects, i.e. it does not have any
pre-determined visual shape that can be displayed on the screen. It is only the
skeleton of a thing that could be displayed. Therefore, you will rarely need
to use plain instances of Mobject; instead, you will most likely
create instances of its derived classes. One of these derived classes is
VMobject. The V stands for Vectorized Mobject. In essence, a
vmobject is a mobject that uses vector graphics to be displayed. Most of
the time, you will be dealing with vmobjects, though we will continue to use
the term “mobject” to refer to the class of shapes that can be displayed on the
screen, as it is more general.
注意
任何可以在屏幕上显示的对象都是mobject,即使它本质上不一定是数学的。
创建和显示mobjects
如快速入门中所述,通常manim脚本中的所有代码都放在场景类的construct()方法中。要在屏幕上显示一个mobject,调用包含它的场景的add()方法。这是在不进行动画时在屏幕上显示mobject的主要方式。要从屏幕上移除一个mobject,只需调用包含它的场景的remove()方法。
示例:创建Mobjects 
from manim import *

class CreatingMobjects(Scene):
    def construct(self):
        circle = Circle()
        self.add(circle)
        self.wait(1)
        self.remove(circle)
        self.wait(1)
class CreatingMobjects(Scene):
    def construct(self):
        circle = Circle()
        self.add(circle)
        self.wait(1)
        self.remove(circle)
        self.wait(1)
放置mobjects
让我们定义一个新的场景,称为Shapes,并add()一些mobjects到其中。这个脚本生成一个静态图片,显示一个圆形、一个正方形和一个三角形:
示例:形状 
from manim import *

class Shapes(Scene):
    def construct(self):
        circle = Circle()
        square = Square()
        triangle = Triangle()

        circle.shift(LEFT)
        square.shift(UP)
        triangle.shift(RIGHT)

        self.add(circle, square, triangle)
        self.wait(1)
class Shapes(Scene):
    def construct(self):
        circle = Circle()
        square = Square()
        triangle = Triangle()

        circle.shift(LEFT)
        square.shift(UP)
        triangle.shift(RIGHT)

        self.add(circle, square, triangle)
        self.wait(1)
默认情况下,mobjects在首次创建时会放置在坐标中心或原点。它们也会被赋予一些默认颜色。此外,Shapes场景通过使用shift()方法来放置mobjects。正方形从原点向UP方向移动一个单位,而圆形和三角形分别向LEFT和RIGHT方向移动一个单位。
注意
与其他图形软件不同,manim将坐标中心放置在屏幕的中心。垂直正方向向上,水平正方向向右。另请参见在constants模块中定义的常量ORIGIN、UP、DOWN、LEFT、RIGHT等。
在屏幕上放置mobjects还有许多其他可能的方式,例如
move_to(), next_to(), 和 align_to()。下一个场景
MobjectPlacement 使用了所有这三种方式。
示例:MobjectPlacement 
from manim import *

class MobjectPlacement(Scene):
    def construct(self):
        circle = Circle()
        square = Square()
        triangle = Triangle()

        # place the circle two units left from the origin
        circle.move_to(LEFT * 2)
        # place the square to the left of the circle
        square.next_to(circle, LEFT)
        # align the left border of the triangle to the left border of the circle
        triangle.align_to(circle, LEFT)

        self.add(circle, square, triangle)
        self.wait(1)
move_to() 方法使用绝对单位(相对于ORIGIN测量),而next_to() 使用相对单位(从作为第一个参数传递的mobject测量)。align_to() 使用LEFT 不是作为测量单位,而是作为确定用于对齐的边界的方式。mobject的边界坐标是通过围绕它的假想边界框确定的。
提示
manim中的许多方法可以链接在一起。例如这两行
square = Square()
square.shift(LEFT)
可以被替换为
square = Square().shift(LEFT)
从技术上讲,这是可能的,因为大多数方法调用都会返回修改后的mobject。
样式化mobjects
以下场景改变了mobjects的默认美学。
示例:MobjectStyling 
from manim import *

class MobjectStyling(Scene):
    def construct(self):
        circle = Circle().shift(LEFT)
        square = Square().shift(UP)
        triangle = Triangle().shift(RIGHT)

        circle.set_stroke(color=GREEN, width=20)
        square.set_fill(YELLOW, opacity=1.0)
        triangle.set_fill(PINK, opacity=0.5)

        self.add(circle, square, triangle)
        self.wait(1)
这个场景使用了两个主要函数来改变mobject的视觉样式:set_stroke() 和 set_fill()。前者改变mobject边框的视觉样式,而后者改变内部的样式。默认情况下,大多数mobject的内部是完全透明的,因此您必须指定opacity参数来显示颜色。1.0的透明度表示完全不透明,而0.0表示完全透明。
Only instances of VMobject implement set_stroke() and
set_fill(). Instances of Mobject implement
set_color() instead. The vast majority of pre-defined classes
are derived from VMobject so it is usually safe to assume that you
have access to set_stroke() and set_fill().
Mobject 屏幕顺序
下一个场景与上一节中的MobjectStyling场景完全相同,只有一行不同。
示例:MobjectZOrder 
from manim import *

class MobjectZOrder(Scene):
    def construct(self):
        circle = Circle().shift(LEFT)
        square = Square().shift(UP)
        triangle = Triangle().shift(RIGHT)

        circle.set_stroke(color=GREEN, width=20)
        square.set_fill(YELLOW, opacity=1.0)
        triangle.set_fill(PINK, opacity=0.5)

        self.add(triangle, square, circle)
        self.wait(1)
这里唯一的区别(除了场景名称)是mobjects被添加到场景中的顺序。在MobjectStyling中,我们以add(circle, square, triangle)的方式添加它们,而在MobjectZOrder中,我们以add(triangle, square, circle)的方式添加它们。
如你所见,add() 参数的顺序决定了屏幕上物体的显示顺序,最左边的参数会被放在后面。
动画
manim的核心是动画。通常,你可以通过调用play()方法向你的场景添加动画。
示例:SomeAnimations 
from manim import *

class SomeAnimations(Scene):
    def construct(self):
        square = Square()

        # some animations display mobjects, ...
        self.play(FadeIn(square))

        # ... some move or rotate mobjects around...
        self.play(Rotate(square, PI/4))

        # some animations remove mobjects from the screen
        self.play(FadeOut(square))

        self.wait(1)
简单来说,动画是在两个mobjects之间进行插值的过程。
例如,FadeIn(square)从一个完全透明的square开始,
并以一个完全不透明的版本结束,通过逐渐增加不透明度在两者之间进行插值。
FadeOut则以相反的方式工作:它从完全不透明插值到完全透明。
再举一个例子,旋转从传递给它的mobject开始,
并以旋转了一定角度的相同对象结束,这次是插值mobject的角度而不是其不透明度。
动画方法
任何可以更改的mobject属性都可以被动画化。事实上,任何更改mobject属性的方法都可以通过使用animate()来作为动画。
示例:AnimateExample 
from manim import *

class AnimateExample(Scene):
    def construct(self):
        square = Square().set_fill(RED, opacity=1.0)
        self.add(square)

        # animate the change of color
        self.play(square.animate.set_fill(WHITE))
        self.wait(1)

        # animate the change of position and the rotation at the same time
        self.play(square.animate.shift(UP).rotate(PI / 3))
        self.wait(1)
参考文献: Animation
animate() 是所有mobjects的一个属性,用于动画化之后的方法。例如,square.set_fill(WHITE) 设置正方形的填充颜色,而 square.animate.set_fill(WHITE) 则动画化这一操作。
动画运行时间
默认情况下,传递给play()的任何动画都正好持续一秒。
使用run_time参数来控制持续时间。
示例:运行时间 
from manim import *

class RunTime(Scene):
    def construct(self):
        square = Square()
        self.add(square)
        self.play(square.animate.shift(UP), run_time=3)
        self.wait(1)
class RunTime(Scene):
    def construct(self):
        square = Square()
        self.add(square)
        self.play(square.animate.shift(UP), run_time=3)
        self.wait(1)
创建自定义动画
Even though Manim has many built-in animations, you will find times when you need to smoothly animate from one state of a Mobject to another.
If you find yourself in that situation, then you can define your own custom animation.
You start by extending the Animation class and overriding its interpolate_mobject().
The interpolate_mobject() method receives alpha as a parameter that starts at 0 and changes throughout the animation.
So, you just have to manipulate self.mobject inside Animation according to the alpha value in its interpolate_mobject method.
Then you get all the benefits of Animation such as playing it for different run times or using different rate functions.
假设你从一个数字开始,并希望创建一个Transform动画,将其转换为目标数字。
你可以使用FadeTransform来实现这一点,它会淡出起始数字并淡入目标数字。
但当我们考虑将一个数字从一个值转换到另一个值时,一种直观的方法是平滑地增加或减少它。
Manim 提供了一个功能,允许你通过定义自己的自定义动画来定制这种行为。
你可以从创建你自己的Count类开始,该类继承自Animation。
这个类可以有一个带有三个参数的构造函数,一个DecimalNumber Mobject,开始和结束。
构造函数将把DecimalNumber Mobject传递给父类构造函数(在这种情况下,是Animation构造函数),并设置开始和结束。
你唯一需要做的就是定义你希望它在动画的每一步看起来是什么样子。
Manim 在 interpolate_mobject() 方法中根据视频的帧率、速率函数和动画播放的运行时间为你提供了 alpha 值。
alpha 参数的值在 0 到 1 之间,表示当前播放动画的步骤。
例如,0 表示动画的开始,0.5 表示动画进行到一半,1 表示动画的结束。
在Count动画的情况下,你只需要找到一种方法来确定在给定的alpha值下显示的数字,然后在Count动画的interpolate_mobject()方法中设置该值。
假设你从50开始递增,直到动画结束时DecimalNumber达到100。
如果alpha为0,您希望该值为50。
如果 alpha 是 0.5,你希望值是 75。
如果alpha为1,您希望该值为100。
通常,你从起始数字开始,根据alpha值只增加部分值。因此,计算每一步显示的数字的逻辑将是50 + alpha * (100 - 50)。一旦你为DecimalNumber设置了计算值,你就完成了。
一旦你定义了你的Count动画,你就可以在你的场景中以任何你想要的持续时间播放它,适用于任何DecimalNumber和任何速率函数。
示例:CountingScene 
from manim import *

class Count(Animation):
    def __init__(self, number: DecimalNumber, start: float, end: float, **kwargs) -> None:
        # Pass number as the mobject of the animation
        super().__init__(number,  **kwargs)
        # Set start and end
        self.start = start
        self.end = end

    def interpolate_mobject(self, alpha: float) -> None:
        # Set value of DecimalNumber according to alpha
        value = self.start + (alpha * (self.end - self.start))
        self.mobject.set_value(value)


class CountingScene(Scene):
    def construct(self):
        # Create Decimal Number and add it to scene
        number = DecimalNumber().set_color(WHITE).scale(5)
        # Add an updater to keep the DecimalNumber centered as its value changes
        number.add_updater(lambda number: number.move_to(ORIGIN))

        self.add(number)

        self.wait()

        # Play the Count Animation to count from 0 to 100 in 4 seconds
        self.play(Count(number, 0, 100), run_time=4, rate_func=linear)

        self.wait()
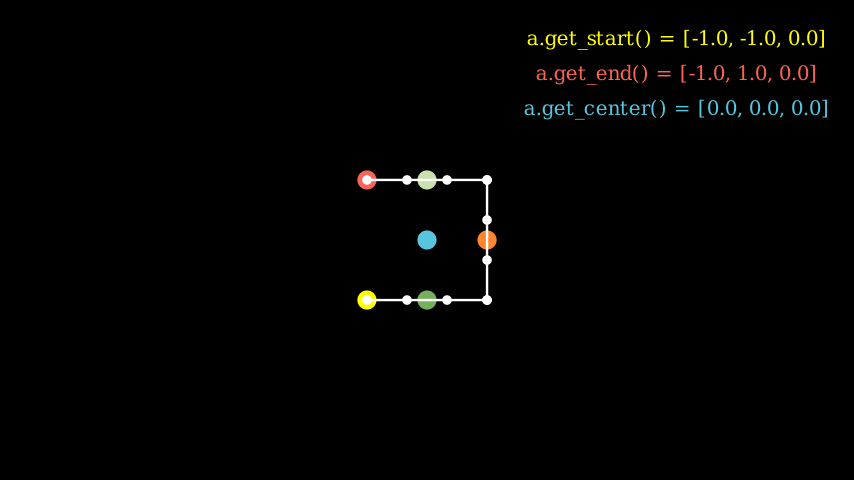
使用mobject的坐标
Mobjects 包含定义其边界的点。
这些点可以用来将其他 mobjects 相互添加,
例如通过 get_center()、get_top()
和 get_start() 等方法。以下是一些重要坐标的示例:
示例:MobjectExample 
from manim import *

class MobjectExample(Scene):
    def construct(self):
        p1 = [-1,-1, 0]
        p2 = [ 1,-1, 0]
        p3 = [ 1, 1, 0]
        p4 = [-1, 1, 0]
        a  = Line(p1,p2).append_points(Line(p2,p3).points).append_points(Line(p3,p4).points)
        point_start  = a.get_start()
        point_end    = a.get_end()
        point_center = a.get_center()
        self.add(Text(f"a.get_start() = {np.round(point_start,2).tolist()}", font_size=24).to_edge(UR).set_color(YELLOW))
        self.add(Text(f"a.get_end() = {np.round(point_end,2).tolist()}", font_size=24).next_to(self.mobjects[-1],DOWN).set_color(RED))
        self.add(Text(f"a.get_center() = {np.round(point_center,2).tolist()}", font_size=24).next_to(self.mobjects[-1],DOWN).set_color(BLUE))

        self.add(Dot(a.get_start()).set_color(YELLOW).scale(2))
        self.add(Dot(a.get_end()).set_color(RED).scale(2))
        self.add(Dot(a.get_top()).set_color(GREEN_A).scale(2))
        self.add(Dot(a.get_bottom()).set_color(GREEN_D).scale(2))
        self.add(Dot(a.get_center()).set_color(BLUE).scale(2))
        self.add(Dot(a.point_from_proportion(0.5)).set_color(ORANGE).scale(2))
        self.add(*[Dot(x) for x in a.points])
        self.add(a)
将mobjects转换为其他mobjects
也可以像这样将一个mobject转换为另一个mobject:
示例:ExampleTransform 
from manim import *

class ExampleTransform(Scene):
    def construct(self):
        self.camera.background_color = WHITE
        m1 = Square().set_color(RED)
        m2 = Rectangle().set_color(RED).rotate(0.2)
        self.play(Transform(m1,m2))
class ExampleTransform(Scene):
    def construct(self):
        self.camera.background_color = WHITE
        m1 = Square().set_color(RED)
        m2 = Rectangle().set_color(RED).rotate(0.2)
        self.play(Transform(m1,m2))
Transform 函数将前一个 mobject 的点映射到下一个 mobject 的点。 这可能会导致奇怪的行为,例如当一个 mobject 的点按顺时针排列而另一个 mobject 的点按逆时针排列时。 在这种情况下,使用 flip 函数并通过 numpy 的 roll 函数重新定位点可能会有所帮助:
示例:ExampleRotation 
from manim import *

class ExampleRotation(Scene):
    def construct(self):
        self.camera.background_color = WHITE
        m1a = Square().set_color(RED).shift(LEFT)
        m1b = Circle().set_color(RED).shift(LEFT)
        m2a = Square().set_color(BLUE).shift(RIGHT)
        m2b = Circle().set_color(BLUE).shift(RIGHT)

        points = m2a.points
        points = np.roll(points, int(len(points)/4), axis=0)
        m2a.points = points

        self.play(Transform(m1a,m1b),Transform(m2a,m2b), run_time=1)
场景
The 场景 class is the connective tissue of manim. Every mobject has
to be added to a scene to be displayed, or removed from it to cease being displayed. Every animation has to be
played by a scene, and every time interval where no
animation occurs is determined by a call to wait(). All of the
code of your video must be contained in the construct() method of
a class that derives from 场景. Finally, a single file may contain
multiple 场景 subclasses if multiple scenes are to be
rendered at the same time.